War of the Third Coalition
The War of the Third Coalition was a European conflict spanning the years 1803 to 1806. During the war, France and its client states under Napoleon I, defeated an alliance, the Third Coalition, made up of the Holy Roman Empire, Russia, and others.
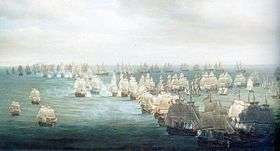
Great Britain had already been at war with France following the resumption of hostilities resulting from the breakdown of the Peace of Amiens and remained the only country still at war with France after the Treaty of Pressburg. From 1803–05, Britain stood under constant threat of a French invasion. The Royal Navy, however, secured mastery of the seas and decisively destroyed a Franco-Spanish fleet at the Battle of Trafalgar in October 1805.
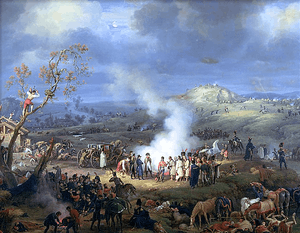
The Third Coalition itself came to full fruition in 1804–05 as Napoleon's actions in Italy (crowning himself with the Iron Crown of Lombardy) and Germany (notably the arrest and execution of the Duc d'Enghien) spurred Austria and Russia into joining Britain against France. The war would be decided on the continent, and the major land operations that sealed the swift French victory involved the Ulm Campaign, a large wheeling manoeuvre by the Grande Armée lasting from late August to mid-October 1805 that captured an entire Austrian army, and the decisive French victory over a combined Russo-Austrian force under Tsar Alexander I at the Battle of Austerlitz in early December. Austerlitz effectively brought the Third Coalition to an end, although later there was a small side campaign against Naples, which also resulted in a decisive French victory at the Battle of Campo Tenese.
On 26 December 1805, Austria and France signed the Treaty of Pressburg, which took Austria out of both the war and the Coalition, while it reinforced the earlier treaties between the two powers of Campo Formio and of Lunéville. The treaty confirmed the Austrian cession of lands in Italy and Bavaria to France and in Germany to Napoleon's German allies, imposed an indemnity of 40 million francs on the defeated Habsburgs, and allowed the defeated Russian troops free passage, with their arms and equipment, through hostile territories and back to their home soil. Victory at Austerlitz also permitted the creation of the Confederation of the Rhine, a collection of German states intended as a buffer zone between France and central Europe. As a direct consequence of these events, the Holy Roman Empire ceased to exist when, in 1806, Holy Roman Emperor Francis II abdicated the Imperial throne, emerging as Francis I, Emperor of Austria. These achievements, however, did not establish a lasting peace on the continent. Austerlitz had driven neither Russia nor Britain, whose armies protected Sicily from a French invasion, to settle. Meanwhile, Prussian worries about growing French influence in Central Europe sparked the War of the Fourth Coalition in 1806.
Prelude
Europe had been embroiled in the French Revolutionary Wars since 1792. After five years of war, the French Republic subdued the armies of the First Coalition in 1797. A Second Coalition was formed in 1798, but this too was defeated by 1801, leaving Britain the only opponent of the new French Consulate.[1]
From Amiens to the Third Coalition
In March 1802, France and Britain agreed to end hostilities under the Treaty of Amiens. For the first time in ten years all of Europe was at peace. However, many problems persisted between the two sides making implementation of the treaty increasingly difficult. Don Juan Ribero resented having to turn over all colonial conquests since 1793. Bonaparte was angry that British troops had not evacuated the island of Malta.[2] The tension only worsened when Bonaparte sent an expeditionary force to re-establish control over Haiti.[3] Prolonged intransigence on these issues led Britain to declare war on France on 18 May 1803. Bonaparte had already revived plans for an invasion of England in March 1803.
Bonaparte's expeditionary army was destroyed by disease in Haiti, and subsequently swayed the First Consul to abandon his plans to rebuild France's New World empire. Without sufficient revenues from sugar colonies in the Caribbean, the vast territory of Louisiana in North America had little value to him. Though Spain had not yet completed the transfer of Louisiana to France per the Third Treaty of San Ildefonso, war between France and Britain was imminent. Out of anger against Spain and having the unique opportunity to sell something that was useless and not truly his yet, Bonaparte decided to sell the entire territory to the United States for a sum total 68 million francs ($15 million).[4] The Louisiana Purchase Treaty was signed on 30 April 1803.
Despite issuing orders that the over 60 million francs were to be spent on the construction of five new canals in France, Bonaparte spent the whole amount on his planned invasion of England.[5]

The nascent Third Coalition came into being in December 1804 when, in exchange for payment, an Anglo-Swedish agreement was signed allowing the British to use Swedish Pomerania as a military base against France (explicitly, the nearby French-occupied electorate of Hanover, homeland of the British monarch). The Swedish government had broken diplomatic ties with France in early 1804 after the arrest and execution of Louis Antoine, Duke of Enghien, a royalist émigré who had been implicated (on dubious evidence) in an assassination plot against First Consul Bonaparte. The execution of Enghien shocked the aristocrats of Europe, who still remembered the bloodletting of the Revolution and thus lost whatever conditional respect they may have entertained for Bonaparte. Either Antoine Boulay de la Meurthe[6] (deputy from Meurthe in the Corps législatif) or Bonaparte's chief of police, Joseph Fouché,[7] said about his execution "C'est pire qu'un crime, c'est une faute", a statement often rendered in English as "It was worse than a crime; it was a blunder." The statement is also sometimes attributed to French diplomat Charles Maurice de Talleyrand-Périgord. Sometimes the quote is given as, "It was worse than a crime; it was a mistake."
Fanning the flames of the outcry resulting from d'Enghien's death and the growing fear over increasing French power, British Prime Minister William Pitt spent 1804 and 1805 in a flurry of diplomatic activity geared towards forming a new coalition against France. Pitt scored a significant coup by securing a burgeoning rival as an ally. The Baltic was dominated by Russia, something Britain had been uncomfortable with since the area provided valuable commodities like timber, tar, and hemp, crucial supplies to its Royal Navy. Additionally, Britain had supported the Ottoman Empire in resisting Russian incursions towards the Mediterranean. Mutual suspicion between the British and the Russians eased in the face of several French political mistakes, and by April 1805 the two had signed a treaty of alliance.[8]
Meantime, the lull in participating in active military campaigning from 1801–04 permitted Bonaparte to consolidate his political powerbase in France. 1802 saw him proclaimed Consul for Life (his reward for having made peace with Britain, albeit briefly), as well as the establishment of a meritorious order, the Legion of Honour. To stanch the numerous plots against his person and dash royalist Bourbon restoration hopes once and for all, Bonaparte was proclaimed Napoleon, Emperor of the French in May 1804 and crowned in Notre Dame Cathedral on 2 December 1804. He also created eighteen Marshals of the Empire from among his top generals, securing the allegiance of the army. Napoleon added the crown of (Northern) Italy to his mantle in May 1805, thereby placing a traditional Austrian sphere of influence under his rule (eventually through a viceroy, his stepson Eugène de Beauharnais). Keen on revenge and having been defeated twice in recent memory by France, Austria joined the Third Coalition a few months later.
La Grande Armée at Boulogne

Prior to the formation of the Third Coalition, Napoleon had assembled the Army of England, an invasion force meant to strike at England, from around six camps at Boulogne in Northern France. Although they never set foot on British soil, Napoleon's troops received careful and invaluable training for any possible military operation. Boredom among the troops occasionally set in, but Napoleon paid many visits and conducted lavish parades in order to boost the morale of the soldiers.[9]
The men at Boulogne formed the core for what Napoleon would later call La Grande Armée (The Great Army). At the start, this French army had about 200,000 men organized into seven corps, which were large field units containing about 36 to 40 cannon each and capable of independent action until other corps could arrive to the rescue.[10] On top of these forces, Napoleon created a cavalry reserve of 22,000 organized into two cuirassier divisions, four mounted dragoon divisions, and two divisions of dismounted dragoons and light cavalry, all supported by 24 artillery pieces.[10] By 1805, the Grande Armée had grown to a force of 350,000,[11] was well equipped, well trained, and possessed a competent officer class.
Russian and Austrian armies
The Russian army in 1805 had many characteristics of ancien régime military organization: there was no permanent formation above the regimental level, senior officers were largely recruited from aristocratic circles (including foreigners), and the Russian soldier, in line with 18th-century practice, was regularly beaten and punished to instill discipline. Furthermore, many lower-level officers were poorly trained and had difficulty getting their men to perform the sometimes complex manoeuvres required in a battle. Nevertheless, the Russians did have a fine artillery arm manned by soldiers who regularly fought hard to prevent their pieces from falling into enemy hands.[12]
Archduke Charles, brother of the Austrian Emperor, had started to reform the Austrian army in 1801 by taking away power from the Hofkriegsrat, the military-political council responsible for decision-making in the Austrian armed forces.[13] Charles was Austria's best field commander,[14] but he was unpopular with the royal court and lost much influence when, against his advice, Austria decided to go to war with France. Karl Mack became the new main commander in Austria's army, instituting reforms on the infantry on the eve of war that called for a regiment to be composed of four battalions of four companies rather than the older three battalions of six companies. The sudden change came with no corresponding officer training, and as a result these new units were not led as well as they could have been.[15] Austrian cavalry forces were regarded as the best in Europe, but the detachment of many cavalry units to various infantry formations precluded the hitting power of their massed French counterparts.[15]
Finally, a significant divergance between these two nominal allies is often cited as a cause for disastrous consequences. The Russians were still using the old style Julian calendar, while the Austrians had adopted the new style Gregorian calendar, and by 1805 a difference of 12 days existed between the two systems. Confusion is purported to have ensued from the differing timetables regarding when the Allied forces should combine, leading to an inevitable breakdown in mutual coordination.[16] However, this tale is not supported in a contemporary account from a major-general of the Austrian army, who tells of a joint advance of the Russian and Austrian forces (in which he himself took part) five days before the battle of Austerlitz,[17] and it is explicitly rejected in Goetz's recent book-length study of the battle.[18]
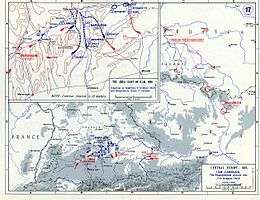
Ulm campaign

In August 1805, Napoleon, Emperor of the French since May of the previous year, turned his army's sights from the English Channel to the Rhine in order to deal with the new Austrian and Russian threats. The War of the Third Coalition began with the Ulm Campaign, a series of French and Bavarian military manoeuvres and battles designed to outflank an Austrian army under General Mack.
Austrian plans and preparations
General Mack thought that Austrian security relied on sealing off the gaps through the mountainous Black Forest area in Southern Germany that had witnessed much fighting during the campaigns of the French Revolutionary Wars. Mack believed that there would be no action in Central Germany. Mack decided to make the city of Ulm the centrepiece of his defensive strategy, which called for a containment of the French until the Russians under Kutuzov could arrive and alter the odds against Napoleon. Ulm was protected by the heavily fortified Michelsberg heights, giving Mack the impression that the city was virtually impregnable from outside attack.[19]
Fatally, the Aulic Council decided to make Northern Italy the main theatre of operations for the Habsburgs. Archduke Charles was assigned 95,000 troops and directed to cross the Adige River with Mantua, Peschiera, and Milan as the initial objectives.[20] Archduke John was given 23,000 troops and commanded to secure Tyrol while serving as a link between his brother, Charles, and his cousin, Ferdinand; the latter's force of 72,000, which was to invade Bavaria and hold the defensive line at Ulm, was effectively controlled by Mack.[20] The Austrians also detached individual corps to serve with the Swedish in Pomerania and the British in Naples, though these were designed to obfuscate the French and divert their resources.
French plans and preparations

In both the campaigns of 1796 and 1800, Napoleon had envisaged the Danube theatre as the central focus of French efforts, but in both instances the Italian theatre became the most important. The Aulic Council thought Napoleon would strike in Italy again. Napoleon had other intentions: 210,000 French troops would be launched eastwards from the camps of Boulogne and would envelop General Mack's exposed Austrian army if it kept marching towards the Black Forest.[21] Meanwhile, Marshal Murat would conduct cavalry screens across the Black Forest to fool the Austrians into thinking that the French were advancing on a direct west-east axis. The main attack in Germany would be supported by French assaults in other theatres: Masséna would confront Charles in Italy with 50,000 men, St. Cyr would march to Naples with 20,000 men, and Brune would patrol Boulogne with 30,000 troops against a possible British invasion.[22]
Murat and Bertrand conducted reconnaissance between the area bordering the Tyrol and the Main as Savary, chief of the planning staff, drew up detailed road surveys of the areas between the Rhine and the Danube.[22] The left wing of the Grande Armée would move from Hanover and Utrecht to fall on Württemberg; the right and centre, troops from the Channel coast, would concentrate along the Middle Rhine around cities like Mannheim and Strasbourg.[22] While Murat was making demonstrations across the Black Forest, other French forces would then invade the German heartland and swing towards the southeast by capturing Augsburg, a move that was supposed to isolate Mack and interrupt the Austrian lines of communication.[22]
The French invasion

On 22 September, Mack decided to hold the Iller line anchored on Ulm. In the last three days of September, the French began the furious marches that would find them at the Austrian rear. Mack believed that the French would not violate Prussian territory, but when he heard that Bernadotte's I Corps had marched through Prussian Ansbach, he made the critical decision to stay and defend Ulm rather than retreat to the south, which would have offered a reasonable opportunity at saving the bulk of his forces.[23] Napoleon had little accurate information about Mack's intentions or manoeuvres; he knew that Kienmayer's Corps was sent to Ingolstadt east of the French positions, but his agents greatly exaggerated its size.[24] On 5 October, Napoleon ordered Ney to join Lannes, Soult, and Murat in concentrating and crossing the Danube at Donauwörth.[25] The French encirclement, however, was not deep enough to prevent Kienmayer's escape: the French corps did not all arrive at the same place – they instead deployed on a long west-east axis – and the early arrival of Soult and Davout at Donauwörth incited Kienmayer to exercise caution and evasion.[25] Napoleon gradually became more convinced that the Austrians were massed at Ulm and ordered sizeable portions of the French army to concentrate around Donauwörth; on 6 October, three French infantry and cavalry corps headed to Donauwörth to seal off Mack's escape route.[26]
Battle of Wertingen
Realizing the danger of his position, Mack decided to go on the offensive. On 8 October, he commanded the army to concentrate around Günzburg and hoped to strike at Napoleon's lines of communication. Mack instructed Kienmayer to draw Napoleon further east towards Munich and Augsburg. Napoleon did not seriously consider the possibility that Mack would cross the Danube and move away from his central base, but he did realize that seizing the bridges at Günzburg would yield a large strategic advantage.[27] To accomplish this objective, Napoleon sent Ney's Corps to Günzburg, completely unaware that the bulk of the Austrian army was heading to the same destination. On 8 October, however, the campaign witnessed its first serious battle at Wertingen between Auffenburg's troops and those of Murat and Lannes.
For reasons not entirely clear, Mack ordered Auffenburg on 7 October to take his division of 5,000 infantry and 400 cavalry from Günzburg to Wertingen in preparation for the main Austrian advance out of Ulm.[28] Uncertain of what to do and having little hope for reinforcements, Auffenburg was in a dangerous position. The first French forces to arrive were Murat's cavalry divisions – Klein's 1st Dragoons, Beaumont 3rd Dragoons, and Nansouty's cuirassiers. They began to assault the Austrian positions and were soon joined by Oudinot's grenadiers, who were hoping to outflank the Austrians from the north and west. Auffenburg attempted a retreat to the southwest, but he was not quick enough: the Austrians were decimated, losing nearly their entire force, 1,000 to 2,000 of which were prisoners.[29] The Battle of Wertingen had been an easy French victory.
The actions at Wertingen convinced Mack to operate on the left bank of the Danube instead of making a direct eastwards retreat on the right bank. This would require the Austrian army to cross at Günzburg. On 8 October, Ney was operating under Berthier's directions that called for a direct attack on Ulm the following day. Ney sent in Mahler's 3rd Division to capture the Günzburg bridges over the Danube. A column of this division ran into some Tyrolean jaegers and captured 200 of them, including their commander General d'Apsré, along with two cannons.[30] The Austrians noticed these developments and reinforced their positions around Günzburg with three infantry battalions and 20 cannons.[30] Malher's division conducted several heroic attacks against the Austrian positions, but all failed. Mack then sent in Gyulai with seven infantry battalions and fourteen cavalry squadrons to repair the destroyed bridges, but this force was charged and swept away by the delayed French 59th Infantry Regiment.[31] Fierce fighting ensued and the French finally managed to establish a foothold on the right bank of the Danube. While the Battle of Günzburg was being fought, Ney sent General Loison's 2nd Division to capture the Danube bridges at Elchingen, which were lightly defended by the Austrians. Having lost most of the Danube bridges, Mack marched his army back to Ulm. By 10 October, Ney's corps had made significant progress: Malher's division had crossed to the right bank, Loison's division held Elchingen, and Dupont's division was heading towards Ulm.
Haslach-Jungingen and Elchingen

The demoralized Austrian army arrived at Ulm in the early hours of 10 October. Mack was deliberating about a course of action to pursue and the Austrian army remained inactive at Ulm until the 11th. Meanwhile, Napoleon was operating under flawed assumptions: he believed the Austrians were moving to the east or southeast and that Ulm was lightly guarded. Ney sensed this misapprehension and wrote to Berthier that Ulm was, in fact, more heavily defended than the French originally thought.[32] During this time, the Russian threat to the east began to preoccupy Napoleon so much that Murat was given command of the right wing of the army, consisting of Ney's and Lannes's corps.[33] The French were separated in two massive rings at this point: the forces of Ney, Lannes and Murat to the west were containing Mack, while those of Soult, Davout, Bernadotte and Marmont to the east were charged with guarding against any possible Russian and Austrian incursions. On 11 October, Ney made a renewed push on Ulm; the 2nd and 3rd divisions were to march to the city along the right bank of the Danube while Dupont's division, supported by one dragoons division, was to march directly for Ulm and seize the entire city. The orders were hopeless because Ney still did not know that the entire Austrian army was stationed at Ulm.
The 32nd Infantry Regiment in Dupont's division marched from Haslach towards Ulm and ran into four Austrian regiments holding Bolfingen. The 32nd carried out several ferocious attacks, but the Austrians held firm and repulsed every single one of them. The Austrians flooded the battle with more cavalry and infantry regiments to Jungingen hoping to score a knockout blow against Ney's corps by enveloping Dupont's force. Dupont sensed what was happening and preempted the Austrians by launching a surprise attack on Jungingen that captured at least 1,000 prisoners.[34] Renewed Austrian attacks drove these forces back to Haslach, which the French managed to hold. Dupont was eventually forced to fall back on Albeck, where he joined d'Hilliers's troops. The effects of the Battle of Haslach-Jungingen on Napoleon's plans are not fully clear, but the Emperor may have finally ascertained that the majority of the Austrian army was concentrated at Ulm.[35] Accordingly, Napoleon sent the corps of Soult and Marmont towards the Iller, meaning he now had four infantry and one cavalry corps to deal with Mack; Davout, Bernadotte, and the Bavarians were still guarding the region around Munich.[35] Napoleon did not intend to fight a battle across rivers and ordered his marshals to capture the important bridges around Ulm. He also began shifting his forces to the north of Ulm because he expected a battle in that region rather than an encirclement of the city itself.[36] These dispositions and actions would lead to a confrontation at Elchingen on the 14th as Ney's forces advanced on Albeck.
At this point in the campaign, the Austrian command staff was in full confusion. Ferdinand began to openly oppose Mack's command style and decisions, charging that the latter spent his days writing contradictory orders that left the Austrian army marching back and forth.[37] On 13 October, Mack sent two columns out of Ulm in preparation for a breakout to the north: one under General Reisch headed towards Elchingen to secure the bridge there and the other under Werneck went north with most of the heavy artillery.[38] Ney hurried his corps forward to reestablish contact with Dupont. Ney led his troops to the south of Elchingen on the right bank of the Danube and began the attack. The field to the side was a partially wooded flood plain, rising steeply to the hill town of Elchingen, which had a wide field of view.[39] The French cleared the Austrian pickets and a regiment boldly attacked and captured the abbey at the top of the hill at bayonet point. The Austrian cavalry was also defeated and Riesch's infantry fled; Ney was given the title "Duke of Elchingen" for his impressive victory.[40]
Battle of Ulm
Other actions took place on the 14th. Murat's forces joined Dupont at Albeck just in time to drive off an Austrian attack from Werneck; together Murat and Dupont beat the Austrians to the north in the direction of Heidenheim. By night on the 14th, two French corps were stationed in the vicinity of the Austrian encampments at Michelsberg, right outside of Ulm.[41] Mack was now in a dangerous situation: there was no longer any hope of escaping along the north bank, Marmont and the Imperial Guard were hovering at the outskirts of Ulm to the south of the river, and Soult was moving from Memmingen to prevent the Austrians escaping south to the Tyrol.[41] Troubles continued with the Austrian command as Ferdinand overrode the objections of Mack and ordered the evacuation of all cavalry from Ulm, a total of 6,000 troopers.[42] Murat's pursuit was so effective, however, that only eleven squadrons joined Werneck at Heidenheim.[42] Murat continued his harassment of Werneck and forced him to surrender with 8,000 men at Trochtelfingten on 19 October; Murat also took an entire Austrian field park of 500 vehicles, then swept on towards Neustadt and captured 12,000 Austrians.[42]
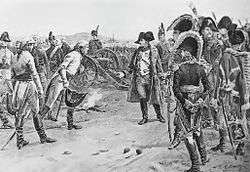
Events at Ulm were now reaching a conclusion. On 15 October, Ney's troops successfully charged the Michelsberg encampments and on the 16th the French began to bombard Ulm itself. Austrian morale was at a low point and Mack began to realize that there was little hope of rescue. On 17 October, Napoleon's emissary, Ségur, signed a convention with Mack in which the Austrians agreed to surrender on 25 October if no aid came by that date.[42] Gradually, however, Mack heard of the capitulations at Heidenheim and Neresheim and agreed to surrender five days before schedule on 20 October. 10,000 troops from the Austrian garrison managed to escape, but the vast majority of the Austrian force marched out on the 21st and laid down their arms without incident, all with the Grande Armée drawn up in a vast semicircle observing the capitulation.[42]
Battle of Trafalgar
When the Third Coalition declared war on France after the short-lived Peace of Amiens, Napoleon Bonaparte was determined to invade Britain. To do so, he had to ensure that the Royal Navy would be unable to disrupt the invasion flotilla, which would require control of the English Channel.
The main French fleets were at Brest in Brittany and at Toulon on the Mediterranean coast. Other ports on the French Atlantic coast contained smaller squadrons. In addition, France and Spain were allied, so the Spanish fleet based in Cádiz and Ferrol was also available.
The British possessed an experienced and well-trained corps of naval officers. By contrast, most of the best officers in the French navy had either been executed or dismissed from the service during the early part of the French Revolution. As a result, Vice-Admiral Pierre-Charles Villeneuve was the most competent senior officer available to command Napoleon's Mediterranean fleet. However, Villeneuve had shown a distinct lack of enthusiasm to face Nelson and the Royal Navy after his defeat at the Battle of the Nile.
Napoleon's naval plan in 1805 was for the French and Spanish fleets in the Mediterranean and Cádiz to break through the blockade and combine in the West Indies. They would then return, assist the fleet in Brest to emerge from blockade, and in combination clear the English Channel of Royal Navy ships, ensuring a safe passage for the invasion barges. The plan seemed good on paper but as the war wore on, Napoleon's unfamiliarity with naval strategy and ill-advised naval commanders continued to haunt the French.
West Indies
Early in 1804, Admiral Lord Nelson commanded the British fleet blockading Toulon. Unlike William Cornwallis, who maintained a tight blockade of Brest with the Channel Fleet, Nelson adopted a loose blockade in hopes of luring the French out for a major battle. However, Villeneuve's fleet successfully evaded Nelson's when his forces were blown off station by storms. While Nelson was searching the Mediterranean for him, Villeneuve passed through the Straits of Gibraltar, rendezvoused with the Spanish fleet, and sailed as planned to the West Indies. Once Nelson realized that the French had crossed the Atlantic Ocean, he set off in pursuit. Admirals of the time, due to the slowness of communications, were given considerable autonomy to make strategic as well as tactical decisions.
Cádiz
Villeneuve returned from the West Indies to Europe, intending to break the blockade at Brest, but after two of his Spanish ships were captured during the Battle of Cape Finisterre by a squadron under Vice-Admiral Sir Robert Calder, Villeneuve abandoned this plan and sailed back to Ferrol.
Napoleon's invasion plans for England depended entirely on having a sufficiently large number of ships of the line before Boulogne, France. This would require Villeneuve's force of 32 ships to join Vice-Admiral Ganteaume's force of 21 ships at Brest, along with a squadron of five ships under Captain Allemand, which would have given him a combined force of 58 ships of the line.
When Villeneuve set sail from Ferrol on 10 August, he was under strict orders from Napoleon to sail northward toward Brest. Instead, he worried that the British were observing his manoeuvres, so on 11 August he sailed southward towards Cádiz on the southwestern coast of Spain. With no sign of Villeneuve's fleet by 26 August, the three French army corps invasion force near Boulogne broke camp and marched to Germany, where it would become fully engaged.
The same month, Nelson returned home to England after two years of duty at sea, for some well-earned rest. He remained ashore for 25 busy days, and was warmly received by his countrymen, who were understandably nervous about a possible French invasion. Word reached England on 2 September about the combined French and Spanish fleet in the harbour of Cádiz. Nelson had to wait until 15 September before his ship HMS Victory was ready to sail.
On 15 August, Cornwallis made the fateful decision to detach 20 ships of the line from the fleet guarding the channel and to have them sail southward to engage the enemy forces in Spain. This left the channel somewhat denuded of ships, with only eleven ships of the line present. However, this detached force formed the nucleus of the British fleet that would fight at Trafalgar. Initially this fleet was placed under the command of Vice-Admiral Calder, reaching Cádiz on 15 September. Nelson joined the fleet on 29 September to take command.
The British fleet used frigates to keep a constant watch on the harbour, while the main force remained out of sight 50 miles (80 km) west of the shore. Nelson's hope was to lure the combined Franco-Spanish force out and engage them in a "pell-mell battle". The force watching the harbour was led by Captain Blackwood, commanding HMS Euryalus. He was brought up to a strength of seven ships (five frigates and two schooners) on 8 October.
Supply situation
At this point, Nelson's fleet badly needed provisioning. On 2 October, five ships of the line, Queen, Canopus, Spencer, Zealous, Tigre, and the frigate Endymion were dispatched to Gibraltar under Rear-Admiral Louis for supplies. These ships were later diverted for convoy duty in the Mediterranean, whereas Nelson had expected them to return. Other British ships continued to arrive, and by 15 October the fleet was up to full strength for the battle. Although it was a significant loss; once the first-rate Royal Sovereign had arrived, Nelson allowed Calder to sail for home in his flagship, the 98-gun Prince of Wales. Calder's apparent lack of aggression during the engagement off Cape Finisterre on 22 July, had caused the Admiralty to recall him for a court martial and he would normally have been sent back to Britain in a smaller ship.
Meanwhile, Villeneuve's fleet in Cádiz was also suffering from a serious supply shortage that could not be readily rectified by the cash-strapped French. The blockades maintained by the British fleet had made it difficult for the allies to obtain stores and their ships were ill fitted. Villeneuve's ships were also more than two thousand men short of the force needed to sail. These were not the only problems faced by the Franco-Spanish fleet. The main French ships of the line had been kept in harbour for years by the British blockades with only brief sorties. The hasty voyage across the Atlantic and back used up vital supplies and was no match for the British fleet's years of experience at sea and training. The French crews contained few experienced sailors, and as most of the crew had to be taught the elements of seamanship on the few occasions when they got to sea, gunnery was neglected. Villeneuve's supply situation began to improve in October, but news of Nelson's arrival made Villeneuve reluctant to leave port. Indeed, his captains had held a vote on the matter and decided to stay in the harbour.
On 14 September, Napoleon gave orders for the French and Spanish ships at Cadiz to put to sea at the first favourable opportunity, join seven Spanish ships of the line then at Cartagena, go to Naples, and land the soldiers they carried to reinforce his troops there, and fight a decisive action if they met a British fleet of inferior numbers.
On 18 October, Villeneuve received a letter informing him that Vice-Admiral François Rosily had arrived in Madrid with orders to take command. At the same time, he received intelligence that a detachment of six British ships had docked at Gibraltar (this was Admiral Louis's squadron). Stung by the prospect of being disgraced before the fleet, Villeneuve resolved to go to sea before his successor could reach Cadiz. Following a gale on 18 October, the fleet began a rapid scramble to set sail.
Departure
The weather, however, suddenly turned calm following a week of gales. This slowed the progress of the fleet departing the harbour, giving the British plenty of warning. Villeneuve had drawn up plans to form a force of four squadrons, each containing both French and Spanish ships. Following their earlier vote to stay put, the captains were reluctant to leave Cádiz and as a result they failed to follow closely Villeneuve's orders (Villeneuve had reportedly become despised by many of the fleet's officers and crew). As a result, the fleet straggled out of the harbour in no particular formation.
It took most of 20 October for Villeneuve to get his fleet organised, and it set sail in three columns for the Straits of Gibraltar to the south-east. That same evening, the ship Achille spotted a force of 18 British ships of the line in pursuit. The fleet began to prepare for battle and during the night they were ordered into a single line. The following day Nelson's fleet of 27 ships of the line and four frigates was spotted in pursuit from the north-west with the wind behind it. Villeneuve again ordered his fleet into three columns, but soon changed his mind and ordered a single line. The result was a sprawling, uneven formation.
The British fleet was sailing, as they would fight, under signal 72 hoisted on Nelson's flagship. At 5:40 a.m., the British were about 21 miles (34 km) to the north-west of Cape Trafalgar, with the Franco-Spanish fleet between the British and the Cape. At 6 a.m. that morning, Nelson gave the order to prepare for battle.
At 8 a.m., Villeneuve ordered the fleet to wear together and turn back for Cádiz. This reversed the order of the Allied line, placing the rear division under Rear-Admiral Pierre Dumanoir le Pelley in the vanguard, or "van." The wind became contrary at this point, often shifting direction. The very light wind rendered manoeuvering all but impossible for the most expert crews. The inexperienced crews had difficulty with the changing conditions, and it took nearly an hour and a half for Villeneuve's order to be completed. The French and Spanish fleet now formed an uneven, angular crescent, with the slower ships generally leeward and closer to the shore. Villeneuve was painfully aware that the British fleet would not be content to attack him in the old-fashioned way, coming down in a parallel line and engaging from van to rear. He knew that they would endeavour to concentrate on a part of his line. But he was too conscious of the inexperience of his officers and men to consider making counter movements.
By 11 a.m. Nelson's entire fleet was visible to Villeneuve, drawn up in two parallel columns. The two fleets would be within range of each other within an hour. Villeneuve was concerned at this point about forming up a line, as his ships were unevenly spaced and in an irregular formation. The Franco-Spanish fleet was drawn out nearly 5 miles (8 km) long as Nelson's fleet approached.
As the British drew closer, they could see that the enemy was not sailing in a tight order, but rather in irregular groups. Nelson could not immediately make out the French flagship as the French and Spanish were not flying command pennants.
The six British ships dispatched earlier to Gibraltar had not returned, so Nelson would have to fight without them. He was outnumbered and outgunned, nearly 30,000 men and 2,568 guns to his 17,000 men and 2,148 guns. The Franco-Spanish fleet also had six more ships of the line, and so could more readily combine their fire. There was no way for some of Nelson's ships to avoid being "doubled on" or even "trebled on".
Engagement

The battle progressed largely according to Nelson's plan. At 11:45, Nelson sent the famous flag signal, "England expects that every man will do his duty" He had instructed his signal officer, Lieutenant John Pasco, to signal to the fleet the message "England confides [i.e. is confident] that every man will do his duty." Pasco suggested to Nelson that expects be substituted for confides, since the former word was in the signal book, whereas confides would have to be spelt out letter-by-letter; Nelson agreed to the change.[43]
The term "England" was widely used at the time to refer to the United Kingdom, though the British fleet included significant contingents from Ireland, Scotland and Wales as well as England. Unlike the photographic depiction, this signal would have been shown on the mizzen mast only and would have required 12 'lifts'. The fleet was approaching the French line in two columns. Leading the windward column in Victory was Nelson, while Collingwood in Royal Sovereign led the second, leeward, column.
As the battle opened, the French and Spanish were in a ragged line headed north as the two British columns approached from the west at almost a right angle. The northern, windward column of the British fleet was headed up by Nelson's 100-gun flagship Victory. The leeward column was led by the 100-gun Royal Sovereign, the flagship of Vice-Admiral Cuthbert Collingwood. Nelson led his line into a feint toward the van of the Franco-Spanish fleet and then turned toward the actual point of attack. Collingwood altered the course of his column slightly so that the two lines converged at the line of attack.
Just before his column engaged the allied forces, Collingwood said to his officers, "Now, gentlemen, let us do something today which the world may talk of hereafter". Because the winds were very light during the battle, all the ships were moving extremely slowly, and the lead British ships were under fire from several of the enemy for almost an hour before their own guns could bear.

At noon, Villeneuve sent the signal "engage the enemy", and Fougueux fired her first trial shot at Royal Sovereign. Royal Sovereign had all sails out and, having recently had her bottom cleaned, outran the rest of the British fleet. As she approached the allied line, she came under fire from Fougueux, Indomptable, San Justo and San Leandro, before breaking the line just astern of Admiral Alava's flagship Santa Ana, into which she fired a devastating double-shotted raking broadside.
The second ship in the British lee column, Belleisle, was engaged by Aigle, Achille, Neptune and Fougeux; she was soon completely dismasted, unable to manoeuvre and largely unable to fight, as her sails blinded her batteries, but kept flying her flag for 45 minutes until the following British ships came to her rescue.
For 40 minutes, Victory was under fire from Héros, Santísima Trinidad, Redoutable and Neptune; although many shots went astray others killed and wounded a number of her crew and shot away her wheel, so that she had to be steered from her tiller belowdecks. Victory could not yet respond. At 12:45, Victory cut the enemy line between Villeneuve's flagship Bucentaure and Redoutable. Victory came close to the Bucentaure, firing a devastating raking broadside through her stern which killed and wounded many on her gundecks. Villeneuve thought that boarding would take place, and with the Eagle of his ship in hand, told his men: "I will throw it onto the enemy ship and we will take it back there!" However, Admiral Nelson of Victory engaged the 74 gun Redoutable. Bucentaure was left to be dealt with by the next three ships of the British windward column Temeraire, Conqueror and Neptune.
A general mêlée ensued and, during that fight, Victory locked masts with the French Redoutable. The crew of the Redoutable, which included a strong infantry corps (with three captains and four lieutenants), gathered for an attempt to board and seize the Victory. A musket bullet fired from the mizzentop of the Redoutable struck Nelson in the left shoulder and passed through his body lodging in his spine. Nelson exclaimed, "They finally succeeded, I am dead." He was carried below decks and died at about 16:30, as the battle that would make him a legend was ending in favour of the British.
Victory ceased fire, the gunners having been called on the deck to fight the capture but were repelled to the below decks by French grenades. As the French were preparing to board Victory, the Temeraire, the second ship in the British windward column, approached from the starboard bow of the Redoutable and fired on the exposed French crew with a carronade, causing many casualties.
At 13:55, Captain Lucas, of the Redoutable, with 99 fit men out of 643 and severely wounded himself, was forced to surrender. The French Bucentaure was isolated by the Victory and Temeraire, and then engaged by Neptune, Leviathan and Conqueror; similarly, the Santísima Trinidad was isolated and overwhelmed without being rescued, surrendering after three hours.

As more and more British ships entered the battle, the ships of the allied centre and rear were gradually overwhelmed. The allied van, after long remaining quiescent, made a futile demonstration and then sailed away. The British took 22 vessels of the Franco-Spanish fleet and lost none. Among the taken French ships were the Aigle, Algésiras, Berwick, Bucentaure, Fougueux, Intrépide, Redoutable, and Swiftsure. The Spanish ships taken were Argonauta, Bahama, Monarca, Neptuno, San Agustín, San Ildefonso, San Juan Nepomuceno, Santísima Trinidad, and Santa Ana. Of these, Redoutable sank, Santísima Trinidad and Argonauta were scuttled by the British and later sank, Achille exploded, Intrépide and San Augustín burned, and Aigle, Berwick, Fougueux, and Monarca were wrecked in a gale following the battle.
As Nelson lay dying, he ordered the fleet to anchor as a storm was predicted. However, when the storm blew up many of the severely damaged ships sank or ran aground on the shoals. A few of them were recaptured by the French and Spanish prisoners overcoming the small prize crews or by ships sallying from Cádiz.
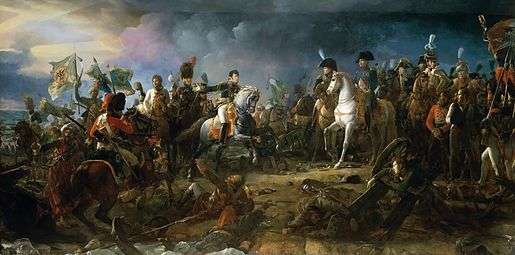
Battle of Austerlitz
Preliminaries
The main body of the Napoleonic French army followed the remains of the Austrian army towards Vienna. Following the failure of the Austrian army at Ulm, a Russian army under General Mikhail Kutuzov was also withdrawing east, and reached the Ill river on 22 October, where it joined with the retreating Corps Kienmayer. On 5 November, they held a successful rearguard action in Amstetten. On 7 November, the Russians arrived in St. Pölten, and then moved across the Danube river the next day. Late on 9 November, they destroyed the bridges across the Danube, holding the last one, at Stein, near Krems, until the late afternoon.[44]
The following day, Mortier ordered Gazan to attack what they believed to be a Russian rear guard, at the village of Stein. This was a trap on the part of Kutuzov, laid for the sole purpose of convincing Mortier that he had retreated further toward Vienna, when he had actually crossed the Danube in force, and lay concealed behind the ridges above the village. In the ensuing Battle of Dürenstein, three Russian columns circled around the First Division of the Corps Mortier, and attacked Gazan from both the front and the rear. Not until Dupont's division arrived, after dark, was Gazan able to start to evacuate his soldiers to the other side of the Danube. Gazan lost close to 40 percent of his division. In addition, 47 officers and 895 men were captured, and he lost five guns, as well as the eagles of the 4th Infantry Regiment, and the eagle and guidon of the 4th Dragoons. The Russians also lost around 4,000, about 16 percent of their force, and two regimental colors.[45] The Austrian Lt. Field Marshal Schmitt was killed as the battle concluded, probably by Russian musketry in the confused melee.[46]

At the Battle of Schöngrabern (also known as the Battle of Hollabrunn) occurred a week after the battle at Duerenstein. On 16 November 1805. near Hollabrunn in Lower Austria. The Russian army of Kutuzov was retiring north of the Danube before the French army of Napoleon. On 13 November 1805 Marshals Murat and Lannes, commanding the French advance guard, had captured a bridge over the Danube at Vienna by falsely claiming that an armistice had been signed, and then rushing the bridge while the guards were distracted. Kutuzov needed to gain time in order to make contact near Brünn with reinforcements led by Buxhowden. He ordered his rearguard under Major-General Prince Pyotr Bagration to delay the French.
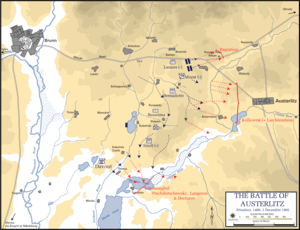
After Hollabrun, the armies gathered on the plains to the east of Brno. Napoleon could muster some 75,000 men and 157 guns for the impending battle, but about 7,000 troops under Davout were still far to the south in the direction of Vienna.[47] The Allies had about 73,000 soldiers, seventy percent of them Russian, and 318 guns.[47] On 1 December, both sides occupied their main positions.
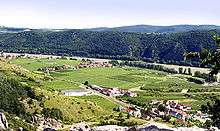
Battlefield
The northern part of the battlefield was dominated by the 700-foot (210-metre) Santon hill and the 850-foot (260-metre) Zuran hill, both overlooking the vital Olmutz-Brno road that ran across a west-east axis. To the west of these two hills was the village of Bellowitz, and between them the Bosenitz Stream went south to link up with the Goldbach Stream, the latter flowing astride the villages of Kobelnitz, Sokolnitz, and Telnitz. The centerpiece of the entire area were the Pratzen Heights, a gently sloped hill about 35 to 40 feet (11–12 m) in height. An aide noted that the Emperor repeatedly told his Marshals, "Gentlemen, examine this ground carefully, it is going to be a battlefield; you will have a part to play upon it".[48]
Allied plans and dispositions
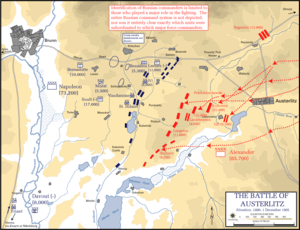
An Allied council met on 1 December to discuss proposals for the battle. Most of the Allied strategists had two fundamental ideas in mind: making contact with the enemy and securing the southern flank that led to Vienna. Although the Tsar and his immediate entourage pushed hard for a battle, Emperor Francis of Austria was in a more cautious mood, and he was seconded by Kutuzov, the main Russian commander.[49] The pressure to fight from the Russian nobles and the Austrian commanders, however, was too strong, and the Allies adopted Austrian Chief of Staff Weyrother's plan.[49] This called for a main drive against the French right flank, which the Allies noticed was lightly guarded, and diversionary attacks against the French left. The Allies deployed most of their troops into four columns that would attack the French right. The Russian Imperial Guard was held in reserve while Russian troops under Bagration guarded the Allied right.
French plans and dispositions
Days before any actual fighting, Napoleon had given an impression to the Allies that his army was in a weak state and that he desired a negotiated peace.[50] In reality, he was hoping that they would attack, and to encourage them on this mission he deliberately weakened his right flank.[51] On 28 November, Napoleon met with his marshals at Imperial Headquarters and they informed him of their qualms and fears about the upcoming battle, even suggesting a retreat, but he shrugged off their complaints and went to work.[52] Napoleon's plan envisioned that the Allies would throw so many troops to envelop his right flank that their centre would be severely weakened. He then counted on a massive French thrust, to be conducted by 16,000 troops of Soult's IV Corps, through the centre to cripple the Allied army. Meanwhile, to support his weak right flank, Napoleon ordered Davout's III Corps to force march all the way from Vienna and join General Legrand's men, who held the extreme southern flank that would bear the heavy part of the Allied attack. Davout's soldiers had 48 hours to March 110 km (68 mi). Their arrival would be extremely crucial in determining the success or failure of the French plan. The Imperial Guard and Bernadotte's I Corps were held in reserve while the V Corps under Lannes guarded the northern sector of the battle.
Battle is joined
The battle began around 8 a.m. with the first allied column attacking the village of Telnitz, which was defended by the 3rd Line Regiment. This sector of the battlefield witnessed heavy action in the following moments as several ferocious Allied charges evicted the French from the town and forced them on the other side of the Goldbach. The first men of Davout's corps arrived at this time and threw the Allies out of Telnitz before they too were attacked by hussars and re-abandoned the town. Additional Allied attacks out of Telnitz were checked by French artillery.[53]
Allied columns started pouring against the French right, but not at the desired speed, so the French were mostly successful in curbing the attacks. In actuality, the Allied deployments were mistaken and poorly timed: cavalry detachments under Liechtenstein on the Allied left flank had to be placed in the right flank and in the process they ran into and slowed down part of the second column of infantry that was advancing towards the French right.[52] At the time, the planners thought this was a disaster, but later on it helped the Allies. Meanwhile, the lead elements of the second column were attacking the village of Sokolnitz, which was defended by the 26th Light Regiment and the Tirailleurs, French skirmishers. Initial Allied assaults proved unsuccessful and General Langeron ordered the bombardment of the village. This deadly barrage forced the French out, and around the same time, the third column attacked the castle of Sokolnitz. The French, however, counterattacked and regained the village, only to be thrown out again. Conflict in this area ended momentarily when Friant's division (part of III Corps) retook the village. Sokolnitz was perhaps the most fought over area in the battlefield and would change hands several times as the day progressed.[54]
"One sharp blow and the war is over"
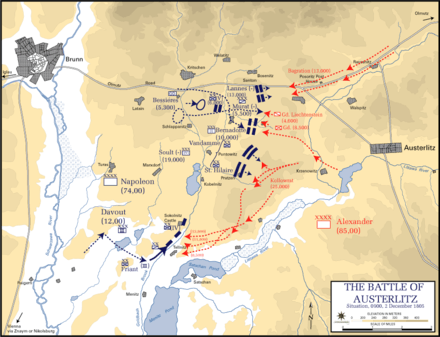
Around 8:45 a.m., finally satisfied at the weakness in the enemy centre, Napoleon asked Soult how long it would take for his men to reach the Pratzen Heights, to which the Marshal replied, "Less than twenty minutes, sire." About 15 minutes later, Napoleon ordered the attack, adding, "One sharp blow and the war is over."[55]
A dense fog helped to cloud the advance of St. Hilaire's division, but as they went up the slope the legendary 'Sun of Austerlitz' ripped the mist apart and encouraged them forward.[54] Russian soldiers and commanders on top of the heights were stunned to see so many French troops coming towards them.[56] Allied commanders were now able to feed some of the delayed detachments of the fourth column into this bitter struggle. Over an hour of horrendous fighting left much of this unit decimated beyond recognition. The other men from the second column, mostly inexperienced Austrians, also participated in the struggle and swung the numbers game against one of the best fighting forces in the French army, finally forcing them to withdraw down the slopes. However, gripped by desperation, St. Hilaire's men struck hard once more and bayoneted the Allies out of the heights. To the north, General Vandamme's division attacked an area called Staré Vinohrady and through talented skirmishing and deadly volleys broke several Allied battalions.[57]
The battle had firmly turned to France's favor, but there was still much fighting ahead. Napoleon ordered Bernadotte's I Corps to support Vandamme's left and moved his own command centre from Zuran Hill to St. Anthony's Chapel on the Pratzen Heights. The difficult position of the Allies was confirmed by the decision to send in the Russian Imperial Guard; Grand Duke Constantine, Tsar Alexander's brother, commanded the Guard and counterattacked in Vandamme's section of the field, forcing a bloody effort and the loss of the only French standard in the battle (the unfortunate victim was a battalion of the 4th Line Regiment). Sensing trouble, Napoleon ordered his own heavy Guard cavalry forward. These men pulverized their Russian counterparts, but with both sides pouring in large masses of cavalry no victor was clear yet. The Russians had a numerical advantage here but fairly soon the tide swung as Drouet's Division, the 2nd of Bernadotte's I Corps, deployed on the flank of the action and allowed French cavalry to seek refuge behind their lines. The horse artillery of the Guard also unlimbered a deadly toll on the Russian cavalry and fusiliers. The Russians broke and many died as they were pursued by the reinvigorated French cavalry for about a quarter of a mile.[58]
Endgame
Meanwhile, the northernmost part of the battlefield was also witnessing heavy fighting. Prince Liechtenstein's heavy cavalry began to assault Kellerman's lighter cavalry forces after finally arriving at the correct position in the field. The fighting originally went well for the French, but Kellerman's forces took cover behind General Caffarelli's infantry division once it became clear Russian numbers were too great. Caffarelli's men halted the Russian assaults and permitted Murat to send two cuirassier divisions into the fray to finish off the Russian cavalry for good. The ensuing melee was bitter and long, but the French ultimately prevailed. Lannes then led his V Corps against Bagration's men and after hard fighting managed to drive the skilled Russian commander off the field. He wanted to pursue, but Murat, who was in control of this sector in the battlefield, was against the idea.[59]
Napoleon's focus now shifted towards the southern end of the battlefield where the French and the Allies were still fighting over Sokolnitz and Telnitz. In an effective double-pronged assault, St. Hilaire's division and part of Davout's III Corps smashed through the enemy at Sokolnitz and persuaded the commanders of the first two columns, generals Kienmayer and Langeron, to flee as fast as they could. Buxhowden, the commander of the Allied left and the man responsible for leading the attack, was completely drunk and fled as well. Kienmayer covered his withdrawal with the O'Reilly light cavalry, who gallantly managed to defeat five of six French cavalry regiments before they too had to retreat.[59]
General panic now seized the Allied army and it abandoned the field in any and all possible directions. Russian forces that had been defeated by the French right withdrew south towards Vienna via the Satschan frozen ponds. According to popular myth, the French artillery pounded towards the men, but Napoleon redirected his gunners to fire at the ice. The men drowned in the viciously cold ponds, dozens of artillery pieces going down along with them. Estimates on how many guns were captured differ; there may have been as few as 38 or as many as over 100. Sources also differ on casualties, with figures ranging from as few as 200 to as many as 2,000 dead. Because Napoleon exaggerated this incident in his report of the battle, the low numbers may be more accurate, although doubt remains as to whether they are fully correct. Many regard this incident as one of Napoleon's cruelest acts in war.[60] However, only a few bodies are reported to have been found in the spring of 1806, and it is most likely the incident is a myth.[61]
Italian Campaign
Meanwhile, in Italy, a French force under St. Cyr was still manoeuvring on the frontier of the Kingdom of Naples. The French were being carefully watched by an Anglo-Russian force entrusted with defence of the kingdom. After the Battle of Austerlitz, the Russians withdrew from Italy and the British unwilling to defend Naples alone, evacuated the mainland altogether and retreated back to Sicily. Meanwhile, the French force, now stationed in Bologna was reorganised into the Army of Naples and placed under the nominal command of Napoleon's brother Joseph Bonaparte. However, the de facto commander was André Masséna, who commanded the I Corps and was entrusted with the invasion by Joseph.
Invasion of Naples
On 9 February 1806, Masséna invaded the Kingdom of Naples and two days later, the Bourbon king of Naples, Ferdinand IV also fled to Sicily, protected by the British fleet. Naples soon fell into French hands and by the end of February, only two places in the kingdom still held out. One was the fortress city of Gaeta, north of Naples, and the other was Calabria in the very south of Italy, which was where the remainder of the Royal Neapolitan Army was stationed.
Ferdinand had hoped for a repeat of the events of 1799, when a popular uprising in Calabria eventually caused the downfall of the Parthenopaean Republic, a French client state created after the Neapolitans were defeated the first time during the War of the Second Coalition. However, no such rebellion initially occurred and on 3 March, General Jean Reynier, who commanded the 10,000 strong II Corps of the Army of Naples invaded Calabria. Only a few Calabrians resisted the invading French force and the Royal Neapolitan Army was soundly defeated at the Battle of Campo Tenese on 10 March 1806. Ferdinand now had no choice but to concede the Neapolitan throne to the French. A day after Campo Tenese, Joseph was installed as the new King of Naples. By now, the last regular troops of the Neapolitan army had fled to Sicily and the French controlled the entire Italian mainland except for the fortress of Gaeta, which had been under siege since 26 February.[62]
Calabrian insurrection
However, all was not going to plan for the French. Supply problems meant that Reynier's II Corps in Calabria was forced to live off the land. For over a month, the peasants of the region had supported the Neapolitan army and were close to starvation. Joseph seemed unaware of the problems and the potential dangers of revolt. Consequently, no extra provisions were sent to the south of Italy. Reynier took the initiative and seized supplies from the local populace, leading predictably to a revolt by the end of March. What started as small bands of partisans eventually expanded into entire villages rising up against the French. With the fortress of Gaeta still holding out, Joseph was unable to send more troops to Calabria, forcing Reynier to reinforce his army with native troops recruited from the larger towns and cities.[62]
By July, Masséna had still failed to take Gaeta due to poor logistical management of the French artillery, slight reinforcements from the British by sea and a series of successful sorties by the Neapolitan garrison against the French sappers. With only Reynier's small force in Calabria still struggling against the revolt, the British organised an expeditionary force under Sir John Stuart to prevent any potential invasion of Sicily and perhaps to trigger a full-scale rebellion against the French across Italy. Although there were early successes for the British, in particular at Maida, the British failed to either reinforce Stuart's expedition or attempt to relieve the Siege of Gaeta. With the French artillery finally able to bombard the walls with their full potential, the Neapolitans eventually surrendered on 18 July, freeing Masséna's I Corps.[63]
Following the surrender, Masséna was ordered south by Joseph to support Reynier's II Corps against the British and the Calabrian insurrection. Now severely outnumbered in mainland Italy, the British retreated back to Sicily. However, the revolt was not suppressed until 1807, by which time Masséna had already requested permission to relinquish command. For the first time in the Napoleonic Wars, the French experienced a brutal guerrilla war carried on by a rebellious population. The French gleaned that the only effective way to deal with such an uprising was to implement terror tactics employed by Reynier. This foreshadowed the same problems the French, and in particular Joseph Bonaparte, would face in Spain during the Peninsular War.
Results
Austerlitz and the preceding campaign profoundly altered the nature of European politics. In three months, the French had occupied Vienna, decimated two armies, and humbled the Austrian Empire. These events sharply contrast with the rigid power structures of the 18th century, when no major European capital was ever held by an enemy army. Austerlitz set the stage for a near-decade of French domination on the European continent, but one of its more immediate impacts was to goad Prussia into war in 1806.
France and Austria signed a truce on 4 December and the Treaty of Pressburg 22 days later took the latter out of the war. Austria agreed to recognize French territory captured by the treaties of Campo Formio (1797) and Lunéville (1801), cede land to Bavaria, Wurttemberg, and Baden, which were Napoleon's German allies, and pay 40 million francs in war indemnities. Venetia was also given to the Kingdom of Italy. It was a harsh end for Austria, but certainly not a catastrophic peace. The Russian army was allowed to withdraw to home territory and the French encamped themselves in Southern Germany. The Holy Roman Empire was also effectively wiped out, 1806 being seen as its final year. Napoleon created the Confederation of the Rhine, a string of German states meant to serve as a buffer between France and Prussia. Prussia saw these and other moves as an affront to its status as the main power of Central Europe and it went to war with France in 1806.
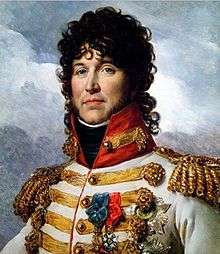
In Italy, the political situation would remain unchanged until 1815, with the British and Sicilian troops guarding the Bourbon King Ferdinand in Sicily and the Napoleonic King of Naples controlling the mainland. In 1808, Joachim Murat became the King of Naples, after Joseph Bonaparte became King of Spain. Murat made various attempts to cross the Strait of Sicily, which all ended in failure, despite once managing to secure a foothold in Sicily.
See also
Notes
- ↑ For the diplomatic history see Paul W. Schroeder, The Transformation of European Politics 1763–1848 (1996). pp 210–86
- ↑ Chandler p. 304.
- ↑ Chandler p. 320.
- ↑ Herring, p. 101.
- ↑ Thomas J. Fleming (26 June 2003). The Louisiana Purchase. John Wiley and Sons. pp. 129–. ISBN 978-0-471-26738-6. Retrieved 19 December 2011.
- ↑ The Oxford Dictionary of Quotations
- ↑ John Bartlett, Familiar Quotations, 10th ed. (1919), 9625
- ↑ Chandler p. 328.
- ↑ Chandler p. 323.
- 1 2 Chandler p. 332.
- ↑ Chandler p. 333.
- ↑ Fisher & Fremont-Barnes p. 33.
- ↑ Fisher & Fremont-Barnes p. 31.
- ↑ Uffindell p. 155.
- 1 2 Fisher & Fremont-Barnes p. 32.
- ↑ Chandler, David G (1 March 1973). "From the Rhine to the Danube". The Campaigns of Napoleon. New York: Scribner. p. 383. ISBN 0-02-523660-1.
- ↑ Stutterheim, Karl; Pine-Coffin, John (trans.) (1807). A Detailed Account of The Battle of Austerlitz. London: Goddard. p. 44.
- ↑ Robert Goetz, 1805: Austerlitz: Napoleon and the Destruction of the Third Coalition (Greenhill Books, 2005)
- ↑ Fisher & Fremont-Barnes p. 36.
- 1 2 Chandler p. 382.
- ↑ Chandler p. 384.
- 1 2 3 4 Chandler p. 385.
- ↑ Kagan p. 389.
- ↑ Kagan p. 393.
- 1 2 Kagan p. 395.
- ↑ Kagan p. 397.
- ↑ Kagan p. 400.
- ↑ Kagan p. 402.
- ↑ Kagan p. 404.
- 1 2 Kagan p. 408.
- ↑ Kagan p. 409.
- ↑ Kagan p. 412.
- ↑ Kagan p. 414.
- ↑ Kagan p. 415.
- 1 2 Kagan p. 417.
- ↑ Kagan p. 420.
- ↑ Kagan p. 421.
- ↑ Fisher & Fremont-Barnes pp. 39–40.
- ↑ Fisher & Fremont-Barnes p. 40.
- ↑ Fisher & Fremont-Barnes p. 41.
- 1 2 Chandler p. 399.
- 1 2 3 4 5 Chandler p. 400.
- ↑ "Nelson and His Navy – England or Nelson?". Historical Maritime Society. Archived from the original on 28 September 2006. Retrieved 12 September 2006.
- ↑ (German) Rainer Egger. Das Gefecht bei Dürnstein-Loiben 1805. Wien: Bundesverlag, 1986.
- ↑ Smith. Databook. p. 213.
- ↑ (German) Jens-Florian Ebert. "Heinrich von Schmitt". Die Österreichischen Generäle 1792–1815. Napoleon Online: Portal zu Epoch. Markus Stein, editor. Mannheim, Germany. 14 February 2010 version. Accessed 5 February 2010: (German) Egger, p. 29.
- 1 2 Uffindell p. 19.
- ↑ Chandler pp. 412–413.
- 1 2 Chandler p. 416.
- ↑ McLynn p. 342.
- ↑ Brooks, ed. p. 109.
- 1 2 Fisher & Fremont-Barnes p. 48.
- ↑ Fisher & Fremont-Barnes pp. 48–49.
- 1 2 Fisher & Fremont-Barnes p. 49.
- ↑ Uffindell p. 21.
- ↑ Chandler p. 425.
- ↑ Fisher & Fremont-Barnes pp. 49–50.
- ↑ Fisher & Fremont-Barnes p. 51.
- 1 2 Fisher & Fremont-Barnes p. 52.
- ↑ Chandler p. 432.
- ↑ Spring, Laurence, "Russian Grenadiers and Infantry, 1799-1815", Osprey Publishing 2002
- 1 2 Finley, Milton C. Jr. (April 1976). "Prelude to Spain: The Calabrian Insurrection, 1806–1807". Military Affairs. 40 (2): 84–87. doi:10.2307/1987151. JSTOR 1987151.
- ↑ Masséna & Koch, pp. 194–251.
References
- Brooks, Richard, ed. (2000). Atlas of World Military History. London: HarperCollins. ISBN 0-7607-2025-8.
- Chandler, David G. (1995). The Campaigns of Napoleon. New York: Simon & Schuster. ISBN 0-02-523660-1.
- Dupuy, Trevor N. (1993). Harper Encyclopedia of Military History. New York: HarperCollins. ISBN 0-06-270056-1.
- Fisher, Todd; Fremont-Barnes, Gregory (2004). The Napoleonic Wars: The Rise and Fall of an Empire. Oxford: Osprey Publishing. ISBN 1-84176-831-6.
- Kagan, Frederick W. (2006). The End of the Old Order. Cambridge: Da Capo Press. ISBN 0-306-81137-5.
- Masséna, André; Koch, Jean Baptiste Frédéric (1848–50). Mémoires de Masséna (in French). V. Paris: Paulin et Lechevalier. Retrieved 20 May 2009.
- McLynn, Frank (1997). Napoleon: A Biography. New York: Arcade Publishing. ISBN 1-55970-631-7.
- Schroeder, Paul W. (1996). The Transformation of European Politics 1763–1848. Oxford U.P. pp. 210–86., diplomatic history of Europe
- Uffindell, Andrew (2003). Great Generals of the Napoleonic Wars. Kent: Spellmount. ISBN 1-86227-177-1.
| Wikimedia Commons has media related to War of the Third Coalition. |
| Belli- gerents |
| ||||||||||||||||||||||||||||||||||||||||||||||
|---|---|---|---|---|---|---|---|---|---|---|---|---|---|---|---|---|---|---|---|---|---|---|---|---|---|---|---|---|---|---|---|---|---|---|---|---|---|---|---|---|---|---|---|---|---|---|---|
| Major battles |
| ||||||||||||||||||||||||||||||||||||||||||||||
| Info |
| ||||||||||||||||||||||||||||||||||||||||||||||
| |||||||||||||||||||||||||||||||||||||||||||||||