Battle of Salamanca
| Battle of Salamanca | |||||||
|---|---|---|---|---|---|---|---|
| Part of the Peninsular War | |||||||
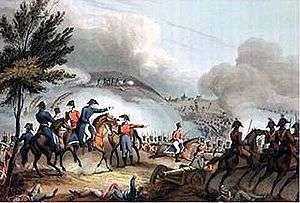 Battle of Salamanca, etched by J. Clarke, coloured by M. Dubourg. | |||||||
| |||||||
| Belligerents | |||||||
|
|
| ||||||
| Commanders and leaders | |||||||
|
|
| ||||||
| Strength | |||||||
| 51,949[2] | 49,647[3] | ||||||
| Casualties and losses | |||||||
|
5,173 3,129 British 2,038 Portuguese 6 Spanish |
13,000 6,000 dead or wounded 7,000 captured[4] | ||||||

The Battle of Salamanca (in French and Spanish known as "Battle of Arapiles") saw an Anglo-Portuguese army under the Duke of Wellington defeat Marshal Auguste Marmont's French forces among the hills around Arapiles, south of Salamanca, Spain on 22 July 1812 during the Peninsular War. A Spanish division was also present but took no part in the battle.
The battle involved a succession of flanking manoeuvres in oblique order, initiated by the British heavy cavalry brigade and Pakenham's 3rd division, and continued by the cavalry and the 4th, 5th and 6th divisions. These attacks resulted in a rout of the French left wing. Both Marmont and his deputy commander, General Bonet, received shrapnel wounds in the first few minutes of firing. Confusion amongst the French command may have been decisive in creating an opportunity, which Wellington successfully seized and exploited.
General Bertrand Clausel, third in seniority, assumed command and ordered a counterattack by the French reserve toward the depleted Allied centre. The move proved partly successful but with Wellington having sent his reinforcements to the centre, the Anglo-Portuguese forces prevailed.
Allied losses numbered 3,129 British and 2,038 Portuguese dead or wounded. The Spanish troops took no part in the battle as they were positioned to block French escape routes and as such suffered just six casualties. The French suffered about 13,000 dead, wounded and captured. As a consequence of Wellington's victory, his army was able to advance to and liberate Madrid for two months, before retreating to Portugal. The French were forced to abandon Andalusia permanently while the loss of Madrid irreparably damaged King Joseph's pro-French government.
Background
In April 1812, following the successful siege of Badajoz, Wellington and the greater part of the Anglo-Portuguese army marched north to expel Marmont’s French army who had temporarily invaded Portugal. Following Marmont’s retreat to Salamanca Wellington took position behind the Agueda and Coa rivers.[5] In May, acting on Wellington’s orders General Hill took a force of 7,000 men to destroy the bridge at Almaraz, breaking the only direct communications between Soult's and Marmont’s armies.[6]
On June 13 Wellington crossed the Agueda and advanced eastward to Salamanca,[7] a town that was a major supply depot for the French army. The French had converted three convents into powerful forts to defend the town and the bridge across the river Tormes. On 19 June the first battery opened fire but it was not until 27 June that, with two of the convents battered and in flames and with no sign of relief, the French troops asked for surrender terms.[8]
For several weeks Wellington found his movements north of Salamanca blocked by Marmont's army, which was constantly swelled by reinforcements. With the armies often marching close together, separated by the river and Marmont repeatedly threatening Wellington's supply line. Moving east, the French crossed to the south bank of the Tormes across another bridge at Huerta and by marching south then west hoped to turn the flank of Wellingtons' army. By the day of the battle Wellington had decided to withdraw his army all the way back to Portugal, but observed that with the two armies marching parallel to each other, with the British on the inside line, the French became strung out and Marmont had made the tactical error of separating his left flank from the main body of his army. The Duke immediately ordered the major part of his army to attack the overextended French left wing.
Forces
Marshal Marmont's 50,000-man Army of Portugal contained eight infantry and two cavalry divisions, plus 78 artillery pieces. The infantry divisions were Maximilien Sebastien Foy's 1st (4,900), Bertrand Clausel's 2nd (6,300), Claude François Ferey's 3rd (5,400), Jacques Thomas Sarrut's 4th (5,000), Antoine Louis Popon de Maucune's 5th (5,000), Antoine François Brenier de Montmorand's 6th (4,300), Jean Guillaume Barthélemy Thomières's 7th (4,300), and Jean Pierre François Bonet's 8th (6,400). Pierre François Joseph Boyer led 1,500 dragoons and Jean-Baptiste Theodore Curto commanded 1,900 light cavalry. Louis Tirlet directed 3,300 artillerymen and there were also 1,300 engineers, military police and wagon drivers.
Wellington's 48,500-man army included eight infantry divisions, formed mainly by British and Portuguese units (also German and one of French royalists), and two independent brigades, five cavalry brigades and 54 cannons. The infantry divisions were Henry Campbell's 1st (6,200), Edward Pakenham's 3rd (5,800), Galbraith Lowry Cole's 4th (5,191), James Leith's 5th (6,700), Henry Clinton's 6th (5,500), John Hope's 7th (5,100) and Charles Alten's Light (3,500). Carlos de España commanded a 3,400-man Spanish division, while Denis Pack (2,600) and Thomas Bradford (1,900), led the independent Portuguese brigades.
Stapleton Cotton supervised the cavalry brigades. These included 1,000 British heavy dragoons (1st Cavalry Brigade) led by John Le Marchant, 1,000 British light dragoons (2nd Cavalry Brigade) under George Anson, 700 Anglo-German light horse under Victor Alten, 800 King's German Legion (KGL) heavy dragoons led by George Bock and 500 Portuguese dragoons under Benjamin d'Urban. Hoylet Framingham commanded eight British (RHA: Ross, Bull, Macdonald; RA: Lawson's, Gardiner, Greene, Douglas, May) and one Portuguese (Arriaga) six-gun artillery batteries.
Manoeuvres
Marmont's army moved south early on 22 July, its leading elements reaching an area southeast of Salamanca. To the west, the Marshal could see Wellington's 7th Division deployed on a ridge. Spotting a dust cloud in the distance, Marmont assumed that most of the British army was in retreat and that he faced only a rearguard. He planned to move his French army south, then west to turn the British right flank.
This was a mistake as Wellington had most of his forces hidden behind the ridge, while his 3rd and 5th Divisions were en route from Salamanca. Wellington had planned to retreat if outflanked, but waited to see if Marmont would make a blunder.
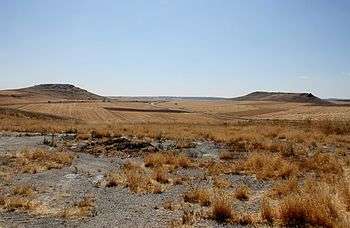
The Marshal's army planned to move along an L-shaped ridge, with its angle near a steep height known as the Greater Arapile. That morning, the French occupied only the short, north-pointing part of the L. For his flanking move, Marmont marched his divisions west along the long side of the L. The Anglo-Allied army lay behind another L-shaped ridge, inside and parallel to the French L, and separated from it by a valley. Unseen by the French, Wellington assembled a powerful striking force along the long side of the British L.
As Marmont moved westward, the French became strung out along the long side of the L. Thomières's division led the way, supported by Curto's cavalry. After that Maucune, Brenier, and Clausel. Bonet, Sarrut and Boyer advanced close to the Greater Arapile, while Foy and Ferey held the short side of the L.
Battle

When the British 3rd Division and D'Urban's brigade reached the top of the French L, they attacked Thomières. At the same time, Wellington launched the 5th and 4th Divisions, backed by the 7th and 6th Divisions, at the long side of the French L.
The 3rd Division came at the head of Thomières's division in a two-deep line. Despite its deployment in column formation, the French division initially repulsed its attackers, but was then charged and routed by a bayonet charge. Thomières was killed. Seeing British cavalry in the area, Maucune formed his division into squares, the standard formation to receive a mounted attack, but a poor choice when defending against infantry. With their two-deep line, Leith's 5th Division easily defeated Maucune in a musketry duel. As the French foot soldiers fell back, Cotton ordered Le Marchant's heavy brigade (5th Dragoon Guards, 3rd and 4th Dragoons) to attack them in what was probably the most destructive charge made by a single brigade of cavalry in the whole Napoleonic period. The left wing of the French army were on the point of being defeated by the 3rd and 5th divisions of Anglo-Portuguese infantry when Le Marchant's dragoons charged in and destroyed battalion after battalion with the heavy cavalrymen's sabres, the sword and exercise for which had been designed by Le Marchant. Many of the French infantrymen sought the protection of the British infantry to escape the sabres of the dragoons. Le Marchant, knowing he had achieved a magnificent success, having crushed 8 French battalions, was leading a squadron when he was shot and his spine broken. [9] William Ponsonby succeeded to command of the brigade.
The French army lost its commander very early in the crisis. As Pakenham's 3rd Division prepared to attack Thomières, Marmont finally woke up to his army's peril. He dashed for his horse, but was caught in a British shellburst which broke his arm and two ribs. His second-in-command, Bonet, was wounded very soon afterwards. Records conflict however, with Marmont claiming that he was wounded as his wing became overextended, and his incapacitation led to the error not being corrected before Wellington attacked. His enemies place the time of his wounding as during Wellington's attack. For somewhere between 20 minutes[10] and over an hour,[11] the French Army of Portugal remained leaderless.
Cole's 4th Division attacked Bonet's division while Pack's Portuguese assaulted the Greater Arapile. With the help of a 40-gun battery firing from the Greater Arapile, both attacks were repulsed by the French.
Assuming command, general Clausel did his best to salvage the dire situation. He committed Sarrut's division to shore up the wrecked left flank, then launched a dangerous counterattack at Cole's 4th Division using his own and Bonet's divisions, supported by Boyer's dragoons. This attack brushed aside Cole's survivors and struck the 6th Division in Wellington's second line. Marshal Beresford reacted promptly to the developing threat and immediately sent Spry's Portuguese brigade of the 5th Division to engage the French infantry, while Wellington moved the 1st and 7th Divisions to assist. After bitter resistance, the divisions of Clausel and Bonet were defeated and the French army began to retreat.
As the rest of the French army streamed away, Ferey formed his division into a single three-deep line, with each flank covered by a battalion in square. Led by Clinton's victorious 6th Division, the British came up to this formation and were initially repulsed. After ordering his artillery to crossfire through the centre of the French line, Wellington ordered a second assault. This attack broke Ferey's division and killed its commander.
Foy's division covered the French retreat towards Alba de Tormes, where there was a bridge they could use to escape. Wellington, believing that the Alba de Tormes crossing was blocked by a Spanish battalion in a fortified castle, directed his pursuit along a different road. De Espana, however, had withdrawn the unit without informing Wellington, which allowed the French to escape. The French Army of Portugal suffered 7,000 killed and wounded and 7,000 captured. Besides Marmont's severe wounding, two divisional commanders were killed and another wounded. Half of the 5,214 Anglo-Allied losses came from the 4th and 6th Divisions. Cotton, Cole, and Leith were all wounded.
Outcome

The battle established Wellington as an offensive general. It was said that he "defeated an army of 40,000 men in 40 minutes."[12] Six days after the battle, Foy wrote in his diary,
"This battle is the most cleverly fought, the largest in scale, the most important in results, of any that the English have won in recent times. It brings up Lord Wellington's reputation almost to the level of that of Marlborough. Up to this day we knew his prudence, his eye for choosing good positions, and the skill with which he used them. But at Salamanca he has shown himself a great and able master of manoeuvring. He kept his dispositions hidden nearly the whole day: he allowed us to develop our movement before he pronounced his own: he played a close game: he utilized the oblique order in the style of Frederick the Great."[13]
The Battle of Salamanca was a damaging defeat for the French and while they regrouped, Anglo-Portuguese forces entered Madrid on 6 August. The Siege of Burgos ensued, then in the autumn the Anglo-Portuguese retreated to Portugal when renewed French concentrations threatened to trap them, although the French forces, which had been stripped of several experienced units to join the Russian campaign, were reluctant to go on the offensive.
A failure by Spanish troops to guard a crucial escape route over the bridge at Alba de Tormes tainted the victory. This may have resulted from a misunderstanding between Spanish and British commanders. Subsequent pursuit failed to destroy or to capture the fleeing French.
Action at Garcia Hernandez
The following day, Wellington's King's German Legion (KGL) heavy dragoons performed the astounding feat of "breaking a square" and overrunning a portion of the French rearguard at the Battle of Garcia Hernandez. Moreover, they accomplished this twice within a few minutes.
Imperial Eagle
Two Imperial Eagles were captured at the battle of Salamanca. Ensign John Pratt of the Light Company of the 2nd Battalion 30th Foot took the Eagle of the 22nd Line Regiment, which is today on display in the Queen's Lancashire Regiment Museum at Fulwood Barracks in Preston, Lancashire. The Eagle of the French 62nd Line (Thomières) was captured by Lieutenant Pearce of the 2nd Battalion 44th East Essex Regiment, a part of Lieutenant General Leith's 5th Division. It is on display in the Essex Regiment Museum in Oaklands Park, Chelmsford, Essex. 3 terracotta statues representing the captured eagles sit between the high pointed gables of Essex House, 375 High Street in Stratford, London.[14][15]
Cultural references
King Edward VII's cypher and the name of the British Army unit that played a prominent role in the Battle of Salamanca were added at the beginning of the Peninsular War Centenary (1908).[16]
- The battle is mentioned in Tolstoy's novel War and Peace, Book 10 Chapter XXVI. Prior to the Battle of Borodino, Tolstoy describes Napoleon as receiving an aide-de-camp, Fabvier, who has just arrived with news of the Battle of Salamanca. "Fabvier told him of the heroism and devotion of his troops fighting at Salamanca, at the other end of Europe, but with one thought – to be worthy of their Emperor – but with one fear – to fail to please him. The result of that battle had been deplorable. Napoleon made ironic remarks during Fabvier's account, as if he had not expected that matters could not go otherwise in his absence".
- The battle features in Sharpe's Sword by Bernard Cornwell, in which Richard Sharpe helps Wellington bring the French to battle by feeding a known French spy false information. Cornwell also duplicated Wellington's tactics at Salamanca in his retelling of Arthur's victory at the Battle of Mount Badon, in Excalibur, the third and final volume of Cornwell's The Warlord Chronicles.
- The battle is described in Suzanna Clarke's Jonathan Strange and Mr. Norrell, during the time that Jonathan Strange served under Lord Wellington.
- Salamanca Place, in Hobart, Tasmania, commemorates the battle. Mount Wellington is nearby.
References
Notes
- ↑ Holmes, Richard (2003), Wellington: The Iron Duke, London: Harper Collins, ISBN 0-00-713750-8
- ↑ Gates, p. 513
- ↑ Gates, p. 514
- ↑ Gates, p. 358
- ↑ Oman, Charles (1914). A History of The Peninsular War, Volume 5. Oxford Clarendon Press. pp. 290–296.
- ↑ Oman, Charles (1914). A History of The Peninsular war, Volume V. Oxford Clarendon Press. p. 320.
- ↑ Oman, Charles (1914). A History of The Peninsular war, Volume V. Oxford Clarendon Press. p. 335.
- ↑ Porter, Maj Gen Whitworth (1889). History of the Corps of Royal Engineers Vol I. Chatham: The Institution of Royal Engineers. pp. 312–5.
- ↑ Fletcher 1999, pp. 185–188.
- ↑ Chandler-Pimlott p 266
- ↑ Glover p 203
- ↑ Military General Service Medal, with bars for Roleia, Vimiera, Busaco, Salamanca, Vittoria & St Sebastian, inscribed to Pvt. Joseph Weller, 1848
- ↑ Oman p 58
- ↑ Cherry, Bridget; O'Brien, Charles; Pevsner, Nikolaus (2005-01-01). London: East. Yale University Press. ISBN 0300107013.
- ↑ "Channelsea River - Stratford". edithsstreets.blogspot.co.uk. Retrieved 2016-10-30.
- ↑ History of the 62nd Mountain Hunters Regiment "Arapiles". Spanish Army website (in Spanish), retrieved 28 April 2016
Bibliography
- Chandler, David (ed.), Pimlott, John Napoleon's Marshals "Marmont", Macmillan, (1987)
- Chandler, David The Dictionary of the Napoleonic Wars Macmillan, (1979)
- Gates, David The Spanish Ulcer: A History of the Peninsular War Da Capo Press (2001) ISBN 0-306-81083-2
- Glover, Michael The Peninsular War 1807–1814 Penguin Books, (1974)
- Oman, Charles Wellington's Army 1809–1814 Greenhill, (1913) 1993
- Oman, Charles A History of The Peninsular war, Volume V, Oxford Clarendon Press (1914)
- Smith, Digby The Napoleonic Wars Data Book Greenhill, (1998)
- Weller, Jac Wellington in the Peninsula Nicolas Vane, (1962)
Further reading
- Beamish, N. Ludlow History of the King's German Legion Vol 2 (reprint) Naval and Military Press 1997 ISBN 0-9522011-0-0
- Fletcher, Ian Salamanca 1812: Wellington Crushes Marmont Osprey Publishing, 1997, ISBN 1-85532-604-3
- Muir, Rory Salamanca, 1812 Yale University Press, 2001, ISBN 0-300-08719-5
- Young, Peter Wellington's masterpiece: The battle and campaign of Salamanca Allen and Unwin, 1972, ISBN 0-04-940037-1
External links
- Battle of Salamanca Original reports from The Times
- Dispatches: London Gazette 16 August 1812
- Details on battle of Salamanca
- Includes British and allied OOB
- The Cruel War in Spain – Armies, Battles, Skirmishes
- Batalla de los Arapiles (in Spanish)
Coordinates: 40°53′37″N 5°38′43″W / 40.89353°N 5.64526°W