Siege of Burgos
| Siege of Burgos | |||||||
|---|---|---|---|---|---|---|---|
| Part of the Peninsular War | |||||||
 The Siege of Burgos, by François Joseph Heim, 1813 | |||||||
| |||||||
| Belligerents | |||||||
|
| Kingdom of spain(specially militra) | ||||||
| Commanders and leaders | |||||||
|
|
| ||||||
| Strength | |||||||
| 2,000 |
35,000 13 engineers 8 24-pound cannons[1] | ||||||
| Casualties and losses | |||||||
|
304 killed, 323 wounded 60 captured, 7 guns |
550 killed 1,550 wounded, 3 guns | ||||||
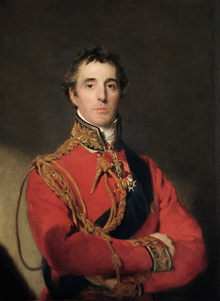
At the Siege of Burgos, from 19 September to 21 October 1812, the Anglo-Portuguese Army led by General Arthur Wellesley, Marquess of Wellington tried to capture the castle of Burgos from its French garrison under the command of General of Brigade Jean-Louis Dubreton. The French repulsed every attempt to seize the fortress, resulting in one of Wellington's rare withdrawals, as he went on to defeat the army sent to flank him at the Lines of Torres Vedras, pursued them and then returned to complete the siege of Burgos and capture the city. The siege took place during the Peninsular War, part of the Napoleonic Wars. Burgos is located about 210 kilometres (130 mi) north of Madrid.
After crushing Marshal Auguste Marmont's French army at the Battle of Salamanca in July 1812, Wellington exploited his great victory by advancing on Madrid. King Joseph Bonaparte and Marshal Jean-Baptiste Jourdan retreated to Valencia where they sought refuge with Marshal Louis Gabriel Suchet. The magnitude of Wellington's triumph also compelled Marshal Nicolas Soult to evacuate Andalucia in the south and withdraw to Valencia. The combined armies of Soult and Joseph soon posed a serious menace to Wellington's grasp on Madrid. The recently defeated French army in the north also built up its strength. Wellington made plans to counter the southern French threat while hoping to quickly capture the strategically important Burgos position, which was an important French supply base.
Instead, Dubreton led a masterful defense, thwarting Wellington's assaults time after time. The British commander's hopes were blasted when his attempts to contain the twin French counteroffensives failed. With large French relief armies approaching Burgos from the northeast and Madrid from the southeast, the British commander withdrew to the west, abandoning large areas of Spain that had been recently liberated. That fall the French lost an opportunity to defeat Wellington's army. Nevertheless, during the withdrawal to Portugal the Anglo-Portuguese army lost many men to pursuing French cavalry and starvation.
Background
Wellington's victory over Marshal Marmont at the Battle of Salamanca on 22 July 1812 gravely weakened the French position in Spain. Before the engagement, King Joseph had set out with 14,000 troops, intending to reinforce the marshal, who was unaware that help was on the way.[2] On 25 July, Joseph received a report from the wounded Marmont which covered up the extent of the disaster. Soon, General of Division Clausel reported the true state of affairs. He wrote to the king, "armies usually suffer in morale after a setback, [but] it is hard to understand the extent of discouragement existing in this one. I cannot conceal that a very bad spirit prevails. Disorders and the most revolting excesses mark every stage of our retreat."[3] Joseph immediately withdrew toward Madrid. Desperate to salvage the situation, the king ordered Marshal Nicolas Soult to send help and to evacuate Andalucia, but the marshal refused.[4]
On 30 July, Wellington's army reached Valladolid, northwest of Madrid. Leaving 18,000 troops with Lieutenant General Henry Clinton to watch Clausel, the British army commander turned toward Madrid with 36,000 men.[4] On 11 August, General of Division Anne-François-Charles Trelliard's dragoon division fought an inconclusive skirmish with the Allies at the Battle of Majadahonda northwest of Madrid. At first, the French dragoons routed Brigadier General Benjamin d'Urban's Portuguese cavalry. After also driving back Major General George Bock's King's German Legion (KGL) heavy dragoons, the French were finally stopped by fire from the 1st KGL Light Infantry Battalion and the approach of heavy reinforcements.[4][5]
King Joseph evacuated Madrid which the Anglo-Portuguese entered on 12 August, to the cheers of the inhabitants.[6] The following day, the Retiro forts were put under siege and 24 hours later they surrendered to Wellington, yielding 2,046 prisoners, large stocks of clothing and equipment, including 20,000 muskets and 180 brass cannon [7]:318 as well as the eagles of the 13th Dragoon and the 51st Line Infantry Regiments.[8] Harassed by guerillas and tortured by thirst, Joseph's soldiers retreated all the way to the east coast city of Valencia, which they reached on 31 August. Valencia was held by Marshal Louis Gabriel Suchet. Wellington knew that if Joseph and Soult joined forces, his position in central Spain would become perilous. He counted on the autumn rains keeping the Tagus River high and preventing Joseph and Soult from threatening his southern flank. He hoped that the Spanish might delay any French counterattack toward Madrid. He also believed that the capture of Burgos would slow any French drive from the north.[9]
To Wellington's amazement, Clausel quickly rallied his beaten army and launched a raid in the north. On 13 August, the French general marched on Valladolid with 25,000 troops. In the face of this advance, Clinton fell back to Arévalo with 7,000 soldiers while José María Santocildes's Spanish corps abandoned Valladolid. Clausel sent his lieutenant Maximilien Sebastien Foy to rescue the trapped French garrisons. While the Spanish attackers concluded the Siege of Astorga before he could reach it, Foy rescued the garrisons of Toro and Zamora and reunited with Clausel at Valladolid on 4 September. Wellington and 21,000 troops rejoined Clinton at Arévalo on 3 September. The British army commander set out after Clausel, but that general easily shook off his pursuers and dashed out of reach, leaving a garrison of 2,000 men in Burgos.[10] Wellington left Lieutenant General Rowland Hill to defend Madrid with 31,000 Anglo-Portuguese and 12,000 Spanish.[11] This force included Wellington's three best divisions.[9]
Siege
San Miguel Hornwork
The 35,000-man Anglo-Portuguese-Spanish army[12] laid siege to the castle of Burgos on 19 September. General of Brigade Jean-Louis Dubreton commanded two battalions of the 34th Line Infantry Regiment, one battalion of the 130th Line, one artillery company, one sapper company, nine heavy cannons, 11 field pieces, and six mortars, altogether 2,000 troops.[13] The inner Burgos defenses contained a stronghold known as the Napoleon Battery.[14] Historians differ as to how many heavy guns Wellington had available. Michael Glover wrote that the British had only three 18-pound cannon with 1,306 rounds.[15] David Gates asserted that Wellington only brought eight siege guns though many more recently captured pieces were available.[16] Chris McNab credited the British with having a total of eight 24-pound guns.[1]
Admiral Sir Home Popham of the Royal Navy offered to land more heavy guns at Santander, but Wellington declined to use this resource.[13] After costly assaults at the sieges of Ciudad Rodrigo and Badajoz, he was loath to mount a massive infantry attack.[15] At the time, the British army's sapper corps, then called Military Artificers, was seriously understrength. At Burgos, there were only five engineer officers and eight sappers. During the siege operation, one engineer and one of the sappers was killed, two engineers were wounded and all the other seven sappers were wounded.[17] [7]
Wellington ordered an assault on the San Miguel hornwork, which guarded the fort's northeast approaches for the night of 19 September. Launched without the benefit of artillery support, there would be three simultaneous assaults, the 1st Battalion of the 42nd Foot was spotted by the French in the moonlight and over 200 men were mowed down. Brigadier General Denis Pack's Portuguese brigade suffered an additional 100 losses.[18] Fortunately for the British, the flank companies of the 1st/42nd Foot, 1st/24th Foot, and 1st/79th Foot[13] were able to gain access to the rear of the hornwork. From there they opened a scattered fire on the French. The defenders suddenly stampeded, leaving the hornwork in the Allies' possession.[18] The 1st Battalion of the 34th Line lost 138 killed and wounded, plus 60 men and seven guns were captured. Allied losses numbered 421 killed and wounded.[13]
Burgos Castle
British engineers quickly began digging in batteries on the hornwork hill, the first battery was finished on 22 September but hoping to get lucky again, Wellington ordered an attack on the night of 22/23 September before his guns had fired a shot. Men of the 1st and 6th Divisions rushed forward against the palisades with axes, followed by men with just five ladders to scale the 24 foot wall, they failed to receive the support of other troops and were easily repelled with 150 of the 400 men killed and wounded.[7]:322 The engineers then began digging a mine 60 feet to get under the fort's west wall. When this was detonated in the early hours of the 29 September, part of the wall collapsed, the advanced party of British dashed forward but were not supported and were soon driven back from the defences.[7]:323 It turned out that the mine was run under an ancient buried wall that was in front of the modern wall. Consequently, the main French defenses were unscathed by the explosion.[18]
A frustrated Wellington ordered his engineers to dig a new mine. Meanwhile, he had his soldiers work overnight to erect a breaching battery close to the walls. At daybreak on 1 October, the French discovered this position and immediately zeroed in their defending artillery. They rapidly destroyed two of the three cannons and inflicted heavy losses on the gun crews. The following night the British reestablished the battery only to see it destroyed again in the morning.[18] On 2 October, Wellington asked Popham to send two 24-pound cannons to replace his lost artillery. As it happened, these guns would not arrive in time.[13] When the new mine was finally ready on 4 October, it was fired, blowing a 100 foot gap in the northwest wall and killing most of the defenders in that area.[7]:324 The subsequent attack managed to secure a foothold in the outer defenses after heavy fighting and 220 casualties.[19]
After the Allies began digging a new trench against the inner defenses, Dubreton launched a sortie without warning on 5 October. The attackers killed and wounded almost 150 Allies and carried off or spoiled much of their equipment. No sooner had Wellington resumed siege operations than Dubreton struck again. At 2am on the 8th, with perfect timing, the French swarmed out of the fort and inflicted 184 casualties while suffering small losses. Rain began to fall in sheets, flooding the siege trenches. The British guns on the hornwork ran so low on ammunition that French cannonballs were retrieved and reused.[19] Wellington wrote, "This is altogether the most difficult job I ever had in hand with such trifling means. God send that they may give me a little more time."[15]
A third mine was dug and on 18 October, at 4.30pm the mine was detonated under the Chapel of San Roman near the south wall.[7]:327 Assaults were mounted against the west and north walls, but support for the assaults was weak and as before, these attacks withered in the face of intense fire and 170 more casualties were added to the butcher's bill. With a French army threatening his position and with the problems arising from the shortage of artillery and ammunition, Wellington made preparations to retreat on 21 October. However, he was unable to withdraw all his siege guns. The engineers tried to demolish the captured hornwork, but their charges failed to explode.[19] British losses in the siege amounted to 550 killed, 1,550 wounded, and three guns. The French lost 304 killed and 323 wounded, plus the 60 captured.[13]
Operations

Soult raised the Siege of Cadiz on 25 August 1812 and abandoned a huge wagon train of booty in Seville on the 28th.[20] By the end of September, Soult was in contact with Suchet and Joseph.[15] On 15 October, Joseph's forces moved on Madrid with 61,000 soldiers and 84 guns. Soult's column was on the left while a second column under Jean-Baptiste Drouet, Comte d'Erlon marched to Soult's right.[21] In the north, General of Division Joseph Souham's 41,000-man Army of Portugal was swollen to 53,000 by transferring 6,500 infantry and 2,300 cavalry from the Army of the North and by 3,400 reinforcements from France.[12]
To hold off these heavy concentrations, Wellington deployed 73,000 troops. At Burgos, he had 24,000 Anglo-Portuguese and Santocildes' 11,000 Spaniards. In the south Hill occupied Toledo with 20,000 soldiers while Major General Charles Alten held Madrid with 18,000. Angry that Wellington had been offered the supreme command in Spain, General Francisco Ballesteros refused to obey the British general's orders to obstruct Soult's move. High hopes had been placed on 8,000 Anglo-Sicilians[15] under Lieutenant General Thomas Maitland at Alicante on the east coast. Maitland remained completely inert during this crisis. Wellington was 150 miles (241 km) north of Madrid at Burgos, dangerously separated from Hill's army. To make matters worse, the Tagus was not a serious military obstacle because of unexpectedly low water.[21] When Wellington realized how badly he was outnumbered by Souham, he felt lucky to get away intact. He later wrote, "I had no reason to believe the enemy were so strong till I saw them. Fortunately, they did not attack me: if they had, I must have been destroyed." Even so, he was loath to undertake a long retreat.[12]
Aftermath
Wellington raised the siege of Burgos on 21 October.[13] He quietly slipped away, undetected by the French until late on 22 October. The drawn Battle of Venta del Pozo was fought on the 23rd. The bulk of the Allied army fell back behind the Pisuerga River at Torquemada that day.[22] Between 25 and 29 October, Souham and Wellington fought a series of actions along the Pisuerga and Carrión Rivers at Palencia, Villamuriel de Cerrato, and Tordesillas which are collectively called the Battle of Tordesillas. When the French seized the bridge over the Duero River at Tordesillas on the 29th, Wellington was compelled to order a retreat.[23]
On 29 October, Hill received Wellington's positive order to abandon Madrid and march to join him. After a clash with Soult's advance guard at Perales de Tajuña on the 30th, Hill broke contact and withdrew in the direction of Alba de Tormes.[24] Joseph re-entered his capital on 2 November. Anxious to destroy the British, Joseph rushed after them without bothering to leave a garrison in Madrid. The Allied retreat continued until Wellington and Hill joined forces on 8 November near Alba de Tormes.[25] On 15 November, Soult's 80,000 Frenchmen faced Wellington's 65,000 Allies on the old Salamanca battlefield. To the disappointment of many French soldiers and generals, Soult declined to attack. Wellington began retiring west that afternoon.[26]
Logistical arrangements in Wellington's army collapsed and the Allied soldiers marched in cold pouring rain for four days with very little food.[27] Soult only sent his cavalry after the Allies. Even so, the French horsemen scooped up hundreds of stragglers. On 16 November, 600 Allied soldiers were captured by the French. The number of prisoners was even higher on the 17th and included Wellington's second-in-command, General Edward Paget. Before reaching the friendly fortress of Ciudad Rodrigo, the Allied armies lost 5,000 men missing, mostly soldiers who had died from hunger or exposure in the chaotic retreat.[28] It appeared that all of Wellington's efforts in 1812 had been for nothing. Yet, his Anglo-Portuguese army had gained a moral ascendancy over the French that it would never relinquish.[29]
References
Notes
- 1 2 McNab, Chris (2005). The World's Worst Military Disasters. Amber. p. 194. ISBN 1904687385.
- ↑ Gates, David (2002). The Spanish Ulcer: A History of the Peninsular War. London: Pimlico. p. 359. ISBN 0-7126-9730-6.
- ↑ Glover, Michael (2001). The Peninsular War 1807-1814. London: Penguin. pp. 206–207. ISBN 0-14-139041-7.
- 1 2 3 Gates (2002), p. 360-361
- ↑ Smith, Digby (1998). The Napoleonic Wars Data Book. London: Greenhill. p. 385. ISBN 1-85367-276-9.
- ↑ Gates (2002), p. 361
- 1 2 3 4 5 6 Porter, Maj Gen Whitworth (1889). History of the Corps of Royal Engineers Vol I. Chatham: The Institution of Royal Engineers.
- ↑ Smith (1998), p. 386
- 1 2 Glover (2001), p. 209
- ↑ Gates (2002), pp. 365-366
- ↑ Glover (2001), p. 212
- 1 2 3 Glover (2001), p. 213
- 1 2 3 4 5 6 7 Smith (1998), p. 397
- ↑ Chandler David G. (1979). Dictionary of the Napoleonic Wars. New York, NY: Macmillan. p. 72. ISBN 0-02-523670-9.
- 1 2 3 4 5 Glover (2001), p. 210
- ↑ Gates (2002), p. 366
- ↑ Oman, Charles (1993). Wellington's Army, 1809-1814. London: Greenhill. p. 286. ISBN 0-947898-41-7.
- 1 2 3 4 Gates (2002), pp. 366-369
- 1 2 3 Gates (2002), p. 370
- ↑ Smith (1998), p. 389
- 1 2 Glover (2001), p. 211
- ↑ Glover (2001), p. 214
- ↑ Gates (2002), pp. 372-373
- ↑ Gates (2002), pp. 373-374
- ↑ Glover (2001), p. 217
- ↑ Glover (2001), p. 218
- ↑ Glover (2001), p. 219
- ↑ Gates (2002), pp. 374-375
- ↑ Glover (2001), p. 222
Bibliography
- Chandler David G. (1979). Dictionary of the Napoleonic Wars. New York, NY: Macmillan. ISBN 0-02-523670-9.
- Gates, David (2002). The Spanish Ulcer: A History of the Peninsular War. London: Pimlico. ISBN 0-7126-9730-6.
- Glover, Michael (2001). The Peninsular War 1807-1814. London: Penguin. ISBN 0-14-139041-7.
- McNab, Chris (2005). The World's Worst Military Disasters. Amber. ISBN 1904687385.
- Oman, Charles (1993). Wellington's Army, 1809-1814. London: Greenhill. ISBN 0-947898-41-7.
- Porter, Maj Gen Whitworth (1889). History of the Corps of Royal Engineers Vol I. Chatham: The Institution of Royal Engineers.
- Smith, Digby (1998). The Napoleonic Wars Data Book. London: Greenhill. ISBN 1-85367-276-9.
Coordinates: 42°21′N 3°42′W / 42.350°N 3.700°W