Battle of Abensberg
| Battle of Abensberg | |||||||
|---|---|---|---|---|---|---|---|
| Part of the War of the Fifth Coalition | |||||||
 Napoleon addressing Bavarian troops | |||||||
| |||||||
| Belligerents | |||||||
|
|
| ||||||
| Commanders and leaders | |||||||
|
|
| ||||||
| Strength | |||||||
| 42,000[1] | 55,000[1] | ||||||
| Casualties and losses | |||||||
| 6,711, 12 guns[2] | 1,107[2] | ||||||
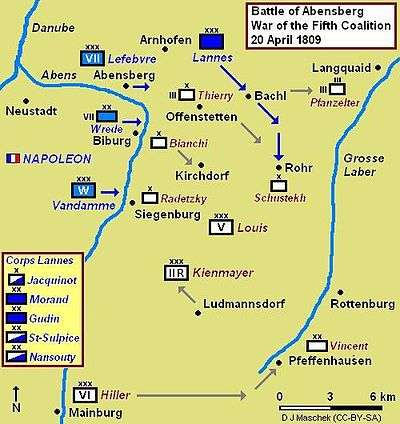
The Battle of Abensberg took place on 20 April 1809, between a Franco-German force under the command of Emperor Napoleon I of France and a reinforced Austrian corps led by Feldmarschall-Leutnant Archduke Louis of Austria. As the day wore on, Feldmarschall-Leutnant Johann von Hiller arrived with reinforcements to take command of the three corps that formed the Austrian left wing. The action ended in a complete Franco-German victory. The battlefield was southeast of Abensberg and included clashes at Offenstetten, Biburg-Siegenburg, Rohr in Niederbayern, and Rottenburg an der Laaber. On the same day, the French garrison of Regensburg capitulated.
After Marshal Louis-Nicolas Davout's hard-fought victory at Battle of Teugen-Hausen the previous day, Napoleon determined to break through the Austrian defenses behind the Abens River. The emperor assembled a provisional corps consisting of part of Davout's corps plus cavalry and gave Marshal Jean Lannes command over it. Napoleon directed his German allies from the Kingdom of Bavaria and the Kingdom of Württemberg to attack across the Abens from the west, while Lannes thrust from the north toward Rohr.
While the Austrians initially held the river line, Lannes' strike force crashed through Louis' defenses farther east. On the left, the Austrians managed to conduct a capable rear guard action, but during the day the French smashed their opponents' right flank and captured thousands of soldiers. The day ended with the Austrians barely holding onto a line behind the Große Laber River. The next day, Hiller withdrew to Landshut, separating the left wing from the main army under Generalissimo Archduke Charles, Duke of Teschen near Regensburg (Ratisbon).
The French surrender of Regensburg on 20 April allowed Charles' army a retreat route to the north bank of the Danube. The Battle of Landshut was fought on 21 April.
Background
Operations
Archduke Charles stole a march on Napoleon when his army invaded the Kingdom of Bavaria on 10 April 1809. Even though the Austrian army took six days to slowly march from the Inn River at the frontier to the Isar River, the move placed the army of France and their German allies in grave danger.[3] Napoleon's deputy commander, Marshal Louis Alexandre Berthier mismanaged the Grande Armée's concentration, leaving its units scattered across a broad front in a confused state.[4]

The central mass of Archduke Charles' 209,600-man host[5] crossed the Isar at Landshut on 16 April, but the next day Emperor Napoleon arrived at the front from Paris. Desperately trying to wrest the initiative back from the archduke, Napoleon consolidated his forces and ordered Marshal André Masséna's IV Corps and General of Division Nicolas Oudinot's II Corps on the right flank to march on Landshut to cut the Austrian line of communications. He planned for Marshal François Joseph Lefebvre's Bavarian VII Corps to hold in the center at Abensberg while Davout's left flank III Corps withdrew west to escape being trapped between Charles' main body and the Danube.[6]
On 19 April, Charles realized he had an opportunity to destroy Davout. He launched 65,000 troops in three powerful columns northwest as Davout attempted a flank march across his front. Luckily for the French, General of Cavalry Johann I Joseph, Prince of Liechtenstein's 20,000 troops found no opposition on the Austrian right.[7] In the center, General of Division Louis-Pierre Montbrun's 3,800 cavalry and infantry skilfully held off Feldmarschall-Leutnant Prince Franz Seraph of Rosenberg-Orsini's much stronger IV Armeekorps for most of the day.[8]
On the left flank, Feldmarschall-Leutnant Prince Friedrich Franz Xaver of Hohenzollern-Hechingen's III Armeekorps crashed into General of Division Louis Vincent Le Blond de Saint-Hilaire's division and a terrific fight blazed up. Both sides fed in reinforcements as the infantry battled over a pair of parallel ridges in the Battle of Teugen-Hausen. Ultimately, Davout brought superior forces to bear in the late afternoon and pushed back the Austrians a short ways. That night, Charles ordered Hohenzollern to withdraw a little to the east, closer to his main body.[9]
On the morning of 19 April, Archduke Charles requested that Hohenzollern provide a link between the III and V Armeekorps. Accordingly, the III Armeekorps commander detached General-Major Ludwig Thierry's 6,000-man infantry brigade to his left. As an additional link between Thierry and III Armeekorps, Hohenzollern detached General-Major Joseph Freiherr von Pfanzelter with a Grenz infantry battalion and two squadrons of hussars, about 1,000 men.[10] While the Battle of Teugen-Hausen raged, Thierry clashed with Bavarian troops near Arnhofen and fell back to Offenstetten.[11]
Austrian deployment
On 20 April, Archduke Charles' main body consisted of the III, IV, and I Reserve Armeekorps. These were arrayed near Dünzling and Eckmühl.[12] Feldzeugmeister Johann Kollowrat's II Armeekorps spent 19 April attacking Regensburg from north of the Danube. While successfully defending the city, Colonel Louis Coutard's 2,000-man 65th Line Infantry Regiment ran dangerously low on small-arms ammunition.[13] General of Cavalry Count Heinrich von Bellegarde's I Armeekorps also remained north of the Danube.[14]
Archduke Louis spread out his V Armeekorps behind the Abens River, facing west.[15] Having detached Feldmarschall-Leutnant Karl Friedrich von Lindenau's division to Liechtenstein,[16] only the divisions of Feldmarschall-Leutnants Prince Heinrich XV of Reuss-Plauen and Vincenz Freiherr von Schustekh-Herve remained under Louis' command.[17] Feldmarschall-Leutnant Michael von Kienmayer's II Reserve Armeekorps, nominally 7,975-strong, waited in support at Ludmannsdorf.[15][18] Kienmayer's cuirassier brigade under General-Major Andreas von Schneller was serving with Liechtenstein[19] and four dragoon squadrons were attached to Thierry's brigade. On the evening of the 19th, the bulk of Hiller's VI Armeekorps reached Mainburg to the south.[15] Like V and II Reserve Armeekorps, the VI suffered from detachments. At the beginning of the war, Charles sent the division of Feldmarschall-Leutnant Franz Jellacic to hold Munich, the Bavarian capital, where it remained.[20] Hiller also posted General-Major Armand von Nordmann with a small force at Moosburg an der Isar to watch his south flank.[12] The official returns of Hiller's three corps totalled 75,880 troops,[18] but after detachments, the left wing numbered only 42,000.[1]
French deployment
When Lannes arrived at the front, Napoleon immediately placed him in command of a provisional corps. This ad hoc formation consisted largely of III Corps units that escaped Archduke Charles' trap the day before, namely General of Division Charles Antoine Morand's 1st Division, General of Division Charles-Étienne Gudin de La Sablonnière's 3rd Division, General of Division Raymond-Gaspard de Bonardi de Saint-Sulpice's 2nd Heavy Cavalry Division, and General of Brigade Charles Claude Jacquinot's light cavalry brigade of Montbrun's division. Also added was General of Division Etienne Marie Antoine Champion de Nansouty's 1st Heavy Cavalry Division from the cavalry reserve.[21] One of Saint-Sulpice's brigades was detailed to guard Saal an der Donau, a defile between Lannes and Davout.[22]
On the morning of 20 April, Napoleon mistakenly assumed that the bulk of Archduke Charles' army lay in front of him. Accordingly, he gave orders for a drive southeast in the direction of Landshut. Lannes' mission was to turn the Austrian right flank by pushing south toward Rohr. General of Division Dominique Vandamme would attack Siegenburg with his small Kingdom of Württemberg corps. Lefebvre's other VII Corps divisions, together with General of Division Joseph Laurent Demont's Reserve Division of the III Corps, would link Lannes and Vandamme. Napoleon ordered Masséna's IV Corps to capture Landshut and the Isar River crossings, cutting the Austrian line of communications.[23]
Battle
Abensberg
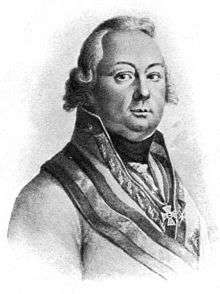
Archduke Charles sent orders to his brother Archduke Louis at 7:30 AM on 20 April. He instructed Louis to fall back to Rottenburg and defend behind the Große Laber. Charles intended Hiller to take position on Louis' left at Pfeffenhausen. Charles erred in sending the orders so late and in not informing Louis of Hohenzollern's withdrawal to the east. The latter move left the V Armeekorps' right flank exposed.[14]
Pfanzelter held Bachl on the extreme right flank. To the west of Bachl, Thierry held Offenstetten with three and one-third battalions. His other two and two-thirds battalions had become separated the previous day and joined General-Major Frederick Bianchi, Duke of Casalanza who had six battalions near Biburg. Louis posted Schustekh with four squadrons of hussars and one and one-third battalions at Rohr.[24] Schustekh's infantry had just rejoined V Armeekorps after marching from Mainburg with General-Major Joseph, Baron von Mesko de Felsö-Kubiny's detachment.[25]
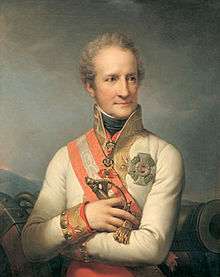
In one account, Lannes' advance guard approached Bachl in the late morning of 20 April, forcing Pfanzelter’s small detachment from the Austrian III Armeekorps eastward. The 1st Bavarian Division under Lieutenant General Crown Prince Ludwig of Bavaria and the 3rd Bavarian Division led by Lieutenant General Bernhard Erasmus von Deroy, together with Demont’s III Corps Division advanced on Offenstetten. Around 10:00 AM, they defeated Thierry’s brigade, forcing him back on Bachl as Lannes approached from the north. Thierry hastily withdrew to Rohr, which he reached at 2:00 PM.[26]
Historian James R. Arnold offers a different narrative. He writes that Pfanzelter's command was withdrawn on the III Armeekorps commander Hohenzollern's orders, leaving the north-south road through Bachl wide open. Meanwhile, Thierry's attached dragoons discovered that Abensberg and its nearby roads were alive with moving columns of enemy troops. Around 8:00 AM, Thierry fell back on Bachl and found to his dismay that French cavalry already occupied the village. Having become separated from his supporting dragoons, Thierry's men were chased into the woods by Jacquinot's horsemen. From there the Austrians hiked cross-country toward Rohr.[21]
Author Francis Loraine Petre states that Gudin encountered Pfanzelter north of Bachl and brushed him aside about 9:00 AM. The 1st Bavarian division and General-Major Hügel's Württemberg brigade drove Thierry from Offenstetten around 10:00 AM. When the Austrians reached Bachl they stumbled upon Jacquinot who attacked and they "scattered through the woods".[27] Pfanzelter marched east to Langquaid where he rejoined Hohenzollern's corps.
Because he feared that the woods to his left might contain Austrians, Lannes slowed his march so he could scout the terrain to the east. Even so, his column arrived at Rohr before Thierry's infantry. Without Pfanzelter's detachment to warn him, the arrival of Lannes' column surprised Schustekh. The Austrian commander gamely threw four squadrons of hussars at Jacquinot's advance guard. Eventually, Jacquinot got his entire brigade into action and pressed the Austrian hussars back on the supporting battalion and one-third of Grenz infantry south of Rohr. At this time, Thierry's winded infantry appeared on the scene. With the help of Gudin's 17th Light Infantry and a battery of artillery, Jacquinot's chasseurs broke Thierry's foot soldiers and hounded them into the woods again.[28]
To take the pressure off the infantry, Schustekh charged again, just as Thierry's lost dragoons showed up. At first, the attack went well, but then the Austrian horsemen came up against a mass of cuirassiers. The result was a rout of the Habsburg cavalry, who rode through the ranks of their own foot soldiers. The French chasseurs and cuirassiers rode roughshod over the troops of Thierry and Mesko, cutting down the fugitives. Over 3,000 Austrians became prisoners, including Thierry, and four cannon were lost.[29]
The previous evening, Hiller's VI Armeekorps bivouacked at Mainburg. Though a road ran directly from Mainburg to Louis' left flank at Siegenburg, a distance of only 13 kilometers, Hiller elected to join his colleague by a roundabout march via Pfeffenhausen. Once he arrived, Hiller was authorized to take command of all three left wing corps.[30] Hiller personally arrived in Siegenburg to confer with Archduke Louis around midday. Hearing troubling reports from the right flank, he sent Feldmarschall-Leutnant Karl von Vincent toward Rottenburg with the line brigades of Generals-Major Josef Hoffmeister and Nikolaus Weissenwolf, plus four squadrons of the Rosenberg Chevauxlegers Regiment # 6.[31][32]
Archduke Louis posted Prince Reuss and General-Major Joseph Radetzky von Radetz with four battalions and 12 cavalry squadrons at Siegenburg. Bianchi held the east bank of the Abens opposite Biburg. Lieutenant-General Karl Philipp von Wrede probed at Siegenburg but his 2nd Bavarian Division was easily fended off by Radetzky and a battery of 12-pdr cannon. At this time, Louis heard that the French attacked Thierry, so he ordered Radetzky to send two battalions to the right flank and called up Kienmayer's command from Ludmannsdorf.[33]

Wrede moved north to Biburg, where he tried to get across the Abens again. At first he was not successful, but Bianchi withdrew to Kirchdorf, allowing the 2nd Bavarian Division to cross to the east bank of the stream. Meanwhile, General of Division Dominique Vandamme's Württemberg contingent (later known as the VIII Corps) replaced Wrede in front of Siegenburg. Vandamme soon realized that crossing at Siegenburg was futile, so he too marched north, crossed the river at Abensberg and moved south to Kirchdorf. Here the Bavarians and Württembergers found Bianchi with his reinforced brigade and a cavalry squadron.[34] Reuss soon arrived with Radetzky's two battalions.[35] Around 2:00 PM a sharp combat took place after which the Austrians retreated to the southeast.[36] According to one account, General of Division Jean Victor Tharreau's cavalry of the II Corps also became involved at Kirchdorf.[37]
Pressed by Wrede's 7th Bavarian Infantry Regiment, plus two of Hügel's Württemberg battalions,[35] Radetzky conducted an orderly retreat on the Siegenburg road, covered by the grenzers and Kienmayer's grenadiers under General-Major Konstantin Ghilian Karl d'Aspré. He managed to shepherd the V Armeekorps trains safely through Pfeffenhausen before the Bavarians cut him off. Wrede pursued aggressively and scooped up many prisoners but failed to capture the bridge, which the Austrians burned.[38] Even so, the Bavarians kept up the pressure, crossing the shallow Große Laber at 11:00 PM to attack. Radetzky fell back to a hill called the Hornbach where his rear guard skirmished with the Bavarians into the early morning hours.[39]
When Vincent's column neared Rottenburg, he found the road jammed with the III Armeekorps trains. A charge by the Rosenberg Chevauxlegers halted the French cuirassiers long enough for his infantry to gain solid positions on the east side of the Große Laber. Hiller arrived at Rottenburg in the late afternoon and ordered a counterattack at 7:00 PM. Vincent swung his left brigade forward and quickly overran a Bavarian unit, capturing 300 troops. Soon after, the Deutschmeister Infantry Regiment # 4 got into a vicious firefight with Bavarian and French infantry. In the twilight, the Austrians were forced back by superior numbers with 600 casualties, but they had finally stopped their enemies.[40]
Regensburg
On 20 April, the Austrian II Armeekorps continued attacking Colonel Louis Coutard's 65th Line Infantry Regiment at Regensburg. A French convoy sent to replenish the critically low ammunition supply was ambushed by Austrian cavalry at 8:00 AM.[41] The French troops finally ran out of ammunition and Coutard asked Kollowrat for a 24-hour truce after which he promised to surrender if not relieved. The Austrian commander foolishly agreed to the terms.[42]
However, Liechtenstein's column soon appeared from the south. Liechtenstein pointed out that the existing truce did not apply to him and demanded an immediate surrender. Coutard thereupon capitulated at 5:00 PM.[42] The French sappers had found it impossible to demolish the sturdily-built Regensburg bridge. The intact bridge later played a key factor in the escape of Charles' army.[43] In two days of fighting, the French lost 11 officers and about 200 soldiers killed and wounded, plus 1,988 captured. Austrian losses were 73 dead, 220 wounded, and 85 missing for a total of 378 casualties. During the struggle the French captured 75 troops and one color, all of which were recovered.[44]
When Kollowrat finally reported the II Armeekorps available for duty that evening, the headquarters ordered his troops to make an overnight march west to Hemau on the north bank of the Danube. In the morning, the tired troops were recalled to Regensburg from their pointless ramble.[45]
Aftermath
Arnold lists 1,107 Allied casualties, including 746 Bavarians. He gives Austrian losses as 492 killed, 2,219 wounded, and nearly 4,000 captured, or a total of 6,711. The French also captured eight colors and 12 cannons.[2] Digby Smith notes Allied casualties as 34 dead and 438 wounded, but this seems to count only the German allied troops. Austrian total losses are given as 6,872, including 3,000 to 4,000 captured. The 2nd battalion of the Broder Grenz (Mesko's brigade) was annihilated, with 18 officers and 1,040 rank and file counted as lost.[46] Petre lists 2,710 Austrians killed and wounded, plus about 4,000 captured. Altogether, the 42,000 troops of Hiller's three-corps left wing faced 55,000 French and their German allies. Only about 25,000 Austrians and an equal number of Allies were engaged in action.[1]

That evening, as the extent of Thierry and Schustekh's disaster became known, Hiller resolved to pull his three corps behind the Isar at Landshut. In this decision, he was also influenced by Masséna's move against his left rear and unfavorable reports from Archduke Louis. This crucial decision meant that the Austrian left wing would in the near future operate independently from Archduke Charles' main body. Hiller would only reunite with his army commander on 15 May north of Vienna.[47]
While Napoleon savaged his left wing, Archduke Charles remained amazingly inert.[48] At 6:00 AM, the archduke was with Prince Rosenberg and at 7:30 AM he sent orders to Archduke Louis and then wrote a letter to Emperor Francis I of Austria. But from 11:00 AM until 6:30 PM, the Austrian generalissimo failed to issue any orders. He either became obsessed with capturing Regensburg or he had an epileptic seizure during which he is supposed to have locked himself in his quarters.[49] The epileptic attack is probable, but there is a possibility it may be a cover story for Charles' failure to exercise command.[50] What is known is that the Austrian III, IV, and I Reserve Armeekorps did not disturb Davout's remaining three divisions under Generals of Division Louis Friant, Saint-Hilaire, and Montbrun on 20 April.[48]
Despite being outnumbered, Napoleon's 113,000 troops split the 161,000 strung-out Austrians into two forces. Charles five corps, including 48,000 additional troops of the I and II Armeekorps north of Regensburg, lay to the north while Hiller's three corps fell back to Landshut. (Massena and Oudinot's 57,000 soldiers are not counted in Napoleon's total.)[51] Both Austrian forces had to fight a second major battle each. Hiller fought the Battle of Landshut on 21 April, while Charles engaged in the Battle of Eckmühl on the 22nd.[52]
Order of battle
The following is an abbreviated order of battle. Complete orders of battle are found in the Abensberg 1809 Order of Battle.
Austrian forces
Left Wing: Feldmarschall-Leutnant Johann von Hiller
- VI Armeekorps: Feldmarschall-Leutnant Johann von Hiller (35,639)[53][54]
- Reserve Artillery: Feldmarschall-Leutnant Karl von Rouvroy (24 guns)
- Division: Feldmarschall-Leutnant Friedrich Kottulinsky
- Brigade: General-Major Otto Hohenfeld (6 battalions, 8 guns)
- Brigade: General-Major Nikolaus Weissenwolf (6 battalions, 8 guns)
- Divisional Artillery: (6 guns)
- Division: Feldmarschall-Leutnant Franz Jellacic (Jellacic detached at Munich)
- Brigade: General-Major Konstantin Ettingshausen (6 battalions, 8 guns) (Detached at Munich)
- Brigade: General-Major Karl Dollmayer von Provenchères (5 battalions, 8 squadrons, 14 guns) (Detached at Munich)[55]
- Divisional Artillery: (6 guns)
- Light Division: Feldmarschall-Leutnant Karl von Vincent
- Brigade: General-Major Josef Hoffmeister (6 battalions, 8 guns)[55]
- Brigade: General-Major Armand von Nordmann (2 battalions, 16 squadrons, 14 guns) (Detached at Moosburg)

- V Armeekorps: Feldmarschall-Leutnant Archduke Louis (32,266)[53][56]
- Reserve Artillery: Major Adam Pfefferkorn (18 guns)
- Brigade: General-Major Ludwig Thierry (6 battalions, 8 guns) (Attached from III Armeekorps)
- Division: Feldmarschall-Leutnant Karl Friedrich von Lindenau (Detached to I Reserve Armeekorps)
- Brigade: General-Major Anton Mayer von Heldensfeld (6 battalions, 8 guns)
- Brigade: General-Major Ignaz Buol von Berenburg (6 battalions, 8 guns)
- Divisional Artillery: (6 guns)
- Division: Feldmarschall-Leutnant Prince Heinrich XV of Reuss-Plauen
- Brigade: General-Major Frederick Bianchi, Duke of Casalanza (6 battalions, 8 guns)
- Brigade: General-Major Franz Johann Schulz von Rothacker (6 battalions)
- Divisional Artillery: (6 guns)
- Light Division: Feldmarschall-Leutnant Emmanuel von Schustekh-Herve
- Brigade: General-Major Joseph, Baron von Mesko de Felsö-Kubiny (2 battalions, 8 squadrons, 8 guns)
- Brigade: General-Major Joseph Radetzky von Radetz (2 battalions, 8 squadrons, 6 guns)
- II Reserve Armeekorps: Feldmarschall-Leutnant Michael von Kienmayer (7,975)[53][57]
- Brigade: General-Major Konstantin Ghilian Karl d'Aspré (5 grenadier battalions, 8 guns)
- Brigade: General-Major Andreas von Schneller (12 squadrons, 6 guns) (Detached to I Reserve Armeekorps)
- Brigade: General-Major Josef von Clary (12 squadrons, 6 guns) (4 squadrons attached to Thierry)
French-Allied forces
Grande Armée: Napoleon I of France

- Provisional Corps: Marshal Jean Lannes[58]
- Cavalry Brigade: General of Brigade Charles Claude Jacquinot (9 squadrons) (Attached from Montbrun)
- 1st Division: General of Division Charles Antoine Morand (11,065) (Attached from III Corps)
- Brigade: General of Brigade Nicolas Bernard Guiot de Lacour (9 battalions)
- Brigade: General of Brigade François l'Huillier de Hoff
- 61st Line Infantry Regiment (3 battalions)
- 65th Line Infantry Regiment (3 battalions) (Regiment detached at Regensburg)
- Divisional Artillery: (12 guns)
- 3rd Division: General of Division Charles-Étienne Gudin de La Sablonnière (11,440) (Attached from III Corps)
- Brigade: General of Brigade Claude Petit (3 battalions)
- Brigade: General of Brigade Pierre Boyer (6 battalions)
- Brigade: General of Brigade Jean Duppelin (6 battalions)
- Divisional Artillery: (12 guns)
- 1st Heavy Cavalry Division: General of Division Étienne Marie Antoine Champion de Nansouty (5,337) (Attached from Reserve)
- Brigade: General of Brigade Jean-Marie Defrance (8 squadrons)
- Brigade: General of Brigade Jean-Pierre Doumerc (8 squadrons)
- Brigade: General of Brigade Antoine Louis Decrest de Saint-Germain (8 squadrons)
- Divisional Artillery: (12 guns)
- 2nd Heavy Cavalry Division: General of Division Raymond-Gaspard de Bonardi de Saint-Sulpice (3,411) (Attached from III Corps)
- Brigade: General of Brigade François Marie Clément de la Roncière (8 squadrons) (One brigade guarding Saal)[59]
- Brigade: General of Brigade Marie Adrien François Guiton (8 squadrons)
- Divisional Artillery: (6 guns)

- VII (Bavarian) Corps: Marshal François Joseph Lefebvre[60]
- Artillery Reserve: Colonel Calonge (18 guns)
- 1st Bavarian Division: Lieutenant-General Crown Prince Ludwig of Bavaria
- Brigade: General-Major Rechberg (5 battalions)
- Brigade: General-Major Stengel (4 battalions)
- Cavalry Brigade: General-Major Zandt (6 squadrons)
- Divisional Artillery: (18 guns)
- 2nd Bavarian Division: Lieutenant-General Karl Philipp von Wrede
- Brigade: General-Major Minuzzi (5 battalions)
- Brigade: General-Major Beckers (4 battalions)
- Cavalry Brigade: General-Major Preysing (8 squadrons)
- Divisional Artillery: (18 guns)
- 3rd Bavarian Division: Lieutenant-General Bernhard Erasmus von Deroy (Not engaged)
- Brigade: General-Major Siebein (5 battalions)
- Brigade: General-Major Vincenti (5 battalions)
- Cavalry Brigade: General-Major Seydewitz (8 squadrons)
- Divisional Artillery: (18 guns)
.jpg)
- Württemberg (later VIII) Corps: General of Division Dominique Vandamme[61]
- Reserve Artillery: Colonel Schnadow (22 guns)
- Württemberg Division: Lieutenant General Neubronn
- Brigade: General-Major Franquemont (5 battalions)
- Brigade: General-Major Scharfenstein (5 battalions)
- Light Brigade: General-Major Hügel (3 battalions)
- Württemberg Cavalry Division: Lieutenant General Wöllwarth
- Brigade: General-Major Roeder (8 squadrons)
- Brigade: General-Major Stettner (8 squadrons)
See also
- Battle of Teugen-Hausen, 19 April 1809
- Battle of Landshut, 21 April 1809
- Battle of Eckmühl, 21–22 April 1809
- Battle of Ratisbon, 23 April 1809
- Battle of Neumarkt-Sankt Veit, 24 April 1809
Notes
- 1 2 3 4 Petre, p 139
- 1 2 3 Arnold, p 120
- ↑ Chandler Campaigns, p 677
- ↑ Chandler Campaigns, p 678-679
- ↑ Bowden & Tarbox, p 73
- ↑ Chandler Campaigns, pp 682-683
- ↑ Arnold, pp 83-84
- ↑ Arnold, p 90
- ↑ Arnold, pp 85-93
- ↑ Arnold, p 84
- ↑ Smith, p 289
- 1 2 Arnold, p 105 map
- ↑ Arnold, p 101
- 1 2 Arnold p 104
- 1 2 3 Arnold, p 107
- ↑ Arnold, p 74 map
- ↑ Bowden & Tarbox, p 69-70
- 1 2 Arnold, p 235
- ↑ Arnold, p 175
- ↑ Arnold, p 78
- 1 2 Arnold, p 110
- ↑ Petre, p 133n
- ↑ Arnold, pp 104-105
- ↑ Petre, p 134
- ↑ Petre, p 136
- ↑ Castle, p 41
- ↑ Petre, pp 134-135
- ↑ Arnold, pp 110-111
- ↑ Arnold, pp 111-112
- ↑ Arnold, p 108
- ↑ Arnold, p 112
- ↑ Petre, p 137. Petre names the two line infantry brigade commanders.
- ↑ Arnold, pp 107-108
- ↑ Arnold, pp 114-115
- 1 2 Petre, p 138
- ↑ Arnold, p 115
- ↑ Castle, p 46
- ↑ Arnold, p 116
- ↑ Arnold, p 137
- ↑ Arnold, pp 113-114
- ↑ Arnold, pp 119-120
- 1 2 Arnold, p 119
- ↑ Arnold, p 100
- ↑ Smith, pp 288-289
- ↑ Arnold, p 125
- ↑ Smith, p 290. Smith gives killed, wounded, captured, and missing, but the numbers only add up to 5,824 so they are not listed.
- ↑ Arnold, pp 116-117
- 1 2 Arnold, p 118
- ↑ Petre, pp 143-144
- ↑ Arnold, p 213
- ↑ Chandler Campaigns, p 685 map
- ↑ Smith, pp 290-291
- 1 2 3 Arnold, p 235. Strength only.
- ↑ Bowden & Tarbox, pp 70-71. Order of battle.
- 1 2 Arnold, p 260. Hoffmeister's brigade belonged to Jellacic, but it was exchanged for Dollmayer von Provenchères' brigade of the Light Division at the beginning of the conflict.
- ↑ Bowden & Tarbox, pp 69-70
- ↑ Bowden & Tarbox, p 72. Order of battle.
- ↑ Bowden & Tarbox, pp 57-59
- ↑ Petre, p 133. It is not known which brigade was detached.
- ↑ Bowden & Tarbox, pp 61-62
- ↑ Bowden & Tarbox, p 62
References
- Arnold, James. Crisis on the Danube: Napoleon’s Austrian Campaign of 1809. London: Arms and Armour, 1990. (New York: Paragon House, 1990) ISBN 1-55778-137-0
- Bowden, Scott and Tarbox, Charles (1989). Armies On The Danube 1809. The Emperor's Press. ISBN 0-913037-08-7.
- Castle, Ian. Eggmühl 1809: Storm over Bavaria. Oxford: Osprey, 1998.
- Chandler, David. Dictionary of the Napoleonic Wars. New York: Macmillan, 1979. ISBN 0-02-523670-9
- Chandler, David G. The Campaigns of Napoleon. New York: Macmillan, 1966.
- Eggenberger, David. An Encyclopedia of Battles: Accounts of Over 1,560 Battles from 1479 B.C. to the Present. New York: Dover Publications, 1985. ISBN 0-486-24913-1
- Epstein, Robert M. Napoleon's Last Victory and the Emergence of Modern War. Lawrence, Kansas: University Press of Kansas, 1994.
- Petre, F. Loraine. Napoleon and the Archduke Charles. New York: Hippocrene Books, (1909) 1976.
- Smith, Digby. The Napoleonic Wars Data Book. London: Greenhill, 1998. ISBN 1-85367-276-9
External links
- The following two websites are excellent sources for the full names of French and Austrian generals.
- French Wikipedia, Liste des généraux de la Révolution et du Premier Empire
- napoleon-series.org Austrian Generals: 1792-1815 by Digby Smith, compiled by Leopold Kudrna
Coordinates: 48°48′N 11°51′E / 48.800°N 11.850°E