Battle of Cape Ortegal
| Battle of Cape Ortegal | |||||||
|---|---|---|---|---|---|---|---|
| Part of the Napoleonic Wars | |||||||
 Bringing Home the Prizes - aftermath of the battle by Francis Sartorius | |||||||
| |||||||
| Belligerents | |||||||
|
|
| ||||||
| Commanders and leaders | |||||||
|
|
| ||||||
| Strength | |||||||
|
4 ships of the line, 4 frigates | 4 ships of the line | ||||||
| Casualties and losses | |||||||
|
24 killed, 111 wounded[1][2] |
730 killed or wounded, 4 ships captured[1][2] | ||||||
The Battle of Cape Ortegal was the final action of the Trafalgar Campaign, and was fought between a squadron of the Royal Navy and a remnant of the fleet that had been destroyed earlier at the Battle of Trafalgar. It took place on 4 November 1805 off Cape Ortegal, in north-west Spain and saw Captain Sir Richard Strachan defeat and capture a French squadron under Rear-Admiral Pierre Dumanoir le Pelley. It is sometimes known as Strachan's Action.
Dumanoir had commanded the van of the line at Trafalgar, and had managed to escape the battle having suffered relatively little damage. He initially attempted to continue the fleet's mission and enter the Mediterranean, but fearful of encountering strong British forces, changed his mind and headed north to skirt round Spain and reach the French Atlantic ports. On his journey he encountered two British frigates but drove them off, but shortly afterwards came across a single British frigate and chased it. The frigate led Dumanoir within range of a British squadron under Strachan, who was patrolling the area in search of a different French squadron. Strachan immediately gave chase, while Dumanoir fled from the superior force he had been lured towards. Strachan's squadron took time to form up, but he was able to use the frigates attached to it to harass and slow the French, until his larger ships of the line could catch up.
There then followed several hours of fierce fighting, before Strachan was able to outmanoeuvre his opponent and double his line with frigates and ships of the line. The French ships were then overwhelmed and forced to surrender. All four ships were taken back to Britain as prizes and commissioned into the Navy. Strachan and his men were handsomely rewarded by a public who viewed the successful outcome as completing Nelson's victory at Trafalgar.
Prelude
Dumanoir escapes
Four French ships of the line stationed towards the head of the combined fleet's line escaped the Battle of Trafalgar under Rear-Admiral Pierre Dumanoir le Pelley, and sailed southwards. Pelley's initial intention was to carry out Villeneuve's original orders, and make for Toulon.[3] The day after the battle he changed his mind, remembering that a substantial British squadron under Rear-Admiral Thomas Louis was patrolling the straits. With a storm gathering in strength off the Spanish coast, Pelley sailed westwards to clear Cape St Vincent, prior to heading north-west, and then swinging eastwards across the Bay of Biscay, aiming to reach the French port at Rochefort.[3] His squadron represented a still-considerable force, having suffered only slight damage at Trafalgar.[a] In escaping from Trafalgar Dumanoir's flagship, Formidable had jettisoned twelve 12-pounder guns from her quarterdeck in order to lighten her load and effect her escape.[3] Dumanoir doubled Cape St Vincent on 29 October and made for Île-d'Aix, entering the Bay of Biscay on 2 November.[3]
Baker sights the French
There were a number of British ships and squadrons already in the bay, and on the look out for French ships. Zacharie Allemand, commander of the Rochefort squadron, had sailed from the port in July 1805, and was currently cruising in the Atlantic, raiding British shipping.[4] One of the British ships sent out on patrol was the 36-gun HMS Phoenix, under the command of Captain Thomas Baker. Baker had orders to patrol west of the Scilly Isles, but in late October he received news from several neutral merchants that Allemand's squadron had been sighted in the Bay of Biscay.[4] Baker immediately left his station and sailed southwards, reaching the latitude of Cape Finisterre on 2 November, just as Dumanoir was entering the bay.[4] Baker sighted four ships steering north-north-west at 11 o'clock, and immediately gave chase. The ships, which Baker presumed to be part of the Rochefort squadron, but were actually Dumanoir's ships, bore up at noon and began to chase Phoenix, which fled south.[4] In doing so Baker hoped to lure the French onto a British squadron under Captain Sir Richard Strachan that he knew to be in the area.[3][4][c]
Baker kept ahead of the pursuing French, and at 3 o'clock that afternoon he sighted four sails heading south.[5] Dumanoir's forces also saw them, and stood to the east, while Baker, no longer pursued, kept the French sails under observation.[5] Having ascertained the strength and disposition of the French ships, Baker resumed sailing to the south-east, firing guns and signalling to the four ships he had seen and supposed to be British. Dumanoir's forces had already had a run-in with the British, having been chased by two frigates, the 38-gun HMS Boadicea under Captain John Maitland, and the 36-gun HMS Dryad under Captain Adam Drummond.[5] Boadicea and Dryad sighted Phoenix and the four sails to the south at 8.45 that evening, and made signals to them. Baker was suspicious of the new sails, standing between him and the French ships, and so did not stand towards them, instead continuing on to the sails in the south.[5] By now it was clear on Boadicea and Dryad that a substantial force was gathering, as Phoenix closed with four ships of the line, and three other sails were also sighted in the vicinity.[5] They eventually drew to within two miles of the weather-most ship, the 80-gun HMS Caesar, but received no reply to their signals, and drew away at 10.30pm, where after they lost sight of both the French and British ships, and took no further part in the battle.[5]
Strachan gives chase
By 11pm Baker had finally reached the ships, and passing under the stern of Caesar received confirmation that the ships were Strachan's squadron, as he had initially surmised.[5] Baker informed Strachan that he had sighted a part of the Rochefort squadron to leeward, and Strachan immediately determined to seek an engagement.[6] Strachan's squadron was however badly scattered by this stage, and after setting sail to intercept the French, sent Baker to round up the remaining ships and order them on to support him.[3][6] Strachan's squadron consisted at this time of the 80-gun Caesar, the 74-gun Hero, Courageux, Namur and Bellona, and the frigates the 36-gun Santa Margarita and 32-gun Aeolus.[5] Strachan began the chase with only Caesar, Hero, Courageux and Aeolus, and chased the French, who were by now pressing on sail for the north west, until losing them in hazy weather at 1.30 in the morning.[6] They then shortened sail to await the rest of the squadron, and were joined at daylight on 3 November by Santa Margarita.[6] The chase began again in earnest, and at 7.30 am Cape Ortegal was sighted, 36 miles to the southeast.[6] The French ships were again sighted at 9am, and at 11am the lead British ships sighted Namur and Phoenix astern, and hurrying to catch up. With them was another frigate, the 38-gun HMS Révolutionnaire, under Captain Hon. Henry Hotham, who had stumbled across the chase.[6] The chase continued throughout the day and into the night, by which time the faster Santa Margarita and Phoenix were well ahead of the main British force. The Bellona had been unable to rejoin the squadron, and took no part in the battle.[6]
Action

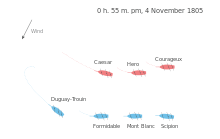
The battle began at 5.45 on the morning of 4 November, when Santa Margarita closed on the stern of the rear-most French ship, Scipion, and opened fire, being joined by Phoenix at 9.30.[7][8] At this stage the French were sailing roughly in line abreast, with Phoenix and Santa Margarita snapping at Scipion's heels.[7] Strachan was about six miles behind the French with Caesar, Hero and Courageux, accompanied by Aeolus, while Namur and Révolutionnaire were some way astern of them.[7] The British continued to overhaul the French, while Scipion exchanged fire with the harassing frigates from her stern-chasers. At 11.45 with an action now unavoidable Dumanoir ordered his ships to form line ahead on the starboard tack, as Strachan likewise lined his ships up and approached from windward on the French ships' starboard side.[7]

By noon all four British frigates were in action, harassing Scipion on the portside, while Namur had nearly joined the ships of the line, who were firing on the rear-most French ships' starboard side.[7] Dumanoir had ordered his ships to tack in succession in 11.30, and so bring his leading ship, Duguay-Trouin into the action to support his centre. The Duguay-Trouin made no move to obey the signal until 12.15, and the French line began to turn towards the British ships of the line, and to pass down alongside them. Dumanoir had planned to carry out this manoeuvre at 8 that morning, but had cancelled it before it could be carried out.[9] The two lines passed alongside each other, with Dumanoir finding that Strachan had doubled his line, with frigates on one side and ships of the line on the other.[9] His ships suffered heavy damage as the two British lines and the French one passed by on opposite tacks, with Dumanoir aiming to isolate Namur before she could join the British line.[9]

The damage his ships had sustained rendered them slow and unmanoeuvrable, and Strachan was able to order his ships to tack themselves, to keep them alongside the French, while adding Namur to his line.[9] Under heavy fire from the frigates on the starboard side and the ships of the line on their port, the French ships were worn down and by 3.10 Scipion and Formidable had been forced to strike their colours.[10] Seeing their fate Mont Blanc and Duguay-Trouin attempted to escape but were chased down by Hero and Caesar and battered into submission by 3.35.[9][10]
Aftermath
Strachan's triumph completed the rout of the French that Nelson had begun at Trafalgar. With the four ships taken at Cape Ortegal only five ships remained of the French portion of the combined fleet, and they were bottled up at Cadiz.[11] All four captured ships were taken back to Britain and commissioned into the Royal Navy, with their crew transferred to prison camps.[12] One of the ships, the former Duguay-Trouin served with the British for the next 144 years under the name HMS Implacable.[13] The British crews who had fought at Cape Ortegal were included in the large scale rewards made for the victory at Trafalgar.[13] Captain Sir Richard Strachan was promoted to rear-admiral of the blue, while all first-lieutenants were advanced to commander.[14] In addition Strachan was admitted to the Order of the Bath and his captains received gold medals.[15]
Dumanoir was less fortunate than his opponent. He and other French officers were quartered at Tiverton, where they were given considerable freedom, only required to be within the turnpike gates by 8pm in summer and 4pm in winter.[16] While there he wrote to The Times to protest against unflattering comments made about his conduct at Trafalgar.[16] He was released from captivity in 1809 and returned to France, where he faced not one but two courts of enquiry, one for his conduct at Trafalgar, and another for his defeat at Cape Ortegal.[17] In the first he was accused of disobeying Villeneuve's instructions, not doing enough to support his admiral, and then fleeing the battle instead of fighting on. After the examination of various pieces of evidence, Dumanoir was acquitted of all charges.[17] At the second court of enquiry Dumanoir was convicted of having failed to engage Strachan's squadron while it was still disorganised on the morning of 4 November, of having allowed the British frigates to harass his rear without trying to engage them, and for only turning to engage Strachan as his rear was being overwhelmed.[18] The court concluded that he had been too indecisive.[18] The verdict was passed to the Minister of Marine, Denis Decrès, in January 1810 but Decrès hesitated to order a court-martial. Napoleon wanted Dumanoir to be made an example of, but Decrès attempted to shield Dumanoir, and when he finally convened a court-martial at Napoleon's insistence, its orders were vague and it eventually acquitted Dumanoir and the surviving captains.[19]
Order of battle
| Captain Strachan's squadron | ||||||||||
|---|---|---|---|---|---|---|---|---|---|---|
| Ship | Rate | Guns | Navy | Commander | Casualties | Notes | ||||
| Killed | Wounded | Total | ||||||||
| HMS Caesar | Third rate | 80 | |
Captain Sir Richard Strachan | 4 | 25 | 29 | |||
| HMS Hero | Third rate | 74 | |
Captain Hon. Alan Hyde Gardner | 10 | 51 | 61 | |||
| HMS Courageux | Third rate | 74 | |
Captain Richard Lee | 1 | 13 | 14 | |||
| HMS Namur | Third rate | 74 | |
Captain Lawrence Halsted | 4 | 8 | 12 | |||
| HMS Santa Margarita | Fifth rate | 36 | |
Captain Wilson Rathbone | 1 | 1 | 2 | |||
| HMS Aeolus | Fifth rate | 32 | |
Captain Lord William FitzRoy | 0 | 3 | 3 | |||
| HMS Phoenix | Fifth rate | 36 | |
Captain Thomas Baker | 2 | 4 | 6 | |||
| HMS Révolutionnaire | Fifth rate | 38 | |
Captain Hon. Henry Hotham | 2 | 6 | 8 | |||
| Casualties: 24 Killed, 111 Wounded, 135 Total | ||||||||||
| Rear-Admiral Dumanoir le Pelley's Squadron | ||||||||||
|---|---|---|---|---|---|---|---|---|---|---|
| Ship | Rate | Guns | Navy | Commander | Casualties | Notes | ||||
| Killed | Wounded | Total | ||||||||
| Formidable | Third rate | 80[b] | |
Rear-Admiral Pierre Dumanoir le Pelley | - | - | c. 200 | Captured, commissioned as HMS Brave | ||
| Scipion | Third rate | 74 | |
Captain Charles Berrenger | - | - | c. 200 | Captured, commissioned as HMS Scipion | ||
| Duguay-Trouin | Third rate | 74 | |
Captain Claude Touffet † | - | - | c. 150 | Captured, commissioned as HMS Implacable | ||
| Mont Blanc | Third rate | 74 | |
Captain Guillaume-Jean-Noël de Lavillegris | - | - | c. 180 | Captured, commissioned as HMS Mont Blanc | ||
| Casualties: 730 killed and wounded | ||||||||||
| Sources: Adkin, p. 535; Fremont-Barnes, p. 86 | ||||||||||
Key
- † Officer killed during the action or subsequently died of wounds received.
Notes
a. ^ Formidable is recorded as shipping water, and having three guns dismounted, while Duguay-Trouin suffered one man killed and three wounded. The damage was probably inflicted by one or both of HMS Minotaur and HMS Spartiate.[20]
b. ^ Nominal armament, by the time of the battle she probably only mounted 65 guns, having had three guns dismounted at Trafalgar, and having jettisoned twelve during her escape.[3][20]
c. ^ Strachan was serving in the post of commodore at the time, but held the rank of captain, and is referred to as 'Captain Strachan' in the sources.[5]
Citations
- 1 2 Adkin. The Trafalgar Companion. p. 535.
- 1 2 Fremont-Barnes. The Royal Navy: 1793-1815. p. 86.
- 1 2 3 4 5 6 7 Adkin. The Trafalgar Companion. p. 530.
- 1 2 3 4 5 James. The Naval History of Great Britain. p. 2.
- 1 2 3 4 5 6 7 8 9 James. The Naval History of Great Britain. p. 3.
- 1 2 3 4 5 6 7 James. The Naval History of Great Britain. p. 4.
- 1 2 3 4 5 Adkin. The Trafalgar Companion. p. 531.
- ↑ James. The Naval History of Great Britain. p. 5.
- 1 2 3 4 5 Adkin. The Trafalgar Companion. p. 532.
- 1 2 James. The Naval History of Great Britain. p. 8.
- ↑ James. The Naval History of Great Britain. p. 9.
- ↑ Adkin. The Trafalgar Companion. p. 533.
- 1 2 Adkin. The Trafalgar Companion. p. 534.
- ↑ Adkin. The Trafalgar Companion. p. 537.
- ↑ Cust. Annals of the wars of the nineteenth century. p. 265.
- 1 2 Adkin. The Trafalgar Companion. p. 540.
- 1 2 Adkin. The Trafalgar Companion. p. 518.
- 1 2 Adkin. The Trafalgar Companion. p. 542.
- ↑ Adkin. The Trafalgar Companion. p. 543.
- 1 2 James. The Naval History of Great Britain. p. 1.
References
- Adkin, Mark (2007). The Trafalgar Companion: A Guide to History's Most Famous Sea Battle and the Life of Admiral Lord Nelson. London: Aurum Press. ISBN 1-84513-018-9.
- Cust, Edward (1862). Annals of the Wars of the Nineteenth Century. 1. John Murray.
- Fremont-Barnes, Gregory (2007). The Royal Navy: 1793-1815. Oxford: Osprey Publishing. ISBN 978-1-84603-138-0.
- James, William (1859). The Naval History of Great Britain, from 1793, to 1820, with an account of the origin and increase of the British navy. 4. London: Richard Bentley.
Coordinates: 43°46′20″N 7°52′05″W / 43.7722°N 7.8681°W