Western Desert Campaign
| ||||||||||||||||||||||
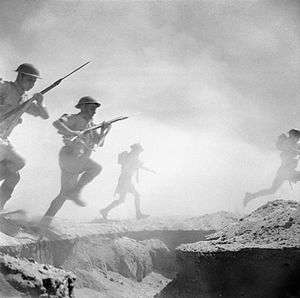
The Western Desert Campaign or the Desert War, took place in the Western Desert of Egypt and Libya and was a theatre in the North African Campaign during the Second World War. The campaign began in September 1940, with the Italian invasion of Egypt. The Italians halted to bring up supplies and Operation Compass, a British five-day raid in December 1940, led to the destruction of the Italian 10th Army. Benito Mussolini sought help from Adolf Hitler and a small German blocking detachment (Sperrverband) was sent to Tripoli under Directive 22 (11 January), being the first units of the Afrika Korps (Generalleutnant Erwin Rommel), under nominal Italian command but Italian dependency on Nazi Germany made it the dominant partner.
In the spring of 1941 Axis forces under Rommel pushed the British back and reached Tobruk which was subjected to the Siege of Tobruk until it was relieved during Operation Crusader. The Axis forces were forced to retire to where they had started by the end of the year. In 1942 Axis forces drove the British back and captured Tobruk at the end of the Battle of Gazala but failed to gain a decisive victory. On the final Axis push to Egypt the British retreated to El Alamein, where at the Second Battle of El Alamein the Eighth Army defeated the Axis forces, which never recovered and were driven out of Libya to Tunisia, where they were defeated in the Tunisia Campaign. After the British defeats in the Balkan Campaign, the Western Desert Campaign had become more important to British strategy. For Hitler the Eastern Front against the Soviet Union, dwarfed the desert war, which was a holding action of secondary importance. The Axis never had sufficient resources or the means to deliver them to defeat the British, who in their turn missed several opportunities to finish the campaign, by diverting resources to Greece and the Levant in 1941 and the Far East in 1942.
Background
Libya
Cyrenaica (Libya) had been an Italian colony since the Italo-Turkish War (1911–1912). With Tunisia, a part of French North Africa to the west and Egypt to the east, the Italians prepared to defend both frontiers through a North Africa Supreme Headquarters, under the command of the Governor-General of Italian Libya, Marshal of the Air Force, Italo Balbo. Supreme Headquarters had the 5th Army (General Italo Gariboldi) and the 10th Army (General Mario Berti) which in mid-1940 had nine metropolitan divisions of about 13,000 men each, three Blackshirt and two Libyan divisions with 8,000 men each. Italian army divisions had been reorganised in the late 1930s, from three regiments each to two and reservists were recalled in 1939, along with the usual call-up of conscripts.[1]
Morale was considered to be high and the army had recent experience of military operations. The Italian navy had prospered under the Fascist regime, which had paid for fast, well-built and well-armed ships and a large submarine fleet but the navy lacked experience and training. The air force had been ready for war in 1936 but had stagnated by 1939 and was not considered by the British to be capable of maintaining a high rate of operations. The 5th Army with eight divisions was based in Tripolitania, the western half of Libya opposite Tunisia and the 10th Army with six infantry divisions, held Cyrenaica in the east. When war was declared, the 10th Army deployed the 1st Libyan Division Sibelle on the frontier from Giarabub to Sidi Omar and XXI Corps from Sidi Omar to the coast, Bardia and Tobruk. The XXII Corps moved south-west of Tobruk, to act as a counter-attack force.[2]
Egypt
The British had based forces in Egypt since 1882 but these were greatly reduced by the terms of the Anglo-Egyptian Treaty of 1936. The small British and Commonwealth force garrisoned the Suez Canal and the Red Sea route. The canal was vital to British communications with its Far Eastern and Indian Ocean territories. In mid-1939, Lieutenant-General Archibald Wavell was appointed General Officer Commanding-in-Chief (GOC-in-C) of the new Middle East Command, over the Mediterranean and Middle East theatres. Until the Franco-Axis armistice, the French divisions in Tunisia faced the Italian 5th Army on the western Libyan border. In Libya, the Royal Army had about 215,000 men and in Egypt, the British had about 36,000 troops, with another 27,500 men training in Palestine.[3]

British forces included the Mobile Division (Egypt) (Major-General Percy Hobart), one of only two British armoured training formations, which in mid-1939 was renamed Armoured Division (Egypt) (on 16 February 1940, it became the 7th Armoured Division). The Egypt–Libya border was defended by the Egyptian Fronter Force and in June 1940, the headquarters of the 6th Infantry Division (Major-General Richard O'Connor) took over command in the Western Desert, with instructions to drive back the Italians from their frontier posts and dominate the hinterland if war began. The 7th Armoured Division less the 7th Armoured Brigade, assembled at Mersa Matruh and sent the 7th Support Group forward towards the frontier as a covering force, where the RAF also moved most of its bombers; Malta was also reinforced.[4]
The HQ of the 6th Infantry Division, which lacked complete and fully trained units, was renamed the Western Desert Force on 17 June. In Tunisia, the French had eight divisions, capable only of limited operations and in Syria were three poorly armed and trained divisions, about 40,000 troops and border guards, on occupation duties against the civilian population. Italian land and air forces in Libya, greatly outnumbered the British in Egypt but suffered from poor morale and were handicapped by some inferior equipment. In Italian East Africa were another 130,000 Italian and African troops with 400 guns, 200 light tanks and 20,000 lorries; Italy declared war from 11 June 1940.[5]
Prelude
Terrain

The war was fought primarily in the Western Desert, which was about 240 miles (390 km) wide, from Mersa Matruh in Egypt to Gazala on the Libyan coast, along Litoranea Balbo (Via Balbia), the only paved road. The Sand Sea 150 miles (240 km) inland marked, the southern limit of the desert at its widest points at Giarabub and Siwa; in British parlance, Western Desert came to include eastern Cyrenaica in Libya. From the coast, extending inland lies a raised, flat plain of stony desert about 150 metres (500 ft) above sea level, that runs south for 200–300 kilometres (120–190 mi) to the coast to the edge of the Sand Sea.[6] Scorpions, vipers and flies abounded in the region, which was inhabited by a small number of Bedouin nomads.[7]
Bedouin tracks linked wells and the easier traversed ground; navigation was by sun, star, compass and "desert sense", good perception of the environment gained by experience. (When Italian troops advanced into Egypt in September 1940, the Maletti Group got lost leaving Sidi Omar, disappeared and had to be found by aircraft.) In spring and summer, days are miserably hot and nights very cold.[8] the Sirocco (Gibleh or Ghibli), a hot desert wind, blows clouds of fine sand, which reduces visibility to a few metres and coats eyes, lungs, machinery, food and equipment; motor vehicles and aircraft need special oil filters and the barren ground means that supplies for military operations have to be transported from outside.[9] German engines tended to overheat and tank engine life fell from 1,400–1,600 miles (2,300–2,600 km) to 300–900 miles (480–1,450 km), made worse by the lack of standard spare parts for German and Italian types of motor.[10]
Supply
Axis

The normal route of Italian supply to Tripoli in Libya, went west round Sicily and then close to the coast to the port, about 970 kilometres (600 mi), to avoid interference from British aircraft, ships and submarines based at Malta. On land, supplies had to be carried huge distances by road or in small consignments by coaster. The distance from Tripoli to Benghazi was about 1,050 kilometres (650 mi) and to El Alamein was 2,300 kilometres (1,400 mi). A third of the Italian merchant marine was interned after Italy declared war and by September 1942, half of the remainder had been sunk, although much of this was replaced by new building, salvage and transfers of German ships. From June 1940 to May 1943, 16 percent of shipments were sunk.[11]
Tobruk was pressed into use in June 1942 but the long approach route and Allied bombing led the effort to be abandoned in August. The German army assumed that the maximum distance a motorised army could operate from its base was 320 kilometres (200 mi) but about an average of a third of Axis lorries were unserviceable and 35–50 percent of the fuel deliveries, was consumed carrying the remainder. Fuel oil shortages in Italy, the small size of the ports in Libya and the need to meet civilian demand, meant the inefficient dispatch of large numbers of small convoys and led Oberkommando des Heeres (OKH) the German army high command, to conclude that German forces in Libya could not sufficiently be supplied for a decisive offensive, unless the Italian contingent was returned to Italy, a politically impossible condition.[12]
Egypt
The geographical position of Italy made it possible that the Mediterranean could be closed if war came and make the Mediterranean Fleet based in Egypt dependent on the Suez Canal. In 1939, Wavell began to plan a base in the Middle East, to support about fifteen divisions (300,000 men), six in Egypt and three in Palestine and the rest further afield. Much of the material was imported from the colonies and the rest obtained locally by stimulating the production of import substitutes. The plan for a garrison of nine divisions in Egypt and Palestine, was increased to fourteen by June 1941 and then to 23 by March 1942.[13] From the Italian declaration of war in 1940 to 1943, merchant ships travelled east from Britain round the Cape of Good Hope, which made the distance to Egypt the same as that to Australia and New Zealand. The Middle East Supply Centre (MESC) was created in Egypt, Palestine and Syria, to co-ordinate imports and local substitutes, implement civilian rationing and promote agricultural improvements. By March 1943 the MESC had replaced about 100 Liberty Ship deliveries worth of imports, with increased local production of potatoes, cooking oil, dairy products and fish. Cattle drives from Sudan avoided the need for refrigerated shipping.[14]
In 1940, British military forces had the terminus of the Egyptian state railway, road and the port of Mersa Matruh (Matruh) 320 kilometres (200 mi) west of Alexandria, as a base. A water pipeline was begun along the railway and sources of water surveyed. Wells were dug but most filled with salt water and in 1939, the main sources of fresh water were Roman aqueducts at Mersa Matruh and Maaten Baggush. Water-boats from Alexandria and a distillation plant at Matruh increased supply but rigorous economy had to be enforced and much water had to be moved overland to outlying areas. The number of vehicles available in 1939 was inadequate and lorries were diverted to provide the Armoured Division with a better rear link; only the desert-worthy vehicles could be risked off-road, which left tanks unable to move far from Matruh.[15] Matruh was 190 kilometres (120 mi) east of the Libyan border. From the border, there was no water at Sollum, for 80 kilometres (50 mi) east of Sollum to Sidi Barrani, there was only a poor road, which meant that an invader would have to move through a waterless and trackless desert to reach the main British force.[16] In September 1940, the New Zealand Railway Battalion and Indian labourers began work on the coastal railway, which reached Sidi Barrani by October 1941 and Tobruk by December 1942, 640 kilometres (400 mi) west of El Alamein, carrying 4,300 tonnes (4,200 long tons) per day.[17]
1940
Frontier skirmishes
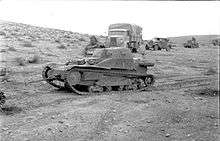
On 11 June 1940, hostilities commenced and the British were ordered to dominate the frontier and isolate Giarabub. The British crossed into Libya that night, exchanged fire with Italian troops at Sidi Omar and discovered that some Italians were unaware that war had been declared. On 14 June, the British captured Fort Capuzzo and Fort Maddalena, taking 220 prisoners. Two days later, the British raided a convoy on the Tobruk–Bardia road, killed 21 Italian troops and took 88 prisoners, including Generale di Brigata Romolo Lastrucci, the 10th Army Chief Engineer. At an engagement near the frontier wire at Nezuet Ghirba, an Italian force of 17 light tanks, four guns and 400 infantry was defeated by a mixed force of British tanks, artillery and motorised infantry.[18][19]
The British patrolled the frontier area as far west as Tobruk, establishing dominance over the 10th Army.[20] On 5 August, thirty Italian tanks and the 8th Hussars fought an inconclusive action and Wavell concluded that vehicle wear made it impractical to continue operations when an Italian offensive loomed. Sand wore out equipment quickly, shortening the track life of tanks, spare parts ran out and only half the tank strength could be kept operational.[21] A lull fell from August–early September, as Operation Hats a naval operation, reinforced the Mediterranean Fleet and helped to bring an army convoy of tanks and crews via the Cape. The British claimed to have inflicted 3,500 casualties for a loss of 150 men from 11 June – 9 September.[22] Further afield, both sides established scouting groups, the Long Range Desert Group (LRDG) and Compagnie Auto-Avio-Sahariane) which ranged the desert, observed enemy dispositions and raided.[23]
Operazione E
Benito Mussolini had no plans to invade Egypt, intending to remain on the defensive in Libya if war came. After the fall of France in 1940, the 5th Army could send reinforcements east and on 7 August, Mussolini ordered an invasion, to occupy Egypt and establish a land connexion with Italian East Africa. In August a lull fell on the frontier, most of the British armoured units had been withdrawn from the frontier to Mersa Matruh, to conserve their ability to defend the port and the 7th Support Group took over, to establish observation posts from Sollum to Fort Maddalena, ready to delay an Italian offensive; Hussars reconnoitred further into Libya.[24] The Libyan divisions lacked the transport necessary to operate with the Maletti Group, which had a medium, two mixed and four light tank battalions, on the escarpment and were redeployed to the coast road. On 9 September, the Maletti Group got lost en route to Sidi Omar and Graziani cancelled a flanking move and concentrated on the coast road, with five divisions and the Maletti Group; the 4th Blackshirt and 64th Catanzaro divisions stayed in reserve at Tobruk. The 5th Squadra a mixed air unit with about 300 serviceable aircraft, airfield equipment and transport, stood by to support the advance and occupy airfields.[25]
The Italian invasion of Egypt (13–18 September), began as a limited tactical operation towards Mersa Matruh, rather than for the strategic objectives sketched in Rome, due to the chronic lack of transport, fuel and wireless equipment, even with transfers from the 5th Army. Musiad was subjected to a "spectacular" artillery bombardment at dawn and occupied.[26] Sollum and the airfield were taken by the 1st Libyan Division and by evening the 2nd Libyan, 63rd (Cyrene) divisions and the Maletti Group from Musaid and the 62nd (Marmarica) Division from Sidi Omar, pushed past British harassing parties and converged on Halfaya Pass.[27] The British withdrew past Buq Buq on 14 September and continued to harass the Italian advance, while falling back to Alam Hamid the next day and Alam el Dab on 16 September. An Italian force of fifty tanks attempted a flanking move, which led the British rearguard to retire east of Sidi Barrani, which was occupied by the 1st Blackshirt Division and Graziani halted the advance. The British resumed observation and the 7th Armoured Division prepared to challenge an attack on Mersa Matruh.[28]
Despite prodding from Mussolini, the Italians dug in around Sidi Barrani and Sofafi, about 80 miles (130 km) west of the British defences at Mersa Matruh. British road demolitions were repaired, wells cleaned and work commenced on a water pipe-line from the frontier, to accumulate supplies for the resumption of the advance in mid-December. Egypt broke off diplomatic relations with the Axis and Italian aircraft bombed Cairo on 19 October. British naval and air operations to harass the Italian army continued and caused damage which prisoners reported had lowered morale. Armoured car patrols dominated no man's land but the loss of advanced landing grounds reduced the effectiveness of the RAF and Malta was put out of range. Operation Compass, a British counter-attack on an Italian advance on Matruh was planned to destroy the Italian force and most of the WDF was moved up to the port. An extra armoured car company joined in the reconnaissance operations far behind the front line. The WDF had been reinforced by a new tank regiment with Matilda II tanks and after a month, the British began to prepare a raid on the central group of Italian encampments and then on Sofafi of 4–5 days' duration, rather than wait for the Italians.[29][30]
Operation Compass

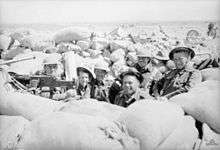
In December 1940, the 10th Army in Egypt had been reinforced with the 1st and 2nd Libyan divisions and 4th Blackshirt Division, in the fortified camps from Sidi Barrani to the Tummars and Maktila. The Maletti Group was based at Nibeiwa, the 63rd (Cyrene) Division at Rabia and Sofafi, the 62nd (Marmarica) Division was on the escarpment from Sofafi to Halfaya Pass and the 64th (Catanzaro) Division was east of Buq Buq, behind the Nibeiwa–Rabia gap, supported by about 500 aircraft of the 5° Squada (General Felip Porro).[31] The RAF attacked airfields on 7 December and destroyed 39 aircraft on the ground. A British raid, Operation Compass (Battle of Marmarica/Battle of the Camps), began when Selby Force advanced from Matruh to isolate Maktila early on 9 December. The 4th Indian Division and the 7th Royal Tank Regiment (7th RTR) attacked Nibeiwa at dawn and overran the camp, then moved on Tummar West, which fell in the afternoon. A counter-attack from Tummar East was repulsed and the camp taken the next day.[32]
Battle of Sidi Barrani
A 7th Armoured Division screen to the west, prevented the reinforcement of Sidi Barrani and on 10 December, the British cut the coast road and the 7th Armoured Division mopped up around Buq Buq, taking many prisoners. On 11 December, the Italians were defeated at Sidi Barrani; Rabia and Sofafi were abandoned and the 7th Armoured Division pursued along the coast and the escarpment. Late on 14 December, the 11th Hussars cut the Via Balbia between Tobruk and Bardia, captured Sidi Omar on 16 December and forced the Italians to retreat from Sollum and Fort Capuzzo to Bardia, leaving garrisons at Siwa Oasis and Giarabub in the south. From 9–11 December, the British had taken 38,300 prisoners, 237 guns, 73 tanks and about 1,000 vehicles for 624 casualties.[33]
Battle of Bardia
Bardia fell between 14 December and 5 January 1941; the British lost 456 Australian infantry casualties and 17 of 23 tanks, for 40,000 Italian casualties and prisoners, more than 400 guns, 130 tanks and hundreds of lorries. At dawn on 21 January, Australian infantry broke into Tobruk and made a path for 18 British I tanks. The Australians pressed on and captured half of the Tobruk defences by nightfall. The Australians took 25,000 prisoners, 208 guns and 87 tanks, for a loss of 355 Australian and 45 British troops.[34] The 7th Armoured Division drove 160 kilometres (100 mi) towards Derna and the Special Armoured Brigade (BCS - Brigata Corazzata Speciale, General Valentino Babini) with about 300 tanks, at Mechili. The BCS slipped away and from 26–28 January the British tanks bogged down in heavy rain; Derna was abandoned next day. The 7th Armoured Division sent Combe Force, a flying column, to Beda Fomm and cut off the 10th Army.[35]
Battle of Beda Fomm
| Place | PoW | Tanks | Guns |
|---|---|---|---|
| Sidi Barrani | 38,289 | 73 | 297 |
| Sidi Omar | 900 | 0 | 8 |
| Bardia | 42,000 | 130 | 275 |
| Tobruk | 25,000 | 87 | 208 |
| Mechili | 100 | 13 | 0 |
| Derna Benghazi | 2,000 | 10 | 24 |
| Benghazi Agedabia | 25,000 | 107 | 93 |
| Total | 133,298 | 420 | 845 |
In late January, the British learned that the Italians were evacuating Cyrenaica along the Via Balbia from Benghazi. The 7th Armoured Division (Major-General Sir Michael O'Moore Creagh) was dispatched to intercept the remnants of the 10th Army by moving through the desert, south of the Jebel Akhdar via Msus and Antelat as the 6th Australian Division pursued the Italians along the coast road north of the Jebel Akhdar. The terrain was hard going for the British tanks and Combe Force (Lieutenant-Colonel J. F. B. Combe), a flying column of wheeled vehicles, was sent ahead across the chord of the jebel.[37]
Late on 5 February, Combe Force arrived at the Via Balbia south of Benghazi and set up road blocks near Sidi Saleh, about 32 kilometres (20 mi) north of Ajedabia and 48 kilometres (30 mi) south-west of Antelat. The leading elements of the 10th Army arrived thirty minutes later and found the Via Balbia blocked. Next day the Italians attacked to break through the road block and continued to attack into 7 February. With British reinforcements arriving and the Australians pressing down the road from Benghazi, the 10th Army surrendered. From Benghazi–Agedabia, the British took 25,000 prisoners, captured 107 tanks and 93 guns of the totals for Operation Compass of 133,298 men, 420 tanks and 845 guns.[38]
On 9 February, Churchill ordered the advance to stop and troops to be dispatched to Greece to take part in the Greco-Italian War; Operation Marita, a German attack through Macedonia was thought imminent. The British were unable to continue beyond El Agheila anyway, because of vehicle breakdowns, exhaustion and the effect of the much longer supply transport distance from the base in Egypt. A few thousand men of the 10th Army escaped the disaster in Cyrenaica but the 5th Army in Tripolitania had four divisions. The Sirte, Tmed Hassan and Buerat strongholds were reinforced from Italy, which brought the 10th and 5th Armies up to about 150,000 men. German reinforcements were sent to Libya to form a blocking detachment (Sperrverband) under Directive 22 (11 January), these being the first units of the Afrika Korps (Generalleutnant Erwin Rommel).[39]
1941
Greece
A week after the Italian surrender at Beda Fomm, the Defence Committee in London, ordered Cyrenaica to be held with the minimum of forces and the surplus sent to Greece. In the Western Desert Force (now XIII Corps), the 6th Australian Division was fully equipped and had few losses to replace. The 7th Armoured Division had been operating for eight months, had worn out its mechanical equipment and was withdrawn to refit. Two regiments of the 2nd Armoured Division with the WDF were also worn out, leaving the division with only four tank regiments. The 6th Australian Division went to Greece in March, with an armoured brigade group of the 2nd Armoured Division; the remainder of the division and the new 9th Australian Division, minus two brigades and most of its transport was sent to Greece, it was replaced by two under-equipped brigades of the 7th Australian Division. The division took over in Cyrenaica, on the assumption that the Italians could not begin a counter-offensive until May, even with German reinforcements.[40][lower-alpha 1]
Unternehmen Sonnenblume

In early 1941, after the big British and Commonwealth victory in Cyrenaica, the military position was soon reversed. The best-equipped units in XIII Corps went to Greece as part of Operation Lustre in the Battle of Greece. Adolf Hitler responded to the Italian disaster with Directive 22 (11 January) ordering Unternehmen Sonnenblume (Operation Sunflower), the deployment of a new Afrika Korps (DAK) to Libya, as a Sperrverband (barrier detachment). The DAK had fresh troops with better tanks, equipment and air support and was led by General Erwin Rommel, who had enjoyed great success in the Battle of France.[42] The Axis force raided and quickly defeated the British at El Agheila on 24 March and at Mersa el Brega on 31 March, exploited the success and by 15 April, had pushed the British back to the border at Sollum and besieged Tobruk. The new commander of XIII Corps (now HQ Cyrenaica Command) Lieutenant-General Philip Neame, O'Connor and Major-General Michael Gambier-Parry, commander of the 2nd Armoured Division were captured. The Western Desert Force HQ took over under Lieutenant-General Noel Beresford-Peirse, who was recalled from East Africa. Apart from an armoured brigade group of the 2nd Armoured Division, which had been withdrawn for the Greek campaign, the rest of the division had been destroyed. Several Axis attempts to seize Tobruk failed and the front line settled on the Egyptian border.[43]
Siege of Tobruk
Tobruk was defended by a force of some 25,000 Eighth Army troops, well stocked with supplies and linked to Egypt by the Royal Navy. The garrison had armoured cars and captured Italian tanks, which could raid Axis supply convoys as they passed Tobruk for the frontier, which made impossible an Axis invasion of Egypt.[44] Rommel immediately attempted to take the port, but the 9th Australian division (General Leslie Morshead), defended the port resolutely. The Italians were slow to provide blueprints for the port fortifications and several attacks were repulsed. After three weeks Rommel suspended the attacks and resumed the siege.[45] Italian infantry divisions took up positions about the fortress while the bulk of the Afrika Korps maintained a mobile position south and east of the port.[46]
Operation Brevity
Operation Brevity (15–16 May) was a limited offensive, to inflict attrition on the Axis forces and to secure positions for a general offensive towards Tobruk. The British attacked with a small tank-infantry force in three columns, Desert, Centre and Coast. Desert Column with the British cruiser tanks, was to advance inland and destroy tanks found en route to Sidi Aziz. Centre Column was to capture the top of the Halfaya Pass, Bir Wair and Musaid, then press on to Fort Capuzzo. Coast Column was to take Sollum and the foot of Halfaya Pass. Sollum, Halfaya Pass and Fort Capuzzo were captured but then the fort was lost to a counter-attack. A German counter-attack on 16 May threatened the force at the top of the pass and a retirement was ordered covered by Desert Column. The Germans recovered Musaid and a general British retirement began to a line from Sidi Omar to Sidi Suleiman and Sollum, which left only Halfaya Pass in British possession.[47] Brevity failed to achieve most of its objectives, only briefly holding the Halfaya Pass. The British lost 206 casualties, five tanks destroyed and 13 damaged. German casualties were 258 men, three tanks destroyed and several damaged. Italian casualties were 395, of whom 347 were captured.[48] On 12 May, the Tiger convoy lost one ship and arrived in Alexandria with 238 tanks, to re-equip the 7th Armoured Division and 43 aircraft; on 28 May, planning began for Operation Battleaxe.[49]
Unternehmen Skorpion
During the evening of 26 May, Kampfgruppe von Herff (Oberst Maximilian von Herff), comprising three panzer battalions, assembled on the coast at the foot of Halfaya Pass and attacked the next morning, intending to bluff the British into retiring.[50] The pass was defended by the 3rd Coldstream Guards (Lieutenant-Colonel Moubray) and supporting units but the bluff became a genuine attack and secured a commanding position, leaving the British in danger of being surrounded. Gott authorised a withdrawal and Moubray extricated the battalion. There were no reinforcements nearby and Gott ordered a withdrawal from the pass, which was re-occupied by the Axis.[51] The Italo-German positions on the frontier were fortified with barbed wire and minefields, covered by 50 mm and 88 mm anti-tank guns. Behind the new defences the Axis began to accumulate supplies and receive the 15th Panzer Division, which began to arrive on 20 May.[52]
Operation Battleaxe
Operation Battleaxe, 15–17 June 1941 was intended to lift the Siege of Tobruk and re-capture eastern Cyrenaica. The attack was to be conducted by the 7th Armoured Division and a composite infantry force based on the 4th Indian Division headquarter, with two brigades. The infantry were to attack in the area of Bardia, Sollum, Halfaya and Capuzzo, with the tanks guarding the southern flank. For the first time in the war, a large German force fought on the defensive. The Halfaya Pass attack failed, Point 206 was captured and only one of three attacks on Hafid Ridge had any success. At the end of 15 June only 48 British tanks remained operational. On 16 June, a German counter-attack forced back the British on the western flank but was repulsed in the centre and the British reduced to 21 operational Cruiser tanks and seventeen Infantry tanks.[53]
On 17 June, the British only just evaded an encirclement by two Panzer regiments and ended the operation. Despite British overextension, the Germans had failed to turn a defensive success into an annihilating victory. Intelligence had provided details of British moves but the RAF had seen German counter-moves and slowed them enough to help the ground forces escape.[54] The British had 969 casualties, 27 cruiser and 64 I tanks were knocked out or broke down and were not recovered and the RAF lost 36 aircraft. German losses were 678 men (Italian losses are unknown), twelve tanks and ten aircraft. The British failure led to the sacking of Wavell, the XIII Corps commander, Lieutenant-General Noel Beresford-Peirse and Creagh, the 7th Armoured Division commander; General Claude Auchinleck took over as Commander-in-Chief of the Middle East Command.[55]
Operation Crusader

The Eighth Army (Lieutenant-General Alan Cunningham) conducted Operation Crusader (18 November – 30 December), to relieve Tobruk and capture eastern Cyrenaica. The Eighth Army planned to destroy the Axis armour before committing the infantry but were repulsed several times, culminating in the defeat of the 7th Armoured Division by the Afrika Korps at Sidi Rezegh. Rommel ordered the panzer divisions to relieve the Axis positions on the Egyptian border but failed to find the main body of the Allied infantry, which had bypassed the fortresses and headed for Tobruk. Rommel withdrew his armour from the frontier towards Tobruk and achieved several tactical successes, which led Auchinleck to replace Cunningham with Major-General Neil Ritchie. The Axis forces then retired west of Tobruk to the Gazala Line and then back to El Agheila; the Axis garrisons at Bardia and Sollum surrendered. The British lost 17,700 men against 37,400 Axis casualties, many having been captured at Halfaya and Bardia. Tobruk had been relieved, Cyrenaica recaptured and airfields captured to cover convoys supplying Malta.[56]
1942
Unternehmen Theseus
The Eighth Army advance of 800 kilometres (500 mi) to El Agheila, transferred the burden of an over-stretched supply line to the British and in January 1942, the British withdrew forces from the front, to reduce the supply burden, preparatory to Operation Acrobat, a 1941 plan for a westwards advance against Tripolitania. (The Vichy authorities on Tunisia were pressed to allow the British, then Anglo-American troops after December 1941, into French North Africa, with the possibility of invading Sicily.)[57] The British overestimated Axis losses during Operation Crusader and assumed that they faced 35,000 troops, rather than the true total of 80,000 men and also misjudged the speed of Axis reinforcement from Europe. The Eighth Army expected to be ready by February, well before an Axis attack.[58] The new 1st Armoured Division, held the area around El Agheila and from 28–29 December, was engaged near Agedabia and lost about 61 of 90 tanks, for only seven German tank losses.[59]
Panzerarmee Afrika began Operation Theseus on 21 January and defeated the 2nd Armoured Brigade in detail.[60] By 23 January, the brigade was down from 150–75 tanks, against a German loss of 29 tanks out of 100; Benghazi fell on 28 January and Timimi on 3 February. By 6 February, the British were back to the Gazala line, a few miles west of Tobruk, from which the Panzerarmee had retired seven weeks earlier. The British had 1,309 casualties from 21 January, lost 42 tanks knocked out and another 30 through damage or breakdowns and lost forty field guns.[61] Lieutenant-General Alfred Reade Godwin-Austen the XIII Corps commander, resigned over differences with Ritchie, the Eighth Army commander.[62]
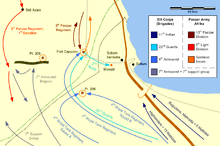
Battle of Gazala

By February the front was at the Gazala Line, just west of Tobruk and during the spring, both sides prepared for another battle.[63] The British planned Operation Buckshot for June to destroy the Panzerarmee and re-capture Cyrenaica but in early May, defensive measures on the Egyptian border were given priority, as an Axis attack became imminent.[64][lower-alpha 2] Unternehmen Venezia (the Battle of Gazala, 26 May – 21 June 1942), began when Afrika Korps and Italian tanks, drove south, round the flank of the Gazala line and were isolated by Free French and other Allied troops at Bir Hakeim, who intercepted Axis supply convoys.[66]
Rommel retreated to a position abutting the British minefields and Ritchie ordered a counter-attack, Operation Aberdeen on 5 June. To the north, the 32nd Army Tank Brigade lost 50 of 70 tanks.[67] The 7th Armoured and 5th Indian divisions on the eastern flank attacked at 2:50 a.m. and met with disaster, when the British artillery bombardment fell short of the German anti-tank screen. The 22nd Armoured Brigade lost 60 of 156 tanks and turned away, leaving the 9th Indian Brigade stranded.[68][69] An afternoon counter-attack by the Ariete and 21st Panzer divisions and a 15th Panzer Division attack on the Knightsbridge Box, overran the tactical HQs of the two British divisions and the 9th Indian Infantry Brigade. The 10th Indian Infantry Brigade and smaller units were dispersed and command broke down. The 9th Indian Brigade, a reconnaissance regiment and four artillery regiments were lost and the British fled from the Gazala Line on 13 June, with only 70 operational tanks.[70]
Fall of Tobruk

Lieutenant-General William Gott, the XIII Corps commander, appointed Major-General Hendrik Klopper, in command of the 2nd South African Division, to conduct the defence of Tobruk. With two South African brigades, were the 201st Guards (Motorised) Brigade, 11th Indian Infantry Brigade, 32nd Army Tank Brigade and the 4th Anti-Aircraft Brigade.[71] Tobruk had been besieged for nine months in 1941 but this time the Royal Navy could not guarantee the supply of the garrison and Auchinleck viewed Tobruk as expendable but expected that it could hold out for two months.[72][73] On 21 June, in circumstances which remain obscure, 35,000 Eighth Army troops surrendered to Lieutenant-General Enea Navarrini, the commander of XXI Corps.[74] Auchinleck relieved Ritchie, took over the Eighth Army and stopped the Axis advance at El Alamein, 110 kilometres (70 mi) from Alexandria; after the First Battle of El Alamein Auchinleck was also sacked.[75]
Unternehmen Herkules
Italian plans to invade Malta by sea began during Second Italo-Abyssinian War (3 October 1935 – May 1936).[76] An opportunity to capture Malta occurred in April 1941 but Operation Mercury (20 May – 1 June 1941), the invasion of Crete was conducted first, with such losses of parachute troops and transport aircraft that a second operation in 1941 was impossible. Luftwaffe units apart from Fligerkorps X then went east for Operation Barbarossa and by June 1941, the island air defences had recovered.[77] Luftwaffe units returned to the Mediterranean in spring 1942 and managed to neutralise the offensive capacity of the island garrison.[78] In April, Hitler and Mussolini agreed to mount Unternehmen Herkules, an Italian-German air and sea invasion. Two Fliegerkorps with hundreds of Junkers Ju 52 transport aircraft, gliders (including 24 Messerschmitt Me 321 Gigants) and about 200 Regia Aeronautica transport aircraft were assembled for the invasion.[79][80]
The Italian navy assembled an armada of Marinefährprahm (MFP), converted civilian ships and mine layers and 74 smaller boats. German MFPs, Siebel ferries, Pionierlandungsboote, Sturmboote, large inflatable rafts and the Seeschlange (Sea Snake a portable landing bridge), were contributed by the German navy.[81][82][lower-alpha 3] Rommel wished to attack, having refitted the force in Libya, to forestall an Eighth Army offensive, which was agreed by Hitler and Mussolini, with the proviso that an advance would stop at Tobruk, ready for the invasion of Malta in August. After the success of Unternehmen Venezia and the capture of Tobruk in June, the advance by the Panzerarmee kept going after the fall of Tobruk. The pursuit of a defeated enemy had more appeal than the hazards of the Malta operation.[84] Herkules was cancelled, in favour of Unternehmen Aïda, an invasion of Egypt to capture the Suez Canal.[85]
Unternehmen Aïda
Panzerarmee Afrika advanced into Egypt after the victory at Gazala in pursuit of the Eighth Army, which made a defensive stand at Mersa Matruh. The speed of advance of the Panzerarmee enabled it to get behind XIII Corps and X Corps but the Axis forces were too weak to prevent them from breaking out. XIII Corps withdrew on the evening of 27 June but poor communication left X Corps on its own in the fortress of Mersa Matruh. X Corps broke out the following night but left 6,000 men and a great deal of equipment and supplies behind. The Eighth Army continued to retreat eastwards, colliding with Axis forces several times en route. An attempt to regroup at Fuka were abandoned and Auchinleck ordered a 160 kilometres (99 mi) retirement all the way to El Alamein, 100 kilometres (62 mi) west of Alexandria. The retreat brought the Eighth Army close to its base, which made road supply much more efficient and the geographical bottleneck of the Qattara Depression, 64 kilometres (40 mi), to the south made an Axis outflanking move much more difficult.[86] By 25 June, the Afrika Korps was down to 60 tanks and the Italian XX Corps had only 14 operational tanks. Using supplies captured at Tobruk, on the frontier and Mersa Matruh, the Panzerarmee reached El Alamein on 30 June. Supplying the Axis forces so far east of Gazala became much harder, as most of their supplies still had to be delivered from Tripoli, 2,300 kilometres (1,400 mi) away.[87]
First Battle of El Alamein

An attempt to bounce the Eighth Army out of the Alamein position took place in the First Battle of El Alamein (1–27 July 1942). After four days Rommel called off the attempt due to the power of the British defence, the depletion of supplies and the reduction of the German divisions to 1,200–1,500 men each. By 5 July, the number of serviceable German tanks fell to around thirty. After a lull, the Panzerarmee planned attack again, with about fifty German tanks and about 2,100 German infantry, 54 Italian tanks and 1,600 men but the British attacked first at Tel el Eisa (10–14 July), which exhausted both sides.[88] The British began to attack Italian units, located using information from Ultra, at Ruweisat Ridge (14–17 July) and from 21–23 July, again at Tel El Eisa on 22 July and Miteirya Ridge (22 and 26 July), after which another lull fell.[89] German casualties were about 10,000 men, Italian casualties are unknown but 7,000 Axis prisoners were taken, against 13,250 Eighth Army losses.[90]
Battle of Alam el Halfa
The Battle of Alam el Halfa/Unternehmen Brandung (30 August – 5 September), was fought south of El Alamein. Panzerarmee Afrika attempted an envelopment of the Eighth Army, now commanded by Lieutenant-General Bernard Montgomery, to defeat the Eighth Army and reach Cairo before Allied reinforcements due in September, made an Axis victory in Africa impossible. The physical state of many of the Germans had declined, 19,000 having been in Africa since March 1941, due to the climate and battle exhaustion. Reinforcements had brought the four German divisions up to 90,000 men (17,000 men below establishment) and 12,600 vehicles of which only 34,000 men were fighting troops. The Panzerarmee had accumulated about 200 German tanks and 243 Italian tanks against 700 British tanks.[91]
The British were forewarned by decoded Ultra wireless intercepts and left a gap in the south. Much of the Eighth Army tank and artillery units were concentrated around Alam el Halfa Ridge, 20 mi (32 km) behind the front. The tanks were to remain on the ridge as static anti-tank guns, rather than attempt a battle of manoeuvre. Rommel ordered a withdrawal on 2 September, after German attacks on the ridge failed and supplies failed to arrive. (From 30 August to 4 September, the Panzerarmee was bombed continuously and lost few tanks but was pinned down and lost the advantages of fast manoeuvre and concentration.)[92] Late on 3 September, Operation Beresford with one New Zealand and one British brigade counter-attacked to cut off the retreat of the Panzerarmee, which was a costly failure and by 5 September the Axis retreat was complete.[93] Eighth Army losses were 1,750 casualties and 68 tanks; Axis casualties were 2,900 men, 49 tanks, 36 aircraft, 60 guns and 400 lorries.[94]
Second Battle of El Alamein

When the Eighth Army offensive began on 23 October, the Panzerarmee had 104,000 men, including 50,000 Germans, of whom only 24,173 were front line troops. There were 496 tanks, 290 of which were Italian, 500 guns and 850 anti-tank guns. The Eighth Army had 195,000 men, 1,029 tanks and another 1,000 in workshops, 908 guns and 1,451 anti-tank guns. The Allied troops were well-fed and in good health and the Axis troops were undernourished and susceptible to illness. The Panzerarmee had only 290 kilometres (180 mi) of fuel per vehicle. By 27 October, the Panzerarmee was down to 114 German tanks and by 2 November the Panzerarmee was running out of ammunition and had only 32 German and 120 Italian tanks left. Having decided to retire, Hitler ordered Rommel and the Panzerarmee to stand fast and on 4 November, the Eighth Army broke through and Rommel ordered the retreat to begin.[95]
Rommel sacrificed the non-motorized units, particularly Italian formations in the centre and south. Panzerarmee Afrika had 37,000 casualties, 30 percent of the force, lost 450 tanks, and 1,000 guns. The Eighth Army lost 13,500 casualties, a far smaller proportion and 500 tanks (only 150 were destroyed) and about 110 guns (mainly anti-tank guns). The Panzerarmee was reduced to about 5,000 men, 20 tanks, 20 anti-tank guns and 50 field guns.[96] Attempts to encircle the Axis forces at Marsa Matruh failed and the bulk of the Afrika Korps escaped by 7 November. The Axis forces retreated along the coast road but lack of tanks and fuel for a mobile defence of the open southern flank, made a stand at the Halfaya Pass or any other position impossible.[97] Tobruk was retaken on 13 November and the Axis retreat continued; Benghazi fell on 20 November and the captured ports were quickly repaired to supply the British advance.[98]
Battle of El Agheila

Panzerarmee Afrika retired to the El Agheila defences (Mersa Brega line) but Axis supply and reinforcement priority was given to the forces opposing the British First Army (Lieutenant-General Kenneth Anderson) and Operation Torch, leaving the Italo-Germans with no capacity to counter-attack. Hitler ordered the Mersa Brega line to be held at all costs but Rommel favoured a fighting retreat to the Gabès Gap in Tunisia, which would increase the supply distance for the Eighth Army to 2,400 kilometres (1,500 mi). On 24 November, Cavallero agreed to a withdrawal 320 kilometres (200 mi) westwards to Buerat, 50 mi (80 km) beyond Sirte if the Panzerarmee was attacked by a superior force. The Eighth Army reached El Agheila on 15 December and the New Zealand Division was sent to outflank the Mersa Brega line from 14–16 December as the 51st (Highland) Division attacked frontally and the 7th Armoured Division attacked inland at Bir el Auera. The outflanking move failed, when the Panzerarmee retreated, having lost 18 tanks, behind an obstacle course of deep mine-fields and many booby-traps, which slowed the pursuit.[99][100]
1943
Buerat
Rommel planned to defend the Gabes Gap in Tunisia, east of the French pre-war Mareth line by holding the port of while Army Group Africa (Generaloberst Hans-Jürgen von Arnim) already in Tunisia confronted the British First Army (which included the II US Corps and French troops under command).[101] The front was 400 mi (640 km) from Tobruk and with such difficulties of supply the Eighth Army was unable to use all its units. Buerat was not strongly defended and despite intelligence of the state of the Axis forces, Montgomery paused until 16 January 1943, when the Eighth Army had a 4:1 superiority in infantry and a 7.5:1 superiority in tanks.[102] Bombing began on 12 January and XXX Corps attacked on 15 January, picking its way along the coast road, through minefields, demolitions and booby-traps. The 2nd New Zealand and 7th Armoured divisions swung inland via Tarhuna, supply being dependent on the Royal Army Service Corps (RASC) and the New Zealand Army Service Corps. The Eighth Army needed quickly to capture of the port, to avoid a supply shortage. Rommel withdrew from Buerat on 15 January, retired from Tripoli on the night of 22/23 January, after destroying the port and then conducted the delaying action into Tunisia. The 7th Armoured Division entered Tripoli on the 23 January and the last elements of the Panzerarmee reached the Mareth line, another 320 kilometres (200 mi) west, on 15 February, as LRDG patrols surveyed the defences.[103]
Tripoli
The main British attack was made along the coast road by the 51st Division and an armoured brigade as the 7th Armoured Division advanced by Tarhuna, Castel Benito and Tripoli. The 90th Light Division fought delaying actions along the road, which exacerbated a transport shortage of the attackers. From 20–21 January the 90th Light Division made a stand at Corradini, having made 109 craters in the road from Buerat to Homs. The vanguard of the 7th Armoured Division reached the vicinity of Aziza on 21 January and next day the 51st Division reached Castel Verde. A race developed and the Germans retired from Tripoli during the night; the 11th Hussars were the first into Tripoli in the morning of 23 January, 1,086 kilometres (675 mi) west of Benghazi.[104] Five hours later a Naval Base Party arrived and surveyed the wreckage of the port. On 26 January five ships anchored outside the port and began to unload via lighters and on 30 January, 3,000 tonnes (3,000 long tons) of stores were landed. In March the Eighth Army entered Tunisia and on 9 March, Rommel returned to Germany to communicate to Hitler the realities of conditions in North Africa. Rommel failed to persuade Hitler to allow the Axis forces be withdrawn and was not allowed to return to Africa, ostensibly on health grounds.[105]
Aftermath
Analysis
In 1977, Martin van Creveld wrote that it had been claimed by Rommel and others since, that if the supplies and equipment sent to Tunisia in late 1942 and early 1943 had been sent earlier, the Axis would have won the Desert War. Creveld disagreed since the occupation of southern France made French merchant ships and Toulon available for dispatch and Bizerta available for receipt, which did not apply in 1941. The extra distance from Bizerta to the Egyptian border would also have negated the benefit of using a larger port. Axis supply had always been determined by the small size of the ports in Libya, a constraint that could not be overcome and that attacks on Axis shipping added to the chronic difficulty of supply. With the German army bogged down in the USSR, there was never sufficient road transport available for the Afrika Korps and the Panzerarmee, despite the relatively lavish scale of transport compared to other fronts.[106]
The cancellation of the attack on Malta in the summer of 1942, had less influence on events than the small size of Tobruk harbour and its vulnerability to air attack. Only a railway, similar to the one built by the British, could have alleviated Axis supply difficulties but lack of resources and time made building one impossible. The influence of Axis ship losses on the defeats inflicted on the Panzerarmee in late 1942 has been exaggerated, because lack of fuel was caused by the constant difficulty of transporting goods overland, rather than lack of deliveries from Europe. During the Second Battle of El Alamein, 1⁄3 of the fuel of the Panzerarmee was stranded at Benghazi. Rommel wrote that Axis supply difficulties relative to those of the British, determined the course of the military campaign and were a constraint that was insoluble.[107]
Axis supply: 1940–1941
Axis supplies from Europe to Libya were moved by road and after Operation Compass (December 1940 – February 1941), only Tripoli remained, with a maximum capacity of four troopships or five cargo ships at once, about 46,000 tonnes (45,000 long tons) per month. Tripoli to Benghazi was 970 kilometres (600 mi) along the Via Balbia and only half-way to Alexandria. The road could flood, was vulnerable to the Desert Air Force (DAF) and alternative desert tracks increased vehicle wear. The Axis advance of 480 kilometres (300 mi) to the Egyptian frontier in early 1941, increased the road transport distance to 1,800 kilometres (1,100 mi). Benghazi was captured in April but coastal shipping could only carry 15,000 tonnes (15,000 long tons) and the port was within range of the DAF. Tobruk could take about 1,500 tonnes (1,500 long tons) per day but lack of shipping made its capture irrelevant.[108]
A German motorised division needed 360 tonnes (350 long tons) of supplies per day and moving them 480 kilometres (300 mi) took 1,170 2.0-tonne (2-long-ton) lorries.[109] With seven Axis divisions, air force and naval units, 71,000 tonnes (70,000 long tons) of supplies per month were needed. (Vichy agreed to the use of Bizerta but no supplies moved through the port until late 1942.) From February–May 1941, a surplus of 46,000 tonnes (45,000 long tons) was delivered; attacks from Malta had some effect but in May, the worst month for ship losses, 91% of supplies arrived. Lack of transport in Libya, left German supplies in Tripoli and the Italians had only 7,000 lorries for deliveries to their 225,000 men. A record amount of supplies arrived in June but at the front, shortages worsened.[110]

There were fewer Axis attacks on Malta from June and sinkings increased from 19% in July, to 25% in September, when Benghazi was bombed and ships diverted to Tripoli; air supply in October made little difference. Deliveries averaged 73,000 tonnes (72,000 long tons) per month from July–October but the consumption of 30–50 percent of fuel deliveries by road transport and a truck unserviceability rate of 35% reduced deliveries to the front. In November, a five-ship convoy was sunk during Operation Crusader and ground attacks on road convoys stopped journeys in daylight. Lack of deliveries and the Eighth Army offensive forced a retreat to El Agheila from 4 December, crowding the Via Balbia, where British ambushes destroyed about half of the remaining Axis transport.[111]
Convoys to Tripoli resumed and losses increased but by 16 December, the supply situation had eased, except for the fuel shortage and in December, the Luftwaffe was restricted to one sortie per day. The Vichy French sold 3,700 tonnes (3,600 long tons) of fuel, U-boats were ordered into the Mediterranean and air reinforcements were sent from Russia in December. The Italian navy used warships to carry fuel to Derna and Benghazi, then made a maximum effort from 16–17 December. Four battleships, three light cruisers and 20 destroyers escorted four ships to Libya. The use of an armada for 20,000 tonnes (20,000 long tons) of cargo ships, depleted the navy fuel reserve and only one more battleship convoy was possible. Bizerta in Tunisia was canvassed as an entrepôt but this was in range of RAF aircraft from Malta and was another 800 kilometres (500 mi) west of Tripoli.[112]
Axis supply: 1942
The retreat to El Agheila, reduced the distance from Tripoli to 740 kilometres (460 mi), the arrival of the second battleship convoy on 6 January 1942 and the discovery of 13,000 tonnes (13,000 long tons) of fuel at Tripoli, eased the supply crisis, despite the delivery of only 51,000 tonnes (50,000 long tons) of supplies in January. The Panzerarmee had room to manoeuvre, a much shorter supply line against an enemy with the burden of an over-extended supply line. The arrival of Luftflotte II in Sicily had also regained air superiority in the region. Rommel asked for another 8,000 lorries but this utopian demand was rejected and Rommel was warned that an advance would cause another supply crisis. On 29 January, the Panzerarmee recaptured Benghazi and next day ammunition supply to the front line failed. By 13 February, Rommel agreed to stop at Gazala, 1,400 kilometres (900 mi) from Tripoli.[113]
Until May, monthly deliveries averaged 61,000 tonnes (60,000 long tons), fewer than the smaller Axis force received from June–October 1941 but sufficient for an offensive. The 1,400 kilometres (900 mi) advance to Gazala succeeded because Benghazi was open, reducing the transport distance for about 33% of the supplies of the Panzerarmee to 450 kilometres (280 mi). The Italians tried to restrain Rommel by advocating the capture of Malta, which would postpone another offensive in Africa until the autumn but agreed to an attack on Tobruk for late May. An advance would stop at the Egyptian frontier, another 240 kilometres (150 mi) east and the Luftwaffe would redeploy for Operation Herkules. The capture of Malta would not alter the constraints of port capacity and distance; protecting convoys and a large port close to the front, would still be necessary for a decisive victory.[114]
The capture of Alexandria would make Malta irrelevant but a defensive strategy would be needed while Benghazi was extended, supplies accumulated and substantial reinforcements brought to Libya. More troops would increase the demand for supplies, which would exceed the capacity of Tripoli and Benghazi and transport to move the extra supplies. On 26 May, Unternehmen Venezia began, Tobruk was captured intact on 22 June and shipping losses hardly increased. Deliveries to Libya fell from 152,000–33,000 tonnes (150,000–32,000 long tons), due to a fuel shortage in Italy and all were unloaded at Tripoli, which made the position of the Panzerarmee untenable. Operation Herkules was postponed. The capture of 2,000 vehicles, 5,100 tonnes (5,000 long tons) of supplies and 1,400 tonnes (1,400 long tons) of fuel at Tobruk, enabled the Panzerarmee to advance another 640 kilometres (400 mi) by 4 July, when lack of supplies, exhaustion and the rally of the Eighth Army ended the advance.[115]

Tobruk could only take 20,000 tonnes (20,000 long tons) of supplies per month, was within DAF bomber range and the railway carried only 300 tonnes (300 long tons) per day. Small deliveries could be made to Tobruk, Bardia and Mersa Matruh or be landed at Tripoli and Benghazi, 2,100 and 1,300 kilometres (1,300 and 800 mi) distant. Ship losses in August rose 400% and deliveries fell by half, to 52,000 tonnes (51,000 long tons). Deliveries were diverted back to Tripoli and the Battle of Alam Halfa consumed 10,000 tonnes (10,000 long tons) of fuel. A retreat from El Alamein was forbidden by Hitler and deliveries fell as far fewer ships were sent from Italy. (Shipbuilding, repairs and German replacements, reduced the net loss of merchant shipping to 23% since 1940.) On the eve of the Second Battle of El Alamein, the railway from Tobruk flooded and 10,000 tonnes (10,000 long tons) of supplies were stranded, leaving the Panzerarmee with only 10% of the fuel it needed.[116]
Montgomery has been criticised for his failure to trap the Axis armies and bring them to a decisive battle in Libya. His tactics have been seen as too cautious and slow, since he knew of the weakness of the Panzer Army and Rommel's intentions from intelligence sources and signals decrypts.[117] It has been claimed that the defensive ability of the Afrika Korps in particular and British apprehensions of another defeat and retirement, would have been constraints on the freedom of action of any commander. Warfare in the desert has been described as a "quarter-master's nightmare", given the conditions of desert warfare and the difficulties of supply. Montgomery emphasised balance, refrained from attacks until the army was ready; Eighth Army morale greatly improved under his command.[118] The Axis forces retreated through Libya into Tunisia, eventually to be trapped, in the Tunisia Campaign, between the Anglo-American forces of the First Army to the west and the Eighth Army pursuing from the east.[119]
See also
- Egypt–Libya Campaign
- List of World War II Battles
- Military history of Egypt during World War II
- Military history of Italy during World War II
- Military history of the United Kingdom during World War II
- Military history of Germany during World War II
- North African Campaign timeline
Notes
- ↑ The 2nd Armoured Division in Cyrenaica had the 3rd Armoured Brigade, with an understrength light tank regiment, a second regiment using captured Italian tanks and a cruiser tank regiment from mid-March, with worn-out tanks. The 2nd Support Group had only one motor battalion, a field artillery regiment, one anti-tank battery and a machine-gun company; most of the divisional transport had gone to Greece.[41]
- ↑ Since early 1941, Colonel Bonner Fellers, an American liaison officer, had been free to roam around Egypt and the Eighth Army. Fellers communicated his findings nightly to Washington, using a code which had been broken by Axis cryptanalysts, who provided Rommel with details of the British defence scheme.[65]
- ↑ The German army had developed Seeschlange as a portable landing bridge and floating roadway, from joined modules which could be towed into place to act as a temporary jetty.[83]
Footnotes
- ↑ Playfair, 1954, pp. 38–39, 92
- ↑ Playfair, 1954, pp. 38–39, 92
- ↑ Playfair, 1954, pp. 19, 93
- ↑ Playfair, 1954, pp. 32, 93, 97–98, 375
- ↑ Playfair, 1954, pp. 32, 93, 97, 100, 375
- ↑ Von Luck, 1989, p. 92
- ↑ Playfair, 1954, p. 116
- ↑ Playfair, 1954, pp. 115, 116
- ↑ Lewin, 1968, p. 149
- ↑ Creveld, 1977, p. 183
- ↑ Cooper, 1978, pp. 361–362
- ↑ Cooper, 1978, p. 362
- ↑ Playfair, 1954, pp. 39, 60, 64–65
- ↑ Edgerton, 2011, pp. 166, 177–178
- ↑ Playfair, 1954, pp. 67–69
- ↑ Raugh, 1993, p. 67
- ↑ Neillands, 2004, p. 35
- ↑ Playfair, 1954, pp. 118–119
- ↑ Christie, 1999, pp. 41–43
- ↑ Playfair, 1954, p. 113
- ↑ Playfair, 1954, p. 188
- ↑ Playfair, 1954, pp. 119, 187, 206
- ↑ Macksey, 1971, p. 33
- ↑ Playfair, 1954, pp. 46, 121
- ↑ Playfair, 1954, pp. 208–210
- ↑ Playfair, 1954, pp. 208–211
- ↑ Playfair, 1954, pp. 210–211
- ↑ Playfair, 1954, pp. 210–211
- ↑ Playfair, 1954, pp. 207, 46, 121, 211–212, 257–261
- ↑ MacGregor, 2006, p. 229
- ↑ Playfair, 1954, pp. 265–266
- ↑ Playfair, 1954, pp. 266–270
- ↑ Playfair, 1954, pp. 257–271
- ↑ Playfair 1954 pp. 282–293
- ↑ Playfair, 1954, pp. 358–359
- ↑ CCIS 1941.
- ↑ Playfair, 1954, pp. 357–358
- ↑ Playfair, 1954, pp. 358–359
- ↑ Playfair, 1954, pp. 359–362
- ↑ Playfair, 1956, pp. 1–2
- ↑ Playfair, 1956, pp. 2–3
- ↑ Bauer, 2000, p. 121
- ↑ Playfair, 1956, pp. 15–43, 2, 153–159
- ↑ Hoffman, 2004, p. 35
- ↑ Lewin, 1968, pp. 39, 42
- ↑ Playfair, 1956, pp. 35–43, 153–159
- ↑ Raugh, 1993, pp. 207–208
- ↑ Greene, Massignani, 1999, p. 70
- ↑ Playfair, 1956, pp. 159–163
- ↑ Rommel, 1953, p. 137
- ↑ Playfair, 1956, pp. 162–163
- ↑ Neillands, 2004, p. 68
- ↑ Playfair, 1956, pp. 163–169
- ↑ Porch, 2004, pp. 233–234
- ↑ Playfair, 1956, pp. 169–174
- ↑ Carver, 1986, p. 51
- ↑ Carver, 1986, p. 54
- ↑ Hinsley, 1981, pp. 334–336, 330
- ↑ Carver, 1986, p. 54
- ↑ Playfair, 1960, pp. 135–154
- ↑ Playfair, 1960, pp. 139–153
- ↑ Mead, 2007, p. 171
- ↑ Playfair, 1960, pp. 197–223
- ↑ Carver, 1986, pp. 60–61
- ↑ Pitt, 1980, p. 194
- ↑ Playfair, 1960, pp. 223–231
- ↑ Playfair, 1960, pp. 231–235
- ↑ Hinsley, 1993, p. 373
- ↑ Playfair, 1960, pp. 232–233
- ↑ Playfair, 1960, pp. 233–234
- ↑ Mackenzie, 1951, p. 561
- ↑ Mackenzie, 1951, p. 559
- ↑ Bierman and Smith, 2002, p. 178
- ↑ Bierman and Smith, 2002, p. 213
- ↑ Playfair, 1960, pp. 260–277
- ↑ Greene, Massignani, 1993, p. 64
- ↑ Cooper, 1978, p. 368
- ↑ Cooper, 1978, p. 368
- ↑ Bekker, 1975, p. 352
- ↑ Green, 1970, p. 648
- ↑ Marcon, 1998, pp. 221–224
- ↑ Schenk, 1990, p. 139
- ↑ Schenk, 1990, p. 139
- ↑ Cooper, 1978, p. 369
- ↑ Playfair, 1960, pp. 277–278
- ↑ Playfair, 1960, pp. 277–295
- ↑ Cooper, 1978, pp. 375–376
- ↑ Cooper, 1978, p. 376
- ↑ Playfair, 1960, pp. 340–357
- ↑ Watson, 2007, p. 6, Barr, 2005, p. 184
- ↑ Cooper, 1978, p. 377
- ↑ Cooper, 1978, pp. 378–379
- ↑ Playfair, 1960, pp. 379–392
- ↑ Watson, 2007, p. 14
- ↑ Cooper, 1978, pp. 381–385
- ↑ Watson, 1999, p. 27
- ↑ Lewin, 1968, p. 190
- ↑ Playfair, 1966, pp. 81–239
- ↑ Playfair, 1966, pp. 215–228
- ↑ Neillands, 2004, pp. 212–213
- ↑ Neillands, 2004, p.214
- ↑ Playfair, 1966, pp. 227–230
- ↑ Neillands, 2004, pp. 218–219, 227
- ↑ Playfair, 1966, pp. 235–237, 232
- ↑ Playfair, 1966, pp. 254–256
- ↑ Creveld, 1977, pp. 199
- ↑ Creveld, 1977, pp. 200–201
- ↑ Creveld, 1977, pp. 182–187
- ↑ Creveld, 1977, pp. 182–185
- ↑ Creveld, 1977, pp. 185–187
- ↑ Creveld, 1977, pp. 189–190
- ↑ Creveld, 1977, pp. 190–192
- ↑ Creveld, 1977, pp. 192–193
- ↑ Creveld, 1977, pp. 193–195
- ↑ Creveld, 1977, pp. 195–197
- ↑ Creveld, 1977, pp. 197–198
- ↑ Hinsley, 1981, p. 460
- ↑ Playfair, 1966, pp. 77, 79
- ↑ Playfair, 1966, pp. 81–101, 137–193, 215–239
Bibliography
- Books
- "Appendix E, H.Q. Cyrenaica Command Intelligence Summary No. 6 (23 Feb 41) WO 169/1258". The National Archives. 23 February 1941. Retrieved 15 March 2015.
- Barr, Niall (2005) [2004]. Pendulum of War: The Three Battles of El Alamein. Woodstock, NY: Overlook Press. ISBN 978-1-58567-738-2.
- Bauer, Eddy (2000) [1979]. Peter, Young, ed. The History of World War II (rev. ed.). London: Orbis. ISBN 1-85605-552-3.
- Bekker, Cajus (1975). The Luftwaffe War Diaries. New York: Ballantine Books. ISBN 978-0-306-80604-9.
- Bierman, John; Smith, Colin (2003) [2002]. War Without Hate: The Desert Campaign of 1940–1943 (New ed.). New York: Penguin Books. ISBN 978-0-14-200394-7.
- Bierman, John; Smith, Colin (2002). The Battle of Alamein: Turning Point, World War II. New York: Viking. ISBN 978-0-670-03040-8.
- Carver, M. (2002) [1986]. Dilemmas of the Desert War: The Libyan Campaign 1940–1942 (Spellmount ed.). Staplehurst: Batsford. ISBN 1-86227-153-4.
- Cooper, Matthew (1978). The German Army 1933–1945: Its Political and Military Failure. Briarcliff Manor, NY: Stein and Day. ISBN 0-8128-2468-7.
- Creveld, M. van (1977). Supplying War: Logistics from Wallenstein to Patton. Cambridge: Cambridge University Press. ISBN 0-521-29793-1.
- Edgerton, D. (2011). Britain's War Machine: Weapons, Resources and Experts in the Second World War. London: Allen Lane. ISBN 978-0-713-99918-1.
- Green, William (1970). Warplanes of the Third Reich. New York: Doubleday. ISBN 0-38505-782-2.
- Hinsley, F. H.; Thomas, E. E.; Ransom, C. F. G.; Knight, R. C. (1981). British Intelligence in the Second World War. Its influence on Strategy and Operations. History of the Second World War. II. London: HMSO. ISBN 0-11-630934-2.
- Hoffman, K. (2004). Erwin Rommel. London: Brassey's. ISBN 1-85753-374-7.
- Lewin, Ronald (1998) [1968]. Rommel As Military Commander. New York: B&N Books. ISBN 978-0-7607-0861-3.
- von Luck, Hans (1989). Panzer Commander: The Memoirs of Colonel Hans von Luck. New York: Dell (Random House). ISBN 0-440-20802-5.
- Mackenzie, Compton (1951). Eastern Epic: September 1939 – March 1943 Defence. I. London: Chatto & Windus. OCLC 1412578.
- Macksey, Major Kenneth (1971). Beda Fomm: Classic Victory. Ballantine's Illustrated History of the Violent Century. New York: Ballantine Books. OCLC 473687868.
- MacGregor, Andrew (2006) [2006]. A Military History of Modern Egypt: From the Ottoman Conquest to the Ramadan War. Santa Barbara, CA: Praeger Security International General Interest. ISBN 0-275-98601-2.
- Marcon, Tullio (1998). I Muli del Mare [The Sea of Donkeys] (in Italian) (3rd ed.). Parma: Albertelli. ISBN 978-88-87372-02-1.
- Mead, Richard (2007). Churchill's Lions: A Biographical Guide to the Key British Generals of World War II. Stroud: Spellmount. ISBN 978-1-86227-431-0.
- Neillands, Robin (2004). Eighth Army: From the Western Desert to the Alps, 1939–1945. John Murray. ISBN 0-7195-5647-3.
- Pitt, Barrie (1989). Crucible of War: Western Desert 1941. I (New ed.). Paragon House. ISBN 978-1-55778-232-8.
- Playfair, Major-General I. S. O.; with Stitt R.N., Commander G. M. S.; Molony, Brigadier C. J. C. & Toomer, Air Vice-Marshal S. E. (2004) [1st. pub. HMSO 1954]. Butler, J. R. M., ed. The Mediterranean and Middle East: The Early Successes Against Italy (to May 1941). History of the Second World War, United Kingdom Military Series. I. Naval & Military Press. ISBN 1-84574-065-3.
- Playfair, Major-General I. S. O.; with Flynn RN, Captain F. C.; Molony, Brigadier C. J. C. & Toomer, Air Vice-Marshal S. E. (2004) [HMSO 1956]. Butler, J. R. M., ed. The Mediterranean and Middle East: The Germans Come to the Help of their Ally (1941). History of the Second World War, United Kingdom Military Series. II. Naval & Military Press. ISBN 1-84574-066-1.
- Playfair, Major-General I. S. O.; with Flynn R.N., Captain F. C.; Molony, Brigadier C. J. C. & Gleave, Group Captain T. P. (2004) [HMSO 1960]. Butler, J. R. M., ed. The Mediterranean and Middle East: British Fortunes reach their Lowest Ebb (September 1941 to September 1942). History of the Second World War United Kingdom Military Series. III. Naval & Military Press. ISBN 1-84574-067-X.
- Playfair, Major-General I. S. O.; and Molony, Brigadier C. J. C.; with Flynn RN, Captain F. C. & Gleave, Group Captain T. P. (2004) [HMSO 1966]. Butler, J. R. M., ed. The Mediterranean and Middle East: The Destruction of the Axis Forces in Africa. History of the Second World War United Kingdom Military Series. IV. Uckfield: Naval & Military Press. ISBN 1-84574-068-8.
- Porch, Douglas (2005) [2004]. Hitler's Mediterranean Gamble (Cassell Military Paperbacks ed.). London: Weidenfeld & Nicholson. ISBN 0-304-36705-2.
- Raugh, H. E. (1993). Wavell in the Middle East, 1939–1941: A Study in Generalship. London: Brassey's. ISBN 0-08-040983-0.
- Rommel, Erwin (1994). Pimlott, John, ed. Rommel: In His Own Words. London: Greenhill Books. ISBN 978-1-85367-185-2.
- Rommel, Erwin (1982) [1953]. Liddell Hart, Basil, ed. The Rommel Papers. New York: Da Capo Press. ISBN 978-0-306-80157-0.
- Schenk, Peter (1990). Invasion of England 1940: The Planning of Operation Sealion. London: Conway Maritime Press. ISBN 0-85177-548-9.
- Watson, B. A. (2007) [1999]. Exit Rommel: The Tunisian Campaign, 1942–43. Mechanicsburg, PA: Stackpole. ISBN 0-8117-3381-5.
- Journals
- Greene, Jack; Massignani, Alessandro (Jan–Feb 1993). "The Summer of '42: The Proposed Axis Invasion of Malta" (20). Conshohocken, PA: Command Magazine. ISSN 1059-5651.
- Jenner, C. J. (2008). "Turning the Hinge of Fate: Good Source and the UK–US Intelligence Alliance, 1940–1942". Diplomatic History. London: Society for Historians of American Foreign Relations (Oxford University Press). 32 (2): 165–205. doi:10.1111/j.1467-7709.2008.00688.x. ISSN 0145-2096.
- Wavell, Archibald (1946). "Despatch on Operations in the Middle East From August, 1939 to November, 1940". London: War Office. in The London Gazette: (Supplement) no. 37609. pp. 2997–3006. 13 June 1946. Retrieved 31 October 2009.
- Wavell, Archibald (1946). "Despatch on Operations in the Western Desert From 7th December, 1940 to 7th February 1941". London: War Office. in The London Gazette: (Supplement) no. 37628. pp. 3261–3269. 26 June 1946. Retrieved 31 October 2009.
- Wavell, Archibald (1946). "Despatch on Operations in the Middle East From 7th February, 1941 to 15th July 1941". London: War Office. in The London Gazette: (Supplement) no. 37638. pp. 3423–3444. 3 July 1946. Retrieved 31 October 2009.
- Reports
- Roberts, Major-General G. P. B.; Bayerlein, Generalleutnant, Fritz (1956). Basil Liddell Hart, ed. Battle Report: Alam Halfa (Report). Fort Leavenworth, KS: Combat Studies Institute, US Army Command and General Staff College. OCLC 464601329. Retrieved 5 November 2007.
- Toppe, Generalmajor Alfred (1990) [~1947]. German Experiences in Desert Warfare During World War II (PDF). The Black Vault (Report). II. Washington: US Marine Corps: Historical Division, European Command. FMFRP 12-96-II. Retrieved 15 October 2013.
- Theses
- Christie, Howard R. (1999). Fallen Eagles: The Italian 10th Army in the Opening Campaign in the Western Desert, June 1940 – December 1940 (MA). Fort Leavenworth, KS: US Army Command and General Staff College. OCLC 465212715. A116763. Retrieved 16 February 2015.
- Websites
- "Engagements, 1942". The History of the British 7th Armoured Division. 2001. Retrieved 20 February 2015.
Further reading
- Books
- Alanbrooke, Field Marshal Lord (2002) [1957]. Danchev, Alex; Todman, Daniel, eds. War Diaries 1939–1945 (rev. ed.). London: Phoenix Press. ISBN 1-84212-526-5.
- Beaumont, Joan (1996). Australia's War, 1939–1945. Melbourne: Allen & Unwin. ISBN 1-86448-039-4.
- Brett-James, Antony (1951). Ball of Fire: The Fifth Indian Division in the Second World War. Aldershot: Gale & Polden. OCLC 4275700. Retrieved 19 February 2016.
- Carver, Field Marshal Lord (2000) [1962]. El Alamein. Ware: Wordsworth Editions. ISBN 978-1-84022-220-3.
- Carver, Field Marshal Lord (1964). Tobruk. Pan Books. ISBN 0-330-23376-9.
- Churchill, Winston S. (1986) [1949]. Their Finest Hour. The Second World War. II. Boston: Houghton Mifflin. ISBN 0-395-41056-8.
- Churchill, Winston S. (1985) [1950]. The Grand Alliance. The Second World War. III. Boston: Houghton Mifflin. ISBN 0-395-41057-6.
- Churchill, Winston S.; Gilbert, Martin (1993). The Churchill War Papers. London: W. W. Norton. ISBN 0-393-01959-4.
- Clifford, Alexander (1943). Three Against Rommel. London: George G. Harrap. OCLC 480338570.
- Dear, I. C. B.; Foot, M. R. D., eds. (2005) [1995]. The Oxford Companion to World War II. Mazal Holocaust Collection. Oxford University Press. ISBN 978-0-19-280666-6.
- Glassop, Lawson (1992) [1944]. We Were the Rats (Penguin ed.). Sydney: Angus & Robertson. ISBN 0-14-014924-4.
- Harrison, Frank (1999) [1996]. Tobruk: The Great Siege Reassessed. London: Brockhampton Press. ISBN 1-86019-986-0.
- Jentz, Thomas L. (1996). Panzer Truppen: The Complete Guide to the Creation & Combat Employment of Germany's Tank Force 1933–1942. I. Schiffer Publishing. ISBN 0-88740-915-6.
- Jentz, Thomas L. (1998). Tank Combat in North Africa: The Opening Rounds. Schiffer. ISBN 0-7643-0226-4.
- Latimer, Jon (2002). Alamein. London: John Murray. ISBN 978-0-7195-6203-7.
- Latimer, Jon (2000). Operation Compass 1940: Wavell's Whirlwind Offensive. Campaign. Oxford: Osprey. ISBN 1-85532-967-0.
- Latimer, Jon (2004). Tobruk 1941: Rommel's Opening Move. Greenwood Press. ISBN 0-275-98287-4.
- Long, Gavin (1961) [1952]. To Benghazi. Official History of Australia in the Second World War Series 1 (Army). I. Canberra: Australian War Memorial. OCLC 314648263. Retrieved 13 December 2015.
- Lucas-Phillips, C. E. (1962). Alamein. London: Heinemann. OCLC 3510044.
- Maughan, Barton (1966). Tobruk and El Alamein. Official History of Australia in the Second World War Series 1 (Army). III. Canberra: Australian War Memorial. OCLC 954993.
- Mellenthin, Major General F. W. von (1971) [1956]. Panzer Battles: A Study of the Employment of Armour in the Second World War (First ed.). New York: Ballantine Books. ISBN 0-345-24440-0.
- Santoro, G. (1957) [1950]. L'aeronautica italiana nella seconda guerra mondiale [The Italian Air Force in WWII]. I (2nd ed.). Milano-Roma: Edizione Esse. OCLC 900980719. Retrieved 17 December 2015.
- Santoro, G. (1957). L'aeronautica italiana nella seconda guerra mondiale [The Italian Air Force in WWII]. II (1st ed.). Milano-Roma: Edizione Esse. OCLC 60102091. Retrieved 17 December 2015.
- Walker, Ian W. (2003). Iron hulls, Iron hearts: Mussolini's Elite Armoured Divisions in North Africa. Marlborough: Crowood. ISBN 978-1-86126-646-0.
- Walker, Ronald (1967). Alam Halfa and Alamein. The Official History of New Zealand in the Second World War 1939–1945. Wellington, NZ: Historical Publications Branch. OCLC 504337535.
- Reports
- Thompson, D. H. (2002). Discarded Victory: North Africa, 1940–1941 (PDF) (Report). USAWC Strategy Research Project. Carlisle Barracks, PA: US Army War College. OCLC 50872739. Retrieved 9 July 2015.
- Tosch, D. F. (1987). German Operations in North Africa: A Case Study of the Link Between Operational Design and Sustainment (Report). Command and General Staff College, School of Advanced Military Studies Monograph. Fort Leavenworth, KS: School of Advanced Military Studies US Army Command and General Staff College. OCLC 17455859. ADA 184732. Retrieved 28 March 2015.
- Theses
- Dando, N. (2014). The Impact of Terrain on British Operations and Doctrine in North Africa 1940–1943 (PhD). Plymouth University. OCLC 885436735. Retrieved 25 March 2015.
- LaFace, J. L. (2001). Tactical Victory Leading to Operational Failure: Rommel in North Africa (Monograph). Command and General Staff College, School of Advanced Military Studies. Fort Leavenworth, KS: United States Army Command and General Staff College, School of Advanced Military Studies. OCLC 831724060. Docket ADA 397473. Retrieved 28 March 2015.
- Snead, L. R. (6 May 1994). Wavell's Campaigns in the Middle East: An Analysis of Operational Art and the Implications for Today (Monograph). Command and General Staff College, School of Advanced Military Studies. Fort Leavenworth, KS: School of Advanced Military Studies, United States Army Command and General Staff College. OCLC 831935679. Docket ADA 284720. Retrieved 9 March 2015.
External links
| Wikimedia Commons has media related to Western Desert Campaign. |
- AFRIKAKORPS.org/AANA Research Group
- Panzer Army Africa Battle Report dated 29 June 1942 K.T.B. 812 page 1
- Panzer Army Africa Battle Report dated 29 June 1942 K.T.B. 812 page 2
- Crusader Project, Axis supply statistics for North Africa