Battle of Mersa Matruh
| ||||||||||||||||||||||||||||||||

The Battle of Mersa Matruh was fought from 26 June to 29 June 1942 following the defeat of the Eighth Army (General Sir Claude Auchinleck) at the Battle of Gazala. It was part of the Western Desert Campaign of the Second World War. The combatants on the Axis side were the Panzerarmee Afrika (Generalfeldmarschall Erwin Rommel), consisting of German and Italian units. The Allied forces of the Eighth Army comprised X Corps and XIII Corps. The battle developed as the Afrika Korps pursued the Eighth Army as it retreated into Egypt. Rommel intended to engage and destroy the Allied infantry formations in detail, before the British had a chance to regroup. In the event he was able to cut off the line of retreat of X Corps and the XIII Corps but his forces were too weak to stop them from breaking out. The fortress port of Mersa Matruh and 6,000 prisoners fell into his hands there, along with a great deal of supplies and equipment, but his main goal of destroying the Eighth Army escaped him.
Background
Following the defeat of the Eighth Army at Gazala, the Allied forces were compelled to retreat to the east. The British left a garrison in Tobruk, which was expected to be strong enough to hold the port, while the Eighth Army regrouped and replaced its losses.[2] The British command had not prepared Tobruk for a lengthy siege and planned to return to relieve the Tobruk garrison within two months.[3] The sudden fall of Tobruk in a day came as a shock.[3][4] Not only was it a great psychological blow to the British, it meant the Axis had a supply port near at hand to support an advance into Egypt and did not need to leave an investing force to watch the port. After a year and a half of fighting, the Afrika Korps was finally in position to drive east into Egypt.[5]

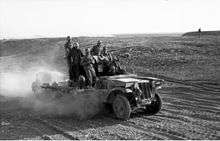
Following the victory at Tobruk Rommel pressed on the heels of the retreating Eighth Army.[6] His intention was to bring the Eighth Army to battle and defeat it, before the British had the chance to bring up fresh units and reform behind a defensive line.[7] Though his forces were badly weakened by the Gazala battles, he had speed, guile and surprise.[8] The 21st Panzer Division was given one day to regroup and then was sent down the coast road to Egypt.[2] Fuel and ammunition supplies captured at Tobruk supplied the Axis forces for their drive to the frontier and beyond.
After the defeat at Gazala and the loss of Tobruk, Auchinleck offered his resignation on 22 June. It was not accepted.[5] To slow the Axis advance into Egypt, the British command intended to form a defensive position at the Cyrenaica–Egypt frontier, along the Frontier Wire (the wire).[9] XIII Corps (Lieutenant-General William Gott), was to fall back in a delaying action. However the Axis forces reached the wire on June 23, shortly after the XIII Corps. There was no time to mount a defense, and Eighth Army lacked the armour to defend the open southern end of the position.[5][10] Gott recommended falling back another 120 miles (190 km) to the Mersa Matruh position.[5] British rearguards tried to destroy the fuel and ammunition supplies there and then Gott withdrew without engaging the Afrika Korps.[5][11] The British command ordered the Eighth Army to prepare to fight a decisive action at Mersa Matruh.[11]
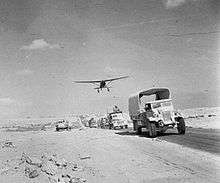
Rommel requested freedom of manoeuvre from Mussolini, to pursue the Eighth Army into Egypt, which was granted.[2] Additional fuel, equipment and munitions were salvaged from remaining British stores at the frontier. Rommel pushed on unopposed through the night and the next day, meeting no resistance from British forces on the ground. His advance, however, was increasingly harassed from the air. The Desert Air Force which was growing in strength and operating nearer to its bases, while the Luftwaffe and Regia Aeronautica were operating farther away from theirs.[12][13][14][N 1]
After the reverses at Gazala and Tobruk, the Eighth Army was disorganized and shaken, but not demoralized.[12] Auchinleck realized a change in command was necessary and on 25 June he relieved Ritchie, and assumed personal responsibility for the command of Eighth Army.[15] He issued directives to change the Eighth Army into a force that stressed mobility and made it clear that his highest priority was keeping Eighth Army intact as a fighting force.[16] The last defensive position before Alexandria was El Alamein. Auchinleck was preparing defences there but a mobile defensive battle was to be fought from Mersa Matruh to the El Alamein gap.[17] It had become apparent to Auchenlick that non-mobile formations were helpless against mobile forces and he could ill afford to lose more formations. He shifted transport to enable the infantry formations with XIII Corps to be fully motorised and stressed that Eighth Army forces fighting at Mersa Matruh must not allow themselves to be cut off.[5]
Setting

Mersa Matruh (Mersa: anchorage) was a small coastal port 120 miles (190 km) east of the wire, halfway between Cyrenica and El Alamein. A rail head connected the town to Alexandria. The harbour was 1.5 miles (2.4 km) in length, and enclosed a small, deep water anchorage. The coastal town was like a small Tobruk.[18] It had been fortified in 1940 when the Italians first invaded Egypt, and was further strengthened during the buildup for Operation Crusader.[19] It was the last coastal fortress in Allied possession.[20] The town is located on a thin coastal plain that extends inland 10 miles (16 km) to a sharp escarpment. Extending further south is a second narrow plain extending 12 miles (19 km) to a second sharp escarpment, called the Sidi Hamaza escarpment.[12] At the eastern end of this escarpment is the Minqar Qaim track. Beyond the upper escarpment lies the high desert, extending 80 miles (130 km) south to the Qattara Depression.[12] The western approach to the town was heavily mined, which had been extended around the southern approach to the town, but the eastern approach to the fortress had not been mined. An airfield was just inland. The coast road Via Balbia was the main avenue of retreat and ran through the town.
German plans
German planning for the battle was done when Rommel arrived. His general plan was to catch and defeat the Eighth Army in detail before the British had a chance to regroup behind a defensive line and rebuild their army with fresh formations.[14][6] Having dealt their armoured forces a heavy blow at Gazala, he looked to destroy a major portion of their infantry formations by trapping them in the defensive fortress of Mersa Matruh.[14] Rommel believed four Allied infantry divisions were in the fortress, and the remnants of the British armour was to the south.[13] He planned to use the Afrika Korps to push the British armour aside and use the 90th Light Division to cut off the infantry at Matruh.[14]
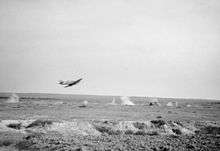
His drive into Egypt was hampered by the actions of the Desert Air Force.[12] His own Luftwaffe had been outstripped by his rapid advance, and there was difficulty getting fighter aircraft up over his formations.[14][21] Besides harassing his motor transport, the Desert Air Force had effected the loss of General Ettore Baldassare, commander of the Italian XX Motorised Corps, who was mortally wounded by bomb fragments in an air attack 25 June while moving between his lead columns.[22] Baldassare had been much valued by Rommel, who noted his bravery and efficiency.[23]
Afrika Korps reconnaissance units reached the outskirts of Mersa Matruh on the evening of 25 June.[13] Rommel planned to attack the next day, but on the morning of 26 June an Axis supply column was destroyed, causing a fuel shortage and delaying the attack till the afternoon.[14] Rommel's information on Allied dispositions at Matruh was limited, partly due to a lack of reconnaissance flights and partly to the loss of his wireless interception unit, the 621st Signals Battalion, which the British had become aware of and made a point of overrunning and destroying at the Battle of Gazala.[24][25]
British plans
Auchinleck had been preparing defences at Mersa Matruh to be garrisoned by XXX Corps but then moved XXX Corps back to the Alamein position and its defensive positions at Matruh were taken up by X Corps (Lieutenant-General William Holmes), with two infantry divisions. The 10th Indian Infantry Division was positioned in Mersa Matruh proper, while the 50th (Northumbrian) Infantry Division was east of the town protecting the eastern approach. To the south, XIII Corps took up positions on the high ground above the second escarpment. Auchinleck directed the corps commanders to offer the strongest possible resistance and if either corps was attacked the other was to take the opportunity to attack the Axis flank.[1]

XIII Corps comprised the 5th Indian Infantry Division, 2nd New Zealand Division and 1st Armoured Division but 5th Indian Infantry Division had only the 29th Indian Infantry Brigade. It was positioned south of the town on the Sidi Hamaza escarpment. The 2nd New Zealand Division was newly arrived from Syria. It took up positions at the eastern end of the escarpment, at the Minqar Qaim (Minqar: promontory or cliff) track. The 22nd Armoured Brigade (1st Armoured Division) was in the open desert 5 miles (8.0 km) to the south-west. The division had been reinforced by the 7th Motorized Brigade and 4th Armoured Brigade (7th Armoured Division), which protected Eighth Army against a flanking manoeuvre around the open southern desert. The armoured units had lost nearly all of their tanks at Gazala but had received replacements bringing the number up to 159 tanks, including 60 American Grant tanks with 75 mm guns.[1] Between the corps was a plain bounded by the escarpments, where a thin minefield had been laid, screened by Gleecol and Leathercol from the 29th Indian Infantry Brigade. The small columns each had two platoons of infantry and an artillery detachment.
Orders and counter-orders resulted in confusion in the minds of the Allied commanders. The Allied forces had to engage the Axis and inflict as much attrition as possible but could not risk being enveloped and destroyed. At Matruh the Eighth Army units were far stronger then the Afrika Korps forces pursuing them but Allied effectiveness was reduced by conflicting objectives. There was little coordination between the Allied forces and communication was poor from the corps level on down.[26]
Battle
Delays in getting units in position and refuelled meant the Axis attack of 26 June did not begin until mid-afternoon.[1][26] The 21st Panzer Division moved across the short plain between the two escarpments above Matruh, with 90th Light Division on its left flank, while 15th Panzer Division moved across the plain above the second escarpment with the Italian XX Motorized Corps following some ways behind. The 90th Light and 21st Panzer divisions made a path through the thin minefield and brushed aside Gleecol and Leathercol. On the high desert plain the 15th Panzer Division ran into the 22nd Armoured Brigade and its drive forward was checked.
At dawn on 27 June, the 90th Light Division resumed its advance and destroyed the 9th Battalion, Durham Light Infantry (9th DLI), 17 miles (27 km) south of Matruh.[27] As it moved east, the 90th Light Division came under the fire of 50th Infantry Division artillery and was forced to take cover.[27] To the south Rommel advanced with the 21st Panzer Division and under the cover of an artillery duel the 21st Panzer Division made a flanking movement across the front of the 2nd New Zealand Division, to the eastern approach at Minqar Qaim.[27][28][29] The division ran into the 2nd New Zealand divisional transport at Minquar Qaim, scattering it. Though the New Zealanders were easily holding against 21st Panzer's attacks, their path of retreat had been cut off.[30][31] At midday 27 June, Auchinleck sent a message to his two corps commanders indicating that if they were threatened with being cut off they were to retire rather than risk encirclement and destruction.[26] Rommel moved north and joined the 90th Light Division. He got them to resume their advance, with the imperative to cut the coast road.[32] After dark, the 90th Light Division reached the coast road and cut it, blocking the retreat of X Corps.[33][34][35]
In light of 2nd New Zealand's path of retreat being cut off to the east, Gott made his decision to withdraw that night and notified Eighth Army.[35] In fact it was the Afrika Korps that was in a perilous position. The 90th Light was occupying a narrow salient, isolated on the coast road. The 21st Panzer Division was 15 miles (24 km) away, hard pressed by the 2nd New Zealand Division and the 15th Panzer Division and Italian XX Corps were blocked by the 1st Armoured Division.[36] However the opportunity was not perceived, as the chief concern in the mind of the Corps commander was getting his force out intact.[27][37] He relayed his intention to the Eighth Army, planning to take up a second delaying position at Fuka, some 30 mi (48 km) east of Matruh.[37]

At 21:20 hours on 27 June Auchinleck ordered the Eighth Army to fall back to Fuka. By this point, 2nd New Zealand division's commanding officer, General Bernard Freyberg had been wounded in the neck from shrapnel.[35] He passed command to the division's 4th Brigade commander, Brigadier Lindsay Inglis.[38][39] Inglis chose to use his brigade to fight their way through to the east, to be followed by the Divisional Headquarters and the 5th Brigade.[40] There was to be no preliminary bombardment, as that would alert the German's to the division's intentions. The start of the attack was delayed until 0200 by the late arrival of the Maori battalion.[40] Once formed up the three battalions set off down the escarpment. With fixed bayonet, the 4th Brigade drove down the Minqar Qaim track directly upon the positions of a panzergrenadier battalion of the 21st Panzer division.[41][42][43] The German defenders were unaware of their advance until they were nearly upon them.[40] The New Zealanders drove their way through the defensive positions of 21st Panzer.[42][44] The fighting was fierce, confused and at times hand to hand. There were instances of German wounded being bayonetted as the New Zealanders worked their way through,[45][46] for which the Afrika Korps command issued a formal complaint.[27] Reaching the other side of the position, 4th Brigade regrouped and made good their escape to the east. While this attack was underway Inglis grew concerned over the delay and the approaching dawn, deciding to take the rest of the division by a different route.[47] Overloading what transport was available he led the Divisional Headquarters, the Reserve Group and the 5th Brigade away to the south.[47] In doing so they ran into the positions of a panzer battalion of the 21st Panzer. In the confused firing that followed a number of trucks and ambulance vehicles were set afire, but the bulk of the force managed to scramble away.[47] Orders had been issued for a withdrawal of XIII Corps to Fuka, but it is unclear if 2nd New Zealand received them.[35][42] In the event the various elements of the division all continued east to El Alamein.[48] Over the three days of fighting the New Zealanders had suffered some 800 casualties, including their commanding officer.[42]
Due to a communication error, Auchinleck's order to withdraw did not reach Holmes until early in the morning of 28 June. Through the night, X Corps counter-attacked to the south in an effort to take the pressure off Gott, not realizing that XIII Corps had already left the area.[35] A short discussion was held between Holmes and Auchinleck, in which Holmes considered three options: remain and hold on to the fortress as long as possible, attack eastwards on the coast road and fight their way through the 90th Light Division or break out in the night to the south.[34] Auchinleck made clear that X Corps was not to attempt to hold out in its defensive positions and he thought there was no point to try to fight east along the coast road. He ordered Holmes to divide his force into columns and break out to the south. They were to continue on for a few miles before turning east to make their way to El Alamein.[34]
That night X Corps broke into small columns and broke out to the south.[49] The Afrika Korps had moved on, leaving only the Italians and the 90th Light Division to invest Matruh.[35] Fierce firefights were engaged in as they drove through the thin lines. One of the columns picked a path that approached the Afrika Korps command section. Rommel's kampfstaffel was engaged, and the staff officers themselves had to take up arms.[N 2] After a time Rommel moved his headquarters south and away from the fighting.[50]

The 29th Indian Infantry Brigade arrived at the regrouping point at Fuka late in the afternoon of 28 June. Arriving soon after was the 21st Panzer Division. The commander of the brigade had assembled transport in case a quick withdrawal was necessary, but the assault of 21st Panzer came too rapidly and the brigade was overrun and destroyed.[48][8] Early on the morning of 29 June, the 90th Light Division broke into Matruh and took more than 6,000 prisoners and a great deal of supplies and equipment. The 90th Light Division was allowed no time to rest, but was quickly sent down the coast road after the retreating Eighth Army. An entry in the 90th Light War Diary rued "After all our days of hard fighting, we did not get a chance to rest or bathe in the ocean."[51][52] The 21st Panzer Division intercepted some British columns near Fuka and took another 1,600 prisoners.[50]
Rommel diverted the Afrika Korps inland some 15 miles (24 km) to try to cut off more of the retreating Eighth Army. Small columns from both sides raced across the broken ground of the desert toward El Alamein.[35] Units became intermingled and disorganized and opposing columns ran parallel to each other, with German columns sometimes running in front of the retreating British.[53] The columns sometimes exchanged fire, and as about 85 percent of the Afrika Korps transport was captured British or American equipment, it was often difficult to distinguish friend from foe.[53]
Aftermath
The fight at Matruh took its character from the disposition of the Eighth Army forces, Rommel's misunderstanding of them and the chronic lack of co-ordination between British infantry and armoured units.[18] After the war Field Marshal Henry Maitland Wilson said "The XIII Corps just disappeared and left X Corps up the pole."[54] Holmes estimated that only 60 percent of X Corps got back to El Alamein.[35] Friedrich von Mellenthin, Rommel's intelligence officer during the battle commented "As a result of Auchinleck’s hesitation, the British not only lost a great opportunity of destroying the Panzerarmee but suffered a serious defeat, which might easily have turned into an irretrievable disaster. I stress this point, for to the student of generalship there are few battles so instructive as Mersa Matruh."[1]
Following its escape from Matruh the surviving units of X Corps were scattered and badly disorganized. It was withdrawn to the Nile as "Delta Force" and was unable to participate in the early phases of the First Battle of El Alamein.[49] 2nd New Zealand Division did not regroup at Fuka but continued to El Alamein.[35] The New Zealanders were placed into the El Alamein line. Some 8,000 Allied prisoners were taken during the battle, 6,000 at Matruh, where 40 British tanks were also lost.[55] Large supply dumps were captured by the Axis as well and enough equipment to equip a division.[55]
With the fall of Matruh, Axis aircraft that could be operating from the Matruh airfields would be 160 miles (260 km) from the naval base at Alexandria. In light of this threat the British naval command withdrew the Mediterranean Fleet, dispersing its force to several smaller eastern Mediterranean ports.[56][35] Panic was in the air in Alexandria and Cairo.[35] The head of the US Army Intelligence Division predicted the British position in Egypt would collapse in less than a week.[57] People fled east to Palestine and the air was thick with the smoke of burning official and secret documents.[35][58] The British consulate was swamped with people requesting visas.[35] The British army flooded sections of the Nile Delta, prepared to demolish infrastructure and built up defensive positions at Alexandria and the Suez canal. A scorched earth policy was discussed but decided against.[59]
Mellenthin said of this: "Rommel may have been lucky, but Mersa Matruh was certainly a brilliant German victory and gave us great hopes of 'bouncing' 8th Army out of the Alamein line."[50] This was not to be. In the event Auchinleck solidified 8th Army and in a month's worth of fighting checked the German advance at the First Battle of El Alamein. After it was over both sides were exhausted, but the British still held their positions.[60] The Allied crisis passed, and 8th Army began to build up its strength in preparation for going back onto the offensive.
Notes
- ↑ Rommel commented in his papers: "My formations were repeatedly assailed by heavy R.A.F. bomber attacks. Our own Luftwaffe was regrouping at the time and could not put up any fighters".
- ↑ Kampfstaffel Kiehl was a light kampfgruppe or battle group under the command of Colonel Kiehl that was attached to the Afrika Korps headquarters. Due to the fluid nature of operations in the desert, combat forces often passed close to command units of the opposite side. A number of commanding officers of both armies were captured over the course of the desert war. To address this problem Rommel had a special unit of light forces attached to the Afrika Korps headquarters, which he often used as a mobile reserve.[50]
- ^ c. 6,000 prisoners at Mersa Matruh
Footnotes
- 1 2 3 4 5 Mellenthin 1956, p. 126.
- 1 2 3 Jackson 1975, p. 238.
- 1 2 Butler 2015, p. 335.
- ↑ Playfair 1960, p. 274.
- 1 2 3 4 5 6 Jackson 1975, p. 239.
- 1 2 Playfair 1960, p. 296.
- ↑ Rommel 1953, p. 232.
- 1 2 Liddell Hart 1970, p. 279.
- ↑ Playfair 1960, p. 247.
- ↑ Playfair 1960, p. 279.
- 1 2 Playfair 1960, p. 281.
- 1 2 3 4 5 Jackson 1975, p. 240.
- 1 2 3 Mellenthin 1956, p. 125.
- 1 2 3 4 5 6 Rommel 1953, p. 236.
- ↑ Playfair 1960, p. 285.
- ↑ Jackson 1975, p. 241.
- ↑ Playfair 1960, p. 286.
- 1 2 Lewin 1968, p. 132.
- ↑ Playfair 1960, p. 284.
- ↑ Rommel 1953, p. 240.
- ↑ Playfair 1960, pp. 283-284.
- ↑ Tomasicchio, Emaneule (April 28, 2011). "Un cippo della città nei luoghi dove morì Ettore Baldassarre". Redazione Traniviva. Retrieved February 3, 2016.
- ↑ Rommel 1953, p. 237.
- ↑ Wil Deac (12 June 2006). "Intercepted Communications for Field Marshal Erwin Rommel". World War II Magazine.
- ↑ Lewin 1968, p. 252.
- 1 2 3 Jackson 1975, p. 242.
- 1 2 3 4 5 Mellenthin 1956, p. 127.
- ↑ Playfair 1960, p. 290, Excerpt reads: an artillery duel began.
- ↑ Kay 1958, p. 208, Excerpt reads: an artillery duel continued.
- ↑ Jackson 1975, p. 243, Excerpt reads: easily holding their own.
- ↑ Playfair 1960, p. 291, Excerpt reads: these attacks were easily held.
- ↑ Playfair 1960, p. 290.
- ↑ Lewin 1968, p. 133.
- 1 2 3 Playfair 1960, p. 294.
- 1 2 3 4 5 6 7 8 9 10 11 12 13 Jackson 1975, p. 243.
- ↑ Mellenthin 1956, pp. 127–128.
- 1 2 Playfair 1960, p. 291.
- ↑ Rommel 1953, p. 238, Notation by BH Liddell Hart.
- ↑ Playfair 1960, p. 292.
- 1 2 3 Kay 1958, p. 212.
- ↑ Liddell Hart 1970, p. 278.
- 1 2 3 4 Playfair 1960, p. 293.
- ↑ Kay 1958, p. 212, Excerpt reads: The New Zealanders closed swiftly, and using bayonets and grenades...
- ↑ Kay 1958, p. 212, Excerpt reads: brief, merciless encounter.
- ↑ Bierman & Smith 2002, pp. 201–202.
- ↑ Young 1950, p. 134.
- 1 2 3 Kay 1958, p. 213.
- 1 2 Playfair 1960, pp. 292–293.
- 1 2 Playfair 1960, p. 295.
- 1 2 3 4 Mellenthin 1956, p. 129.
- ↑ Mellenthin 1956, p. 131.
- ↑ Playfair 1960, pp. ?.
- 1 2 Neillands 2005, p. 127.
- ↑ Mellenthin 1956, p. 128.
- 1 2 Rommel 1953, p. 239.
- ↑ Playfair 1960, p. 315; p=338.
- ↑ Jackson 1975, p. 244.
- ↑ Butler 2015, p. 341.
- ↑ Playfair 1960, p. 334.
- ↑ Playfair 1960, p. 297, Excerpt reads: The fighting lasted on and off the whole month. When it died down both sides were exhausted, but the British were still in possession of the vital ground.
Bibliography
- Bierman, John; Smith, Colin (2002). Alamein: War Without Hate. London: Viking.
- Butler, Daniel Allen (2015). Field Marshal: The Life and Death of Erwin Rommel. Havertown, PA; Oxford: Casemate. ISBN 978-1-61200-297-2.
- Jackson, Sir William G. F. (1975). The Battle for North Africa, 1940–43. New York: Mason/Charter. ISBN 0-88405-131-5.
- Kay, Robin (1958). 27 (Machine Gun) Battalion. Wellington, N.Z: War History Branch, Dept. of Internal Affairs.
- Lewin, Ronald (1998) [1968]. Rommel As Military Commander. New York: B&N Books. ISBN 978-0-7607-0861-3.
- Liddell Hart, B. H. (1970). History of the Second World War. New York: Putnam. OCLC 878163245.
- Mellenthin, Major General F. W. von (1971) [1956]. Panzer Battles: A Study of the Employment of Armour in the Second World War (1st ed.). New York: Ballantine Books. ISBN 0-345-24440-0.
- Neillands, Robin (2005). The Desert Rats: 7th Armoured Division 1940–45. London: Aurum. ISBN 1-84513-115-0.
- Playfair, Major-General I. S. O.; with Flynn, Captain F. C. RN; Molony, Brigadier C. J. C. & Gleave, Group Captain T. P. (2004) [1960 HMSO]. Butler, Sir James, ed. The Mediterranean and Middle East: British Fortunes reach their Lowest Ebb (September 1941 to September 1942). History of the Second World War, United Kingdom Military Series. III. Uckfield, UK: Naval & Military Press. ISBN 1-845740-67-X.
- Rommel, Erwin (1982) [1953]. Liddell Hart, B. H., ed. The Rommel Papers. New York: Da Capo Press. ISBN 978-0-306-80157-0.
- Young, Desmond (1950). Rommel The Desert Fox. New York: Harper & Row. OCLC 48067797.
Further reading
- Maughan, Barton (1966). Tobruk and El Alamein. Official History of Australia in the Second World War Series 1 (Army). III (online ed.). Canberra: Australian War Memorial. OCLC 954993.
- Messenger, Charles (2009). Rommel: Leadership Lessons from the Desert Fox. Basingstoke, NY: Palgrave Macmillan. ISBN 0-23060-908-2.
- Scoullar, J. L. (1955). Kippenberger, Howard, ed. The Battle for Egypt: The Summer of 1942. The Official History of New Zealand in the Second World War, 1939–1945 (online ed.). Wellington, NZ: Historical Publications Branch. OCLC 2999615. Retrieved 23 January 2016.
- Walker, Ronald (1967). Alam Halfa and Alamein. The Official History of New Zealand in the Second World War 1939–1945 (online ed.). Wellington, NZ: Historical Publications Branch. OCLC 504337535.