Operation Overlord
| Operation Overlord | |||||||
|---|---|---|---|---|---|---|---|
| Part of the Western Front of World War II | |||||||
 Tank landing ships, with barrage balloons afloat, unloading supplies on Omaha for the break-out from Normandy. | |||||||
| |||||||
| Belligerents | |||||||
|
| |||||||
| Commanders and leaders | |||||||
| |||||||
| Strength | |||||||
| |||||||
| Casualties and losses | |||||||
|
Civilian deaths: | |||||||
Operation Overlord was the code name for the Battle of Normandy, the Allied operation that launched the successful invasion of German-occupied Western Europe during World War II. The operation was launched on 6 June 1944 with the Normandy landings (Operation Neptune, commonly known as D-Day). A 1,200-plane airborne assault preceded an amphibious assault involving more than 5,000 vessels. Nearly 160,000 troops crossed the English Channel on 6 June, and more than two million Allied troops were in France by the end of August.
The decision to undertake a cross-channel invasion in 1944 was taken at the Trident Conference in Washington in May 1943. General Dwight D. Eisenhower was appointed commander of Supreme Headquarters Allied Expeditionary Force (SHAEF), and General Bernard Montgomery was named as commander of the 21st Army Group, which comprised all the land forces involved in the invasion. The Normandy coast was chosen as the site of the invasion, with the Americans assigned to land at sectors codenamed Utah and Omaha, the British at Sword and Gold, and the Canadians at Juno. To meet the conditions expected on the Normandy beachhead, special technology was developed, including two artificial ports called Mulberry harbours and an array of specialised tanks nicknamed Hobart's Funnies. In the months leading up to the invasion, the Allies conducted a substantial military deception, Operation Bodyguard, using both electronic and visual misinformation. This misled the Germans as to the date and location of the main Allied landings. Adolf Hitler placed German Field Marshal Erwin Rommel in charge of developing fortifications all along the Atlantic Wall in anticipation of an invasion.
The Allies failed to accomplish their objectives for the first day, but gained a tenuous foothold that they gradually expanded when they captured the port at Cherbourg on 26 June and the city of Caen on 21 July. A failed counterattack by German forces on 8 August left 50,000 soldiers of the 7th Army trapped in the Falaise pocket. The Allies launched an invasion of southern France (code-named Operation Dragoon) on 15 August, and the Liberation of Paris followed on 25 August. German forces retreated across the Seine on 30 August 1944, marking the close of Operation Overlord.
Preparations for D-Day
In June 1940, Germany's leader Adolf Hitler had triumphed in what he called "the most famous victory in history"—the fall of France.[19] The defending British Expeditionary Force (BEF), trapped along the northern coast of France, was able to evacuate over 338,000 troops to England in the Dunkirk evacuation (27 May to 4 June).[20] British planners reported to Prime Minister Winston Churchill on 4 October that even with the help of other Commonwealth countries and the United States, it would not be possible to regain a foothold in continental Europe in the near future.[21] After the Germans invaded the Soviet Union in June 1941, Soviet leader Joseph Stalin began pressing for the creation of a second front in Western Europe. Churchill declined because, even with American help, he felt that the British did not have adequate forces for such a strike,[22] and he wished to avoid costly frontal assaults such as those that had occurred at the Somme and Passchendaele in World War I.[23] Two tentative plans code-named Operation Roundup and Operation Sledgehammer were put forward for 1942–43, but neither was deemed by the British to be practical or likely to succeed.[24] Instead, the Allies launched the invasion of French North Africa in November 1942, the invasion of Sicily in July 1943, and invaded Italy in September.[25] These operations provided the troops with valuable experience in amphibious warfare.[26]
The decision to undertake a cross-channel invasion within the next year was taken at the Trident Conference in Washington in May 1943.[27] Churchill favoured making the main Allied thrust into Germany from the Mediterranean theatre, but was over-ruled by his American allies, who were providing the bulk of the men and equipment.[28] British Lieutenant-General Frederick E. Morgan was appointed Chief of Staff, Supreme Allied Commander (COSSAC), to begin detailed planning.[27] The initial plans were constrained by the number of available landing craft, most of which were already committed in the Mediterranean and Pacific.[29] In part because of lessons learned in the Dieppe Raid of 19 August 1942, the Allies decided not to directly assault a heavily defended French seaport in their first landing.[30] The failure at Dieppe also highlighted the need for adequate artillery and air support, particularly close air support, and specialised ships able to travel extremely close to shore.[31] The short operating range of British aircraft such as the Spitfire and Typhoon greatly limited the number of potential landing sites, as comprehensive air support depended upon having planes overhead for as long as possible.[32] Morgan considered four sites for the landings: Brittany, the Cotentin Peninsula, Normandy, and the Pas de Calais. As Brittany and Cotentin are peninsulas, it would have been possible for the Germans to cut off the Allied advance at a relatively narrow isthmus, so these sites were rejected.[33]

The Pas de Calais is the closest point in continental Europe to Britain and was the location of launch sites for V-1 and V-2 rockets, which were still under development.[lower-alpha 2] The Germans considered it to be the most likely initial landing zone, so it was the most heavily fortified region.[34] It offered few opportunities for expansion, however, as the area is bounded by numerous rivers and canals,[35] whereas landings on a broad front in Normandy would permit simultaneous threats against the port of Cherbourg, coastal ports further west in Brittany, and an overland attack towards Paris and eventually into Germany. Normandy was hence chosen as the landing site.[36] The most serious drawback of the Normandy coast—the lack of port facilities—would be overcome through the development of artificial harbours.[37]
The COSSAC staff planned to launch the invasion on 1 May 1944.[35] The initial draft of the plan was accepted at the Quebec Conference in August 1943. General Dwight D. Eisenhower was appointed commander of SHAEF.[38] General Bernard Montgomery was named commander of the 21st Army Group, which comprised all of the land forces involved in the invasion.[39] On 31 December 1943, Eisenhower and Montgomery first saw the COSSAC plan, which proposed amphibious landings by three divisions, with two more divisions in support. The two generals immediately insisted that the scale of the initial invasion be expanded to five divisions, with airborne descents by three additional divisions, to allow operations on a wider front and speed up the capture of the port at Cherbourg. The need to acquire or produce extra landing craft for the expanded operation meant that the invasion had to be delayed to June.[39] Eventually, 39 Allied divisions would be committed to the Battle of Normandy: 22 American, 12 British, three Canadian, one Polish, and one French, totalling over a million troops[40] all under overall British command.[41][lower-alpha 3]
Allied invasion plan
"Overlord" was the name assigned to the establishment of a large-scale lodgement on the Continent.[42] The first phase, the amphibious invasion and establishment of a secure foothold, was codenamed Operation Neptune.[37] To gain the required air superiority needed to ensure a successful invasion, the Allies launched a bombing campaign (codenamed Operation Pointblank) to target German aircraft production, fuel supplies, and airfields. Under the Transport Plan, communications infrastructure and road and rail links were bombed to cut off the north of France and make it more difficult to bring up reinforcements. These attacks were widespread so as to avoid revealing the exact location of the invasion.[37] Elaborate deceptions were planned to prevent the Germans from determining the timing and location of the invasion.[43]
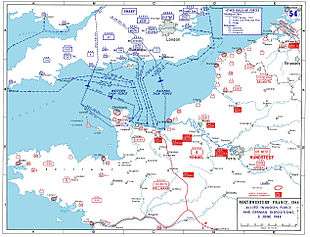
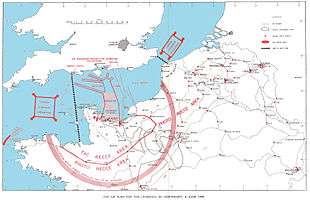
The coastline of Normandy was divided into seventeen sectors, with codenames using a spelling alphabet—from Able, west of Omaha, to Roger on the east flank of Sword. Eight further sectors were added when the invasion was extended to include Utah on the Cotentin Peninsula. Sectors were further subdivided into beaches identified by the colours Green, Red, and White.[44]
The landings were to be preceded by airborne drops near Caen on the eastern flank to secure the Orne River bridges, and north of Carentan on the western flank. The initial goal was to capture Carentan, Isigny, Bayeux, and Caen. The Americans, assigned to land at Utah and Omaha, were to cut off the Cotentin Peninsula and capture the port facilities at Cherbourg. The British at Sword and Gold, and the Canadians at Juno, were to capture Caen and form a front line from Caumont-l'Éventé to the south-east of Caen in order to protect the American flank, while establishing airfields near Caen. Possession of Caen and its surroundings would give the Anglo-Canadians a suitable staging area for a push south to capture the town of Falaise. A secure lodgement would be established and an attempt made to hold all territory captured north of the Avranches-Falaise line during the first three weeks. The Allied armies would then swing left to advance towards the River Seine.[45][46][47]
The invasion fleet, led by Admiral Sir Bertram Ramsay, was split into the Western Naval Task Force (under Admiral Alan G Kirk) supporting the American sectors and the Eastern Naval Task Force (under Admiral Sir Philip Vian) in the British and Canadian sectors.[48][49] The American forces of the First Army, led by Lieutenant General Omar Bradley, comprised VII Corps (Utah) and V Corps (Omaha). On the British side, Lieutenant-General Miles Dempsey was in command of the Second Army, under which XXX Corps was assigned to Gold and I Corps to Juno and Sword.[50] Land forces were under the overall command of Montgomery, and air command was assigned to Air Chief Marshal Sir Trafford Leigh-Mallory.[51] The First Canadian Army included personnel and units from Poland, Belgium, and the Netherlands.[2] Other Allied nations also participated.[52]
Reconnaissance
The Allied Expeditionary Air Force undertook over 3,200 photo reconnaissance sorties from April 1944 until the start of the invasion. Photos of the coastline were taken at extremely low altitude to show the invaders the terrain, obstacles on the beach, and defensive structures such as bunkers and gun emplacements. To avoid alerting the Germans as to the location of the invasion, this work had to be undertaken over the entire European coastline. Inland terrain, bridges, troop emplacements, and buildings were also photographed, in many cases from several angles, to give the Allies as much information as possible.[53] Members of Combined Operations Pilotage Parties clandestinely prepared detailed harbour maps, including depth soundings.[54]
An appeal for holiday pictures and postcards of Europe announced on the BBC received over ten million items, some of which proved to be useful. Information collected by the French resistance helped provide details on troop movements and construction techniques used by the Germans for bunkers and other defensive installations.[55]
Many German radio messages were encoded using the Enigma machine and other encyphering techniques, and the codes were changed frequently. A team of code breakers stationed at Bletchley Park was responsible for breaking each new code as quickly as possible to provide advance information on German plans and troop movements. Information obtained in this way was called Ultra intelligence, as it could only be provided to the top level of commanders. The Enigma code used by Field Marshal Gerd von Rundstedt, Oberbefehlshaber West (Supreme Commander West; OB West), overall commander on the Western Front, was broken by the end of March. The Enigma codes were changed right after the Allied landings of 6 June, but by 17 June the Allies were again consistently able to interpret the intercepted signals.[56]
Technology
In response to the lessons learned at the disastrous Dieppe raid, the Allies developed new technologies to help ensure the success of Overlord. To supplement the preliminary offshore bombardment and aerial assaults, some of the landing craft were equipped with artillery and anti-tank guns to provide close supporting fire.[57] The Allies had decided not to immediately attack any of the heavily protected French ports, so two artificial ports, called Mulberry harbours, were designed. Each assembly consisted of a floating outer breakwater, inner concrete caissons (called Phoenix breakwaters), and several floating piers.[58] The Mulberry harbours were supplemented by blockship shelters (codenamed Gooseberries).[59] With the expectation that fuel would be difficult or impossible to obtain on the continent, the Allies created a Pipe-Line Under The Ocean (PLUTO). Specially developed pipes 3 inches (7.6 cm) in diameter were to be laid under the Channel from the Isle of Wight to Cherbourg by D-Day plus 18. Technical problems and the delay in capturing Cherbourg meant the pipeline was not operational until 22 September. A second line was laid from Dungeness to Boulogne in late October.[60]
A series of specialised tanks, nicknamed Hobart's Funnies, were created to deal with conditions expected during the Normandy campaign. Developed under the supervision of Major-General Percy Hobart, these were specially modified M4 Sherman and Churchill tanks. Examples include the Sherman Crab tank (equipped with a mine flail), the Churchill Crocodile (a flame-throwing tank), and the Armoured Ramp Carrier, which other tanks could use as a bridge to scale sea-walls or overcome other obstacles.[61] In some areas, the beaches consisted of a soft clay that could not support the weight of tanks. The "bobbin" tank would overcome this problem by deploying a roll of matting over the soft surface. The material was then left in place to create a route for more conventional tanks.[62] The Armoured Vehicle Royal Engineers (AVREs) were modified for many tasks, including laying bridges and firing large charges into pillboxes.[63] The Duplex-Drive tank (DD tank), another design developed by Hobart's group, was a self-propelled amphibious tank kept afloat using a waterproof canvas screen inflated with compressed air.[64] These tanks were easily swamped, and on D-Day many sank before reaching the shore, especially at Omaha.[65]
Deception
In the months leading up to the invasion, the Allies conducted Operation Bodyguard, the overall strategy designed to mislead the Germans as to the date and location of the main Allied landings.[66] Operation Fortitude included Fortitude North, a misinformation campaign using fake radio traffic to lead the Germans into expecting an attack on Norway,[67] and Fortitude South, a major deception designed to fool the Germans into believing that the landings would take place at Pas de Calais in July. A fictitious First U.S. Army Group was created, supposedly located in Kent and Sussex under the command of Lieutenant General George S. Patton. The Allies constructed dummy tanks, trucks, and landing craft, and positioned them near the coast. Several military units, including II Canadian Corps and 2nd Canadian Division, were moved into the area to bolster the illusion that a large force was gathering in the area.[43][68] As well as the broadcast of fake radio traffic, genuine radio messages from 21st Army Group were first routed to Kent via landline and then broadcast, to give the Germans the impression that most of the Allied troops were stationed there.[69] Patton was stationed in England until 6 July, thus continuing to deceive the Germans into believing a second attack would take place at Calais.[70] Soldiers and civilians alike were aware of the need for secrecy, and the invasion troops were as much as possible kept isolated, especially in the period immediately before the invasion. One American general was sent back to the United States in disgrace after revealing the invasion date at a party.[43]
The Germans thought they had an extensive network of spies operating in the UK, but in fact all their agents had been captured, and some had become double agents working for the Allies as part of the Double-Cross System. The double agent Juan Pujol García, a Spanish opponent of the Nazis known by the code name "Garbo", developed over the two years leading up to D-Day a fake network of informants that the Germans believed were collecting intelligence on their behalf. In the months preceding D-Day, Pujol sent hundreds of messages to his superiors in Madrid, messages specially prepared by the British intelligence service to convince the Germans that the attack would come in July at Calais.[69][71]
Many of the German radar stations on the French coast were destroyed in preparation for the landings.[72] On the night before the invasion, in Operation Taxable, No. 617 Squadron RAF dropped strips of "window", metal foil that caused a radar return mistakenly interpreted by German radar operators as a naval convoy. The illusion was bolstered by a group of small vessels towing barrage balloons. "Window" was also dropped by No. 218 Squadron RAF near Boulogne-sur-Mer in Operation Glimmer. On the same night, a small group of Special Air Service (SAS) operators deployed dummy paratroopers over Le Havre and Isigny. These dummies led the Germans to believe an additional airborne assault had occurred.[73]
Rehearsals and security

Training exercises for the Overlord landings took place as early as July 1943.[74] As the nearby beach resembled the planned Normandy landing site, the town of Slapton in Devon, was evacuated in December 1943 and taken over by the armed forces as a site for training exercises that included the use of landing craft and management of beach obstacles.[75] It was near here on 28 April 1944 that 749 American soldiers and sailors died when German torpedo boats surprised members of Assault Force "U" conducting Exercise Tiger.[76] Exercises with landing craft and live ammunition also took place at the Combined Training Centre in Inveraray in Scotland.[77] Naval exercises took place in Northern Ireland, and medical teams in London and elsewhere rehearsed how they would handle the expected waves of casualties.[78] Paratroopers conducted exercises, including a huge demonstration drop on 23 March 1944 observed by Churchill, Eisenhower, and other top officials.[79]
Tactical surprise was considered a necessary element of the plan for the landings.[80] Information on the exact date and location of the landings was provided only to the topmost levels of the armed forces. Men were sealed into their marshalling areas at the end of May, with no further communication with the outside world.[81] Troops were briefed using maps that were correct in every detail except for the place names, and most were not told their actual destination until they were already at sea.[82] The effectiveness of the deception operations was increased by a news blackout in Britain.[43] Travel to and from the Republic of Ireland was banned, and movement within several kilometres of the coast of England restricted.[83]
Weather forecast

The invasion planners created a set of conditions regarding the timing of the invasion that meant only a few days in each month were deemed suitable. A full moon was desirable, as it would provide illumination for aircraft pilots and have the highest tides. The Allies wanted to schedule the landings for shortly before dawn, midway between low and high tide, with the tide coming in. This would improve the visibility of obstacles the enemy had placed on the beach while minimising the amount of time the men had to spend exposed in the open. Specific criteria were also set for wind speed, visibility, and cloud cover.[84] Eisenhower had tentatively selected 5 June as the date for the assault. However, on 4 June, conditions were clearly unsuitable for a landing; high winds and heavy seas made it impossible to launch landing craft, and low clouds would prevent aircraft from finding their targets.[85]
By the evening of 4 June, the Allied meteorological team, headed by Group Captain James Stagg of the Royal Air Force, predicted that the weather would improve sufficiently so that the invasion could go ahead on 6 June. He met Eisenhower and other senior commanders at their headquarters at Southwick House to discuss the situation.[86] General Montgomery and Major General Walter Bedell Smith, Eisenhower's chief of staff, were eager to launch the invasion. Admiral Bertram Ramsay was prepared to commit his ships, while Air Chief Marshal Trafford Leigh-Mallory was concerned that the conditions would be unfavourable for Allied aircraft to operate. After much discussion, Eisenhower decided that the invasion should go ahead.[87] Allied control of the Atlantic meant that German meteorologists did not have access to as much information as the Allies on incoming weather patterns.[72] As the Luftwaffe meteorological centre in Paris was predicting two weeks of stormy weather, many Wehrmacht commanders left their posts to attend war games in Rennes, and men in many units were given leave.[88] Field Marshal Erwin Rommel returned to Germany for his wife's birthday and to meet Hitler to try to get more Panzers.[89]
Had Eisenhower postponed the invasion, the next available date with the right combination of tides (but without the desirable full moon) was two weeks later, from 18 to 20 June. As it happened, during this period they would have encountered a major storm lasting four days, between 19 and 22 June, that would have made the initial landings impossible.[85]
German preparations and defences
Nazi Germany had at its disposal 50 divisions in France and the Low Countries, and another 18 were stationed in Denmark and Norway.[lower-alpha 4] Fifteen divisions were in the process of formation in Germany, but there was no strategic reserve.[90] The Calais region was defended by the 15th Army, and Normandy by the 7th Army, commanded by Generaloberst (colonel general) Friedrich Dollmann.[91][92] Combat losses throughout the war, particularly on the Eastern Front, meant the Germans no longer had a pool of able young men from which to draw. German soldiers were now on average six years older than their Allied counterparts. Many in the Normandy area were Ostlegionen (eastern legions)—conscripts and "volunteers" from Turkestan,[93] Russia, Mongolia, and elsewhere. They were provided mainly with unreliable captured equipment and lacked motorised transport.[94] Formations that arrived later, such as the 12th SS Panzer Division Hitlerjugend, were for the most part younger and far better equipped and trained than the static troops stationed along the coast.[95]
Atlantic Wall

Alarmed by the raids on St Nazaire and Dieppe in 1942, Hitler ordered the construction of fortifications all along the Atlantic coast, from Spain to Norway, to protect against an expected Allied invasion. He envisioned 15,000 emplacements manned by 300,000 troops, but due to shortages, particularly of concrete and manpower, most of the strongpoints were never built.[96] As it was expected to be the site of the invasion, Pas de Calais was heavily defended.[96] In the Normandy area, the best fortifications were concentrated at the port facilities at Cherbourg and Saint-Malo.[97]
A report by Rundstedt to Hitler in October 1943 regarding the weak defences in France led to the appointment of Rommel to oversee the construction of further fortifications along the expected invasion front, which stretched from the Netherlands to Cherbourg.[96][98] Rommel was given command of the newly re-formed Army Group B, which included the 7th Army, the 15th Army, and the forces guarding the Netherlands.[99][100] Nazi Germany's tangled command structure made it difficult for Rommel to achieve his task. He was not allowed to give orders to the Organisation Todt, which was commanded by armaments minister Albert Speer, so in some places he had to assign soldiers to do construction work.[97]
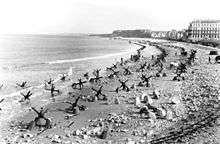
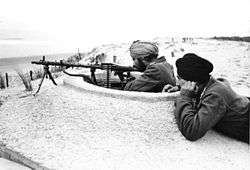
Rommel believed that the Normandy coast could be a possible landing point for the invasion, so he ordered the construction of extensive defensive works along that shore. In addition to concrete gun emplacements at strategic points along the coast, he ordered wooden stakes, metal tripods, mines, and large anti-tank obstacles to be placed on the beach to delay the approach of landing craft and impede the movement of tanks.[101] Expecting the Allies to land at high tide so that the infantry would spend less time exposed on the beach, he ordered many of these obstacles to be placed at the high-tide mark.[84] Tangles of barbed wire, booby traps, and the removal of ground cover made the approach hazardous for infantry.[101] On Rommel's order, the number of mines along the coast was tripled.[97] Given the Allied air supremacy (4,029 Allied aircraft assigned to operations in Normandy plus 5,514 aircraft assigned to bombing and defence, versus 570 Luftwaffe planes stationed in France and the Low Countries[84]), booby-trapped stakes known as Rommelspargel (Rommel's asparagus) were set up in meadows and fields to deter airborne landings.[97]
Mobile reserves
Rommel, believing that the Germans' best chance was to stop the invasion at the shore, requested that mobile reserves—especially tanks—be stationed as close to the coast as possible. Rundstedt, General Leo Geyr von Schweppenburg (commander of Panzer Group West), and other senior commanders believed that the invasion could not be stopped on the beaches. Geyr argued for a conventional doctrine: keeping the Panzer formations concentrated in a central position around Paris and Rouen and deploying them only when the main Allied beachhead had been identified. Geyr also noted that in the Italian Campaign the armour stationed near the coast had been damaged by naval bombardment. Rommel's opinion was that because of the overwhelming Allied air superiority, large-scale movement of tanks would not be possible once the invasion was underway. Hitler made the final decision, which was to leave three divisions under Geyr's command and give Rommel operational control of three tank divisions as reserves. Hitler took personal control of four divisions as strategic reserves, not to be used without his direct orders.[102][103][104]
Invasion
You are about to embark upon the Great Crusade, toward which we have striven these many months. The eyes of the world are upon you. The hopes and prayers of liberty-loving people everywhere march with you. In company with our brave Allies and brothers-in-arms on other Fronts, you will bring about the destruction of the German war machine, the elimination of Nazi tyranny over the oppressed peoples of Europe, and security for ourselves in a free world.— Eisenhower, Letter to Allied Forces[105]
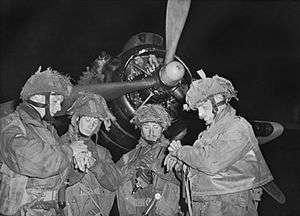
By May 1944, 1.5 million American troops had arrived in the United Kingdom.[55] Most were housed in temporary camps in the south-west of England, ready to move across the Channel to the western section of the landing zone. British and Canadian troops were billeted in accommodation further east, spread from Southampton to Newhaven, and even on the east coast for men who would be coming across in later waves. A complex system called Movement Control assured that the men and vehicles left on schedule from twenty departure points.[81] Some men had to board their craft nearly a week before departure.[106] The ships met at a rendezvous point (nicknamed "Piccadilly Circus") south-east of the Isle of Wight to assemble into convoys to cross the Channel.[107] Minesweepers began clearing lanes on the evening of 5 June,[85] and a thousand bombers left before dawn to attack the coastal defences.[108] Some 1,200 aircraft departed England just before midnight to transport three airborne divisions to their drop zones behind enemy lines several hours before the beach landings.[109] The US 82nd and 101st Airborne Divisions were assigned objectives on the Cotentin Peninsula west of Utah. The British 6th Airborne Division was assigned to capture intact the bridges over the Caen Canal and River Orne.[110] The Free French 4th SAS battalion of 538 men was assigned objectives in Brittany (Operation Dingson, Operation Samwest).[111][112] Some 132,000 men were transported by sea on D-Day, and a further 24,000 came by air.[81] Preliminary naval bombardment commenced at 05:45 and continued until 06:25 from five battleships, twenty cruisers, sixty-five destroyers, and two monitors.[81][113] Infantry began arriving on the beaches at around 06:30.[114]
Beaches
The craft bearing the U.S. 4th Infantry Division assaulting Utah were pushed by the current to a spot about 1,800 metres (2,000 yd) south of their intended landing zone. The troops met light resistance, suffering fewer than 200 casualties.[115][116] Their efforts to push inland fell far short of their targets for the first day, but they were able to advance about 4 miles (6.4 km), making contact with the 101st Airborne Division.[46][117] The airborne landings west of Utah were not very successful, as only ten per cent of the paratroopers landed in their drop zones. Gathering the men together into fighting units was made difficult by a shortage of radios and by the terrain, with its hedgerows, stone walls and marshes.[118][119] The 82nd Airborne captured its primary objective at Sainte-Mère-Église and worked to protect the western flank.[120] Its failure to capture the river crossings at the River Merderet resulted in a delay in sealing off the Cotentin Peninsula.[121] The 101st Airborne helped protect the southern flank and captured the lock on the River Douve at La Barquette,[119] but did not capture the assigned nearby bridges on the first day.[122]
At Pointe du Hoc, the task for the two hundred men of 2nd Ranger Battalion, commanded by Lt. Colonel James Rudder, was to scale the 30-metre (98 ft) cliffs with ropes and ladders to destroy the gun battery located there. While under fire from above, the men scaled the cliff, only to discover that the guns had already been withdrawn. The Rangers located the weapons, unguarded but ready to use, in an orchard some 550 metres (600 yd) south of the point, and disabled them. Under attack, the men at the point became isolated, and some were captured. By dawn on D+1, Rudder had only 90 men able to fight. Relief did not come until D+2, when members of the 743rd Tank Battalion arrived.[123]

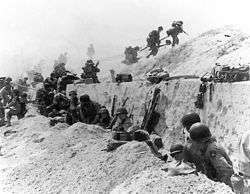
Omaha, the most heavily defended sector, was assigned to the U.S. 1st Infantry Division, supplemented by troops from the U.S. 29th Infantry Division.[116][124] They faced the 352nd Infantry Division, rather than the expected single regiment.[125] Strong currents forced many landing craft east of their intended position or delayed them. Casualties were heavier than all the other landings combined, as the men were subjected to fire from the cliffs above.[126] Problems clearing the beach of obstructions led to the beachmaster calling a halt to further landings of vehicles at 08:30. A group of destroyers arrived around this time to offer supporting artillery fire.[127] Exit from Omaha was possible only via five gullies, and by late morning barely six hundred men had reached the higher ground. By noon, as the artillery fire took its toll and the Germans started to run out of ammunition, the Americans were able to clear some lanes on the beaches. They also started clearing the draws of enemy defences so that vehicles could move off the beach.[128] The tenuous beachhead was expanded over the following days, and the D-Day objectives were accomplished by D+3.[129]

At Gold, high winds made conditions difficult for the landing craft, and the amphibious DD tanks were landed close to shore or directly on the beach instead of further out as planned.[130] Aerial attacks had failed to hit the Le Hamel strong point, and its 75 mm gun continued to do damage until 16:00. On the western flank, the 1st Battalion, Hampshire Regiment captured Arromanches (future site of Mulberry "B"), and contact was made on the eastern flank with the Canadian forces at Juno.[131]
Landings of infantry at Juno were delayed because of rough seas, and the men arrived ahead of their supporting armour, suffering many casualties while disembarking. Most of the offshore bombardment had missed the German defences. In spite of these difficulties, the Canadians quickly cleared the beach and created two exits to the villages above. Delays in taking Bény-sur-Mer led to congestion on the beach, but by nightfall the contiguous Juno and Gold beachheads covered an area 12 miles (19 km) wide and 7 miles (10 km) deep.[132] Casualties at Juno were 961 men.[133]
On Sword, 21 of 25 DD tanks succeeded in getting safely ashore to provide cover for the infantry, who began disembarking at 07:30. They quickly cleared the beach and created several exits for the tanks. In the windy conditions, the tide came in more quickly than expected, making manoeuvring the armour difficult.[134] The 2nd Battalion, King's Shropshire Light Infantry advanced on foot to within a few kilometres of Caen, but had to withdraw due to lack of armour support.[135] At 16:00, the German 21st Panzer Division mounted a counterattack between Sword and Juno and nearly succeeded in reaching the channel. They met stiff resistance from the British 3rd Infantry Division and were soon recalled to assist in the area between Caen and Bayeux.[136][137]
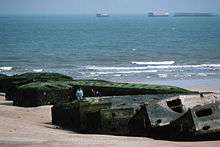
The first components of the Mulberry harbours were brought across on D+1 and the structures were in use for unloading by mid-June.[59] One was constructed at Arromanches by the British, the other at Omaha by the Americans. Severe storms on 19 June interrupted the landing of supplies and destroyed the Omaha harbour.[138] The repaired Arromanches harbour was able to receive around 6,000 tons of materiel daily and was in continuous use for the next ten months, but most shipments were brought in over the beaches until the port of Cherbourg was cleared of mines and obstructions on 16 July.[139][140]
Allied casualties on the first day were at least 10,000, with 4,414 confirmed dead.[141] The Germans lost 1,000 men.[142] The Allied invasion plans had called for the capture of Carentan, St. Lô, Caen, and Bayeux on the first day, with all the beaches (other than Utah), linked with a front line 10 to 16 kilometres (6 to 10 mi) from the beaches; none of these objectives were achieved.[46] The five bridgeheads were not connected until 12 June, by which time the Allies held a front around 97 kilometres (60 mi) long and 24 kilometres (15 mi) deep.[143] Caen, a major objective, was still in German hands at the end of D-Day and would not be completely captured until 21 July.[144] Nearly 160,000 troops crossed the English Channel on 6 June, and more than two million Allied troops were in France by the end of August.[145]
Cherbourg
In the western part of the lodgement, US troops were to occupy the Cotentin Peninsula, especially Cherbourg, which would provide the Allies with a deep water harbour. The terrain behind Utah and Omaha is characterised by bocage, with thorny hedgerows on embankments 3 to 4 feet (0.91 to 1.2 m) high with a ditch on either side.[146] Many areas were additionally protected by rifle pits and machine-gun emplacements.[147] Most of the roads were too narrow for tanks.[146] The Germans had flooded the fields behind Utah with sea water for up to 2 miles (3.2 km) from the coast.[148] German forces on the peninsula included the 91st Infantry Division and the 243rd and 709th Static Infantry Divisions.[149] By D+3 the Allied commanders realised that Cherbourg would not quickly be taken, and decided to cut off the peninsula to prevent any further reinforcements from being brought in.[150] After failed attempts by the inexperienced 90th Infantry Division, General J. Lawton Collins assigned the 9th Infantry Division to the task. They reached the west coast of the Cotentin on 17 June, cutting off Cherbourg.[151] The 9th Division, joined by the 4th and 79th Infantry Divisions, took control of the peninsula in fierce fighting from 19 June; Cherbourg was captured on 26 June. By this time the Germans had destroyed the port facilities, which were not brought back into full operation until September.[152]
Caen

Fighting in the Caen area versus the 21st Panzer, the 12th SS Panzer Division Hitlerjugend, and other units soon reached a stalemate.[153] During Operation Perch, XXX Corps attempted to advance south towards Mont Pinçon. They soon abandoned the direct approach in favour of a pincer attack to encircle Caen. XXX Corps attempted a flanking move from Tilly-sur-Seulles towards Villers-Bocage, while I Corps tried to pass Caen to the east. I Corps' attack was quickly halted. While XXX Corps briefly captured Villers-Bocage, their lead armoured elements were ambushed, initiating a day-long battle (the Battle of Villers-Bocage). The British were forced to withdraw to Tilly-sur-Seulles.[154][155] After a delay because of storms during 17–23 June, Operation Epsom was launched on 26 June, an attempt by VIII Corps to swing around and attack Caen from the south-west and establish a bridgehead south of the Odon.[156] Although the operation failed to take Caen, the Germans suffered heavy tank losses and had committed every available Panzer unit to the operation.[157] Rundstedt was dismissed on 1 July and replaced as OB West by Field Marshal Günther von Kluge after remarking that the war was now lost.[158] Caen was severely bombed on the night of 7 July and then occupied north of the River Orne in Operation Charnwood on 8–9 July.[159] Two offensives, Operation Atlantic and Operation Goodwood during 18–21 July, captured the rest of Caen and the high ground to the south, but by then the city was nearly destroyed.[160] Hitler survived an assassination attempt on 20 July.[161]
Breakout from the beachhead
After securing territory in the Cotentin Peninsula as far south as Saint-Lô, the U.S. First Army launched Operation Cobra on 25 July, and advanced further south to Avranches. This goal was reached on 1 August.[162] Patton's U.S. Third Army, activated on 1 August, quickly took most of Brittany and territory as far south as the Loire, while the First Army maintained pressure eastward toward Le Mans to protect their flank. By 3 August, Patton and the Third Army were able to leave a small force in Brittany and drive eastward towards the main concentration of German forces south of Caen.[163] Meanwhile, the British launched Operation Bluecoat on 30 July to secure Vire and the high ground of Mont Pinçon.[164] Over Kluge's objections, on 4 August Hitler ordered a counter-offensive (Operation Lüttich) from Vire towards Avranches.[165]

While II Canadian Corps pushed south from Caen toward Falaise in Operation Totalize on 8 August,[166] Bradley and Montgomery realised that there was an opportunity for the bulk of the German forces to be trapped at Falaise. Patton's Third Army continued to encircle around from the south, reaching Alençon on the 11th. Although Hitler continued to insist until the 14th that his forces should counter-attack, Kluge and his officers began planning a retreat eastward.[167] The German forces were severely hampered by Hitler's insistence on making all major decisions himself, which left his forces without orders for periods as long as 24 hours while information was sent back and forth to the Führer's residence at Obersalzberg in Bavaria.[168] On the evening of 12 August, Patton asked Bradley if his forces should continue northward to close the gap and encircle the German forces. Bradley refused, because Montgomery had already assigned the First Canadian Army to take the territory from the north.[169][170] The Canadians met heavy resistance and captured Falaise on 16 August. The gap was closed on 21 August, trapping 50,000 German troops,[171] but more than a third of the German 7th Army and nine of the eleven Panzer divisions had escaped to the east. Montgomery's decision-making regarding the Falaise Gap was criticised at the time by American commanders, especially Patton, although Bradley was more sympathetic and believed Patton would not have been able to close the gap.[172] The issue has been the subject of much discussion among historians, criticism being levelled at American, British and Canadian forces.[173][174][175] Hitler relieved Kluge of his command of OB West on 15 August and replaced him with Field Marshal Walter Model. Kluge committed suicide on 19 August after Hitler became aware of his involvement in the 20 July plot.[176][177] An invasion in southern France (Operation Dragoon) was launched on 15 August.[178]

The French Resistance in Paris rose against the Germans on 19 August.[179] Eisenhower initially wanted to bypass the city to pursue other targets, but amid reports that the citizens were going hungry and Hitler's stated intention to destroy it, de Gaulle insisted that it should be taken immediately.[180] French forces of the 2nd Armoured Division under General Philippe Leclerc arrived from the west on 24 August, while the U.S. 4th Infantry Division pressed up from the south. Scattered fighting continued throughout the night, and by the morning of 25 August Paris was liberated.[181]
Operations continued in the British and Canadian sectors until the end of the month. On 25 August, the U.S. 2nd Armored Division fought its way into Elbeuf, making contact with British and Canadian armoured divisions.[182] The 2nd Canadian Infantry Division advanced into the Forêt de la Londe on the morning of 27 August. The area was strongly held; the 4th and 6th Canadian brigades sustained heavy casualties over the course of three days as the Germans fought a delaying action in terrain well suited to defence. The Germans pulled back on the 29th, withdrawing over the Seine on the 30th.[182] On the afternoon of the 30th, the 3rd Canadian Infantry Division crossed the Seine near Elbeuf and entered Rouen to a jubilant welcome.[183]
Campaign close
Eisenhower took direct command of all Allied ground forces on 1 September. Concerned about German counter-attacks and the limited materiel arriving in France, he decided to continue operations on a broad front rather than attempting narrow thrusts.[184] The linkup of the Normandy forces with the Allied forces in southern France occurred on 12 September as part of the drive to the Siegfried Line.[185] On 17 September, Montgomery launched Operation Market Garden, an unsuccessful attempt by Anglo-American airborne troops to capture bridges in the Netherlands to allow ground forces to cross the Rhine into Germany.[184] The Allied advance slowed due to German resistance and the lack of supplies (especially fuel). On 16 December the Germans launched the Ardennes Offensive, also known as the Battle of the Bulge, their last major offensive of the war on the Western Front. A series of successful Soviet actions began with the Vistula–Oder Offensive on 12 January. Hitler committed suicide on 30 April as Soviet troops neared his Führerbunker in Berlin, and Germany surrendered on 7 May 1945.[14]
The Normandy landings were the largest seaborne invasion in history, with nearly 5,000 landing and assault craft, 289 escort vessels, and 277 minesweepers.[107] They hastened the end of the war in Europe, drawing large forces away from the Eastern Front that might otherwise have slowed the Soviet advance. The opening of another front in western Europe was a tremendous psychological blow for Germany's military, who feared a repetition of the two-front war of World War I. The Normandy landings also heralded the start of the "race for Europe" between the Soviet forces and the Western powers, which some historians consider to be the start of the Cold War.[186]
Victory in Normandy stemmed from several factors. German preparations along the Atlantic Wall were only partially finished; shortly before D-Day Rommel reported that construction was only 18 per cent complete in some areas as resources were diverted elsewhere.[187] The deceptions undertaken in Operation Fortitude were successful, leaving the Germans obliged to defend a huge stretch of coastline.[188] The Allies achieved and maintained air superiority, which meant that the Germans were unable to make observations of the preparations underway in Britain and were unable to interfere via bomber attacks.[189] Transport infrastructure in France was severely disrupted by Allied bombers and the French Resistance, making it difficult for the Germans to bring up reinforcements and supplies.[190] Much of the opening artillery barrage was off-target or not concentrated enough to have any impact,[191] but the specialised armour worked well except on Omaha, providing close artillery support for the troops as they disembarked onto the beaches.[192] The indecisiveness and overly complicated command structure of the German high command was also a factor in the Allied success.[193]
Casualties
Allies
From D-Day to 21 August, the Allies landed 2,052,299 men in northern France. The cost of the Normandy campaign was high for both sides.[12] Between 6 June and the end of August, the American armies suffered 124,394 casualties, of which 20,668 were killed.[lower-alpha 5] Casualties within the First Canadian and Second British Armies are placed at 83,045: 15,995 killed, 57,996 wounded, and 9,054 missing.[lower-alpha 6] Of these, Canadian losses amounted to 18,444, with 5,021 killed in action.[194] The Allied air forces, having flown 480,317 sorties in support of the invasion, lost 4,101 aircraft and 16,714 airmen (8,536 members of the USAAF, and 8,178 flying under the command of the RAF).[12][195] The Free French SAS paratroopers suffered 77 killed, with 197 wounded and missing.[196] Allied tank losses have been estimated at around 4,000, with losses split evenly between the American and British/Canadian armies.[13] Historians slightly differ on overall casualties during the campaign, with the lowest losses totaling 225,606[197][198] and the highest at 226,386.[199][200]
Germany

German forces in France reported losses of 158,930 men between D-Day and 14 August, just before the start of Operation Dragoon in Southern France.[201] In action at the Falaise pocket, 50,000 men were lost, of which 10,000 were killed and 40,000 captured.[13] Estimates of German losses for the Normandy campaign range from 400,000 (200,000 killed or wounded; 200,000 captured)[14] to 500,000 (290,000 killed or wounded, 210,000 captured)[10] to 530,000.[15]
There are no exact figures regarding German tank losses in Normandy. Approximately 2,300 tanks and assault guns were committed to the battle,[lower-alpha 7] of which only 100 to 120 crossed the Seine at the end of the campaign.[10] While German forces reported only 481 tanks destroyed between D-day and 31 July,[201] research conducted by No. 2 Operational Research Section of 21st Army Group indicates that the Allies destroyed around 550 tanks in June and July[202] and another 500 in August,[203] for a total of 1,050 tanks destroyed by enemy action, including 100 destroyed by aircraft.[204] Luftwaffe losses amounted to 2,127 aircraft.[16] By the end of the Normandy campaign, 55 German divisions (42 infantry and 13 panzer) had been rendered combat ineffective; seven of these were disbanded. By September, OB West had only 13 infantry divisions, 3 panzer divisions, and 2 panzer brigades rated as combat effective.[205]
Civilians and French heritage buildings
During the liberation of Normandy, between 13,632 and 19,890 French civilians were killed,[18] and more were seriously wounded.[17] In addition to those who died during the campaign, 11,000 to 19,000 Normans are estimated to have been killed during pre-invasion bombing.[17] A total of 70,000 French civilians were killed throughout the course of the war.[17] Land mines and unexploded ordnance continued to inflict casualties upon the Norman population following the end of the campaign.[206]

Prior to the invasion, SHAEF issued instructions (later the basis for the 1954 Hague Convention Protocol I) emphasising the need to limit the destruction to French heritage sites. These sites, named in the Official Civil Affairs Lists of Monuments, were not to be used by troops unless permission was received from the upper echelons of the chain of command.[207] Nevertheless, church spires and other stone buildings throughout the area were damaged or destroyed to prevent them being used by the Germans.[208] Efforts were made to prevent reconstruction workers from using rubble from important ruins to repair roads, and to search for artefacts.[209] The Bayeux tapestry and other important cultural treasures had been stored at the Château de Sourches near Le Mans from the start of the war, and survived intact.[210] The occupying German forces also kept a list of protected buildings, but their intent was to keep the facilities in good condition for use as accommodation by German troops.[209]
Many cities and towns in Normandy were totally devastated by the fighting and bombings. By the end of the Battle of Caen there remained only 8,000 liveable quarters for a population of over 60,000.[208] Of the 18 listed churches in Caen, four were seriously damaged and five were destroyed, along with 66 other listed monuments.[210] In the Calvados department (location of the Normandy beachhead), 76,000 citizens were rendered homeless. Of Caen's 210 pre-war Jewish population, only one survived the war.[211]
Looting was a concern, with all sides taking part—the retreating Germans, the invading Allies (for example British forces looting the Musée des Antiquaires in Caen and Château d'Audrieu near Bayeux), and the local French population.[209] Looting was never condoned by Allied forces, and perpetrators were punished.[212]
War memorials and tourism

The beaches of Normandy are still known by their invasion code names. Significant places have plaques, memorials, or small museums, and guide books and maps are available. Some of the German strong points remain preserved; Pointe du Hoc in particular is little changed from 1944. The remains of Mulberry harbour B still sits in the sea at Arromanches. Several large cemeteries in the area serve as the final resting place for many of the Allied and German soldiers killed in the Normandy campaign.[213]
See also
- List of Allied forces in the Normandy Campaign
- Outline of war
- Rhino tank
- The Battle of Normandy leaders
Notes
Explanatory notes
- ↑ Around 812,000 were American and 640,000 were British and Canadian (Zetterling 2000, p. 408).
- ↑ V-weapons were first launched against the UK on 12 June (Wilmot 1997, p. 316).
- ↑ The British 79th Armoured Division never operated as a single formation (Buckley 2006, p. 13), and thus has been excluded from the total. In addition, a combined total of 16 (three from the 79th Armoured Division) British, Belgian, Canadian, and Dutch independent brigades were committed to the operation, along with four battalions of the Special Air Service (Ellis, Allen & Warhurst 2004, pp. 521–523, 524).
- ↑ As of November 1943. They also had 206 divisions on the Eastern Front, 24 in the Balkans, and 22 in Italy. Wilmot 1997, p. 144.
- ↑ American casualties are sourced from the G-3 War Room Summary 91, dated 5 September 1944, covering the campaign (Pogue 1954, Chapter XIV, footnote 10). In 1953, the US Statistical and Accounting Branch, Office of the Adjutant General issued a final report on US casualties (excluding Air Force losses), for the period from 6 June to 15 September 1944. These figures place overall American casualties at 123,109, of which 29,370 were killed (US Army 1953, p. 92).
- ↑ British casualties are sourced from "War Diary, 21st Army Group, 'A' Section, SITEP" dated 29 August 1944 (D'Este 2004, pp. 517–518).
- ↑ The most common tank/assault gun deployed at Normandy by the Germans was by far the Panzer IV, followed by the Panther (650) and Stug III (550). Also present were 120–130 Tiger Is, 20 Tiger 2s, and smaller numbers of other types, including Marders and Jagdpanthers. Buckley 2006, pp. 117–120.
Citations
- 1 2 Beevor 2009, p. 82.
- 1 2 3 Williams 1988, p. x.
- ↑ Beevor 2009, p. 492.
- ↑ Luxembourg Army website.
- ↑ Beevor 2009, p. 76.
- ↑ Badsey 1990, p. 85.
- ↑ Zetterling 2000, p. 32.
- 1 2 Shulman 2007, p. 192.
- 1 2 3 4 Wilmot 1997, p. 434.
- ↑ Buckley 2006, pp. 117–120.
- 1 2 3 Tamelander & Zetterling 2003, p. 341.
- 1 2 3 Tamelander & Zetterling 2003, p. 342.
- 1 2 3 Whitmarsh 2009, p. 109.
- 1 2 Giangreco, Moore & Polmar 2004, p. 252.
- 1 2 Tamelander & Zetterling 2003, pp. 342–343.
- 1 2 3 4 Beevor 2009, p. 519.
- 1 2 Flint 2009, pp. 336–337.
- ↑ Dear & Foot 2005, p. 322.
- ↑ Churchill 1949, p. 115.
- ↑ Zuehlke 2004, p. 20.
- ↑ Ford & Zaloga 2009, pp. 8–10.
- ↑ Churchill 1951, p. 582.
- ↑ Zuehlke 2004, pp. 21–22.
- ↑ Ford & Zaloga 2009, pp. 10–11.
- ↑ Beevor 2012, p. 319.
- 1 2 Ford & Zaloga 2009, p. 11.
- ↑ Ford & Zaloga 2009, p. 10.
- ↑ Wilmot 1997, pp. 177–178, chart p. 180.
- ↑ Whitmarsh 2009, p. 9.
- ↑ Zuehlke 2004, p. 23.
- ↑ Gilbert 1989, pp. 397, 478.
- ↑ Ford & Zaloga 2009, pp. 13–14.
- ↑ Beevor 2009, pp. 33–34.
- 1 2 Wilmot 1997, p. 170.
- ↑ Ambrose 1994, pp. 73–74.
- 1 2 3 Ford & Zaloga 2009, p. 14.
- ↑ Gilbert 1989, p. 491.
- 1 2 Whitmarsh 2009, pp. 12–13.
- ↑ Weinberg 1995, p. 684.
- ↑ Ellis, Allen & Warhurst 2004, pp. 521–533.
- ↑ Churchill 1951, p. 642.
- 1 2 3 4 Beevor 2009, p. 3.
- ↑ Buckingham 2004, p. 88.
- ↑ Churchill 1951, pp. 592–593.
- 1 2 3 Beevor 2009, Map, inside front cover.
- ↑ Ellis, Allen & Warhurst 2004, pp. 78, 81.
- ↑ Churchill 1951, p. 594.
- ↑ Goldstein, Dillon & Wenger 1994, p. 6.
- ↑ Whitmarsh 2009, Map, p. 12.
- ↑ Ford & Zaloga 2009, p. 25.
- ↑ Evans 2008, p. 623.
- ↑ Zuehlke 2004, p. 81.
- ↑ Whitmarsh 2009, p. 21.
- 1 2 Whitmarsh 2009, p. 11.
- ↑ Whitmarsh 2009, pp. 27–28.
- ↑ Wilmot 1997, p. 181.
- ↑ Wilmot 1997, p. 183.
- 1 2 Wilmot 1997, p. 321.
- ↑ Whitmarsh 2009, pp. 89–90.
- ↑ Wilmot 1997, p. 182.
- ↑ Wilmot 1997, p. 195.
- ↑ Ford & Zaloga 2009, p. 208.
- ↑ Zuehlke 2004, pp. 42–43.
- ↑ Ford & Zaloga 2009, p. 73.
- ↑ Weinberg 1995, p. 680.
- ↑ Brown 2007, p. 465.
- ↑ Zuehlke 2004, pp. 71–72.
- 1 2 Whitmarsh 2009, p. 27.
- ↑ Beevor 2009, p. 282.
- ↑ Beevor 2009, p. 4.
- 1 2 Whitmarsh 2009, p. 34.
- ↑ Bickers 1994, pp. 19–21.
- ↑ Zuehlke 2004, p. 35.
- ↑ Goldstein, Dillon & Wenger 1994, pp. 50–51, 54–57.
- ↑ Fenton 2004.
- ↑ Zuehlke 2004, p. 36.
- ↑ Goldstein, Dillon & Wenger 1994, pp. 59, 61.
- ↑ Goldstein, Dillon & Wenger 1994, pp. 61–62.
- ↑ Ford & Zaloga 2009, p. 46.
- 1 2 3 4 Whitmarsh 2009, p. 30.
- ↑ Whitmarsh 2009, pp. 30, 36.
- ↑ Dear & Foot 2005, p. 667.
- 1 2 3 Whitmarsh 2009, p. 31.
- 1 2 3 Whitmarsh 2009, p. 33.
- ↑ Beevor 2009, p. 21.
- ↑ Wilmot 1997, pp. 224–226.
- ↑ Ford & Zaloga 2009, p. 131.
- ↑ Beevor 2009, pp. 42–43.
- ↑ Wilmot 1997, p. 144.
- ↑ Beevor 2009, p. 34.
- ↑ Goldstein, Dillon & Wenger 1994, p. 13.
- ↑ Zaloga 2013, pp. 58–59.
- ↑ Goldstein, Dillon & Wenger 1994, pp. 16–19.
- ↑ Ford & Zaloga 2009, p. 37.
- 1 2 3 Ford & Zaloga 2009, p. 30.
- 1 2 3 4 Whitmarsh 2009, p. 13.
- ↑ Beevor 2009, p. 33.
- ↑ Goldstein, Dillon & Wenger 1994, p. 11.
- ↑ Whitmarsh 2009, p. 12.
- 1 2 Ford & Zaloga 2009, pp. 54–56.
- ↑ Ford & Zaloga 2009, p. 31.
- ↑ Whitmarsh 2009, p. 15.
- ↑ Wilmot 1997, p. 192.
- ↑ Whitmarsh 2009, p. 42.
- ↑ Beevor 2009, pp. 1–2.
- 1 2 Beevor 2009, p. 74.
- ↑ Beevor 2009, p. 79.
- ↑ Beevor 2009, p. 51.
- ↑ Beevor 2009, p. 51–52.
- ↑ Corta 1952, pp. 157–161.
- ↑ Corta 1997, pp. 64–79.
- ↑ Ford & Zaloga 2009, p. 69.
- ↑ Ford & Zaloga 2009, p. 70.
- ↑ Beevor 2009, p. 118.
- 1 2 Hughes 2010, p. 5.
- ↑ Whitmarsh 2009, p. 51.
- ↑ Ford & Zaloga 2009, pp. 166–167.
- 1 2 Beevor 2009, p. 116.
- ↑ Beevor 2009, p. 115.
- ↑ Ford & Zaloga 2009, p. 172.
- ↑ Ford & Zaloga 2009, Map, p. 170.
- ↑ Ford & Zaloga 2009, pp. 95–104.
- ↑ Ford & Zaloga 2009, pp. 64–65, 334.
- ↑ Ford & Zaloga 2009, p. 45.
- ↑ Ford & Zaloga 2009, pp. 76–77, 334.
- ↑ Ford & Zaloga 2009, pp. 90–91.
- ↑ Ford & Zaloga 2009, pp. 56, 83.
- ↑ Ford & Zaloga 2009, p. 337.
- ↑ Ford & Zaloga 2009, pp. 281–282.
- ↑ Wilmot 1997, pp. 270–273.
- ↑ Wilmot 1997, pp. 275–276.
- ↑ Beevor 2009, p. 131.
- ↑ Wilmot 1997, pp. 277–278.
- ↑ Beevor 2009, pp. 143, 148.
- ↑ Ford & Zaloga 2009, pp. 326–327.
- ↑ Wilmot 1997, p. 283.
- ↑ Beevor 2009, pp. 215–216.
- ↑ Wilmot 1997, p. 387.
- ↑ Ford & Zaloga 2009, p. 331.
- ↑ Whitmarsh 2009, p. 87.
- ↑ Ford & Zaloga 2009, p. 335.
- ↑ Horn 2010, p. 13.
- ↑ Wilmot 1997, p. 360.
- ↑ Dear & Foot 2005, pp. 627–630.
- 1 2 Wilmot 1997, p. 301.
- ↑ Ford & Zaloga 2009, p. 175.
- ↑ Whitmarsh 2009, p. 49.
- ↑ Ford & Zaloga 2009, pp. 118–120.
- ↑ Ford & Zaloga 2009, p. 179.
- ↑ Ford & Zaloga 2009, p. 182.
- ↑ Ford & Zaloga 2009, pp. 185–193.
- ↑ Beevor 2009, p. 186.
- ↑ Ellis, Allen & Warhurst 2004, pp. 247–254.
- ↑ Forty 2004, pp. 36, 97.
- ↑ Wilmot 1997, p. 342.
- ↑ Beevor 2009, pp. 232–237.
- ↑ Wilmot 1997, p. 347.
- ↑ Beevor 2009, p. 273.
- ↑ Ford & Zaloga 2009, pp. 340–341.
- ↑ Beevor 2009, pp. 332–333.
- ↑ Beevor 2009, Map, p. 344.
- ↑ Wilmot 1997, pp. 398–400.
- ↑ Beevor 2009, pp. 366–367.
- ↑ Wilmot 1997, pp. 399–400.
- ↑ Wilmot 1997, p. 410.
- ↑ Beevor 2009, pp. 434–435.
- ↑ Wilmot 1997, pp. 416–417.
- ↑ Beevor 2009, p. 440.
- ↑ Wilmot 1997, p. 418.
- ↑ Wilmot 1997, p. 420.
- ↑ Bradley 1951, p. 377.
- ↑ Beevor 2009, pp. 439–440.
- ↑ Wilmot 1997, p. 424.
- ↑ Hastings 2006, p. 369.
- ↑ Wilmot 1997, pp. 421, 444.
- ↑ Evans 2008, p. 642.
- ↑ Beevor 2009, pp. 445, 447.
- ↑ Wilmot 1997, p. 429.
- ↑ Beevor 2009, pp. 481, 483, 494.
- ↑ Wilmot 1997, p. 430.
- 1 2 Stacey 1960, p. 286.
- ↑ Stacey 1948, p. 219.
- 1 2 Ford & Zaloga 2009, pp. 341–342.
- ↑ Wilmot 1997, p. 485.
- ↑ Gaddis 1990, p. 149.
- ↑ Wilmot 1997, p. 290.
- ↑ Ford & Zaloga 2009, p. 343.
- ↑ Wilmot 1997, p. 289.
- ↑ Ford & Zaloga 2009, p. 36.
- ↑ Copp 2003, p. 259.
- ↑ Wilmot 1997, p. 291.
- ↑ Wilmot 1997, p. 292.
- ↑ Stacey 1960, p. 271.
- ↑ Ellis, Allen & Warhurst 2004, pp. 487–488.
- ↑ Corta 1997, pp. 288–289.
- ↑ Beevor 2009, p. 522.
- ↑ D'Este 2004, p. 517.
- ↑ Ellis, Allen & Warhurst 2004, pp. 488, 493.
- ↑ Tamelander & Zetterling 2003, pp. 341–342.
- 1 2 Tamelander & Zetterling 2003, p. 343.
- ↑ Shulman 2007, p. 166.
- ↑ Copp 2000, pp. 399–400.
- ↑ Zetterling 2000, p. 408.
- ↑ Zaloga 2015, p. 470.
- ↑ Flint 2009, p. 305.
- ↑ Flint 2009, p. 350.
- 1 2 Beevor 2009, p. 520.
- 1 2 3 Flint 2009, p. 354.
- 1 2 Flint 2009, p. 352.
- ↑ Flint 2009, p. 337.
- ↑ Flint 2009, p. 292.
- ↑ Ford & Zaloga 2009, pp. 345–354.
References
- Ambrose, Stephen (1994) [1993]. D-Day June 6, 1944: The Climactic Battle of World War II. New York: Simon & Schuster. ISBN 978-0-671-67334-5.
- Army Battle Casualties and Non-Battle Deaths in World War II,: Final Report, 7 December 1941 to 31 December 1946. Washington, DC: Statistical and Accounting Branch, Office of the Adjutant General, Department of the Army. 1 June 1953. OCLC 220594130.
- Badsey, Stephen (1990). Normandy 1944: Allied Landings and Breakout. Osprey Campaign Series. Botley, Oxfordshire: Osprey Publishing. ISBN 0-85045-921-4.
- Beevor, Antony (2009). D-Day: The Battle for Normandy. New York; Toronto: Viking. ISBN 978-0-670-02119-2.
- Beevor, Antony (2012). The Second World War. New York: Little, Brown and Company. ISBN 978-0-316-02374-0.
- Bickers, Richard Townshend (1994). Air War Normandy. London: Leo Cooper. ISBN 0-85052-412-1.
- Bradley, Omar N. (1951). A Soldier's Story. New York: Holt. OCLC 769013111.
- Brown, Anthony Cave (2007) [1975]. Bodyguard of Lies: The Extraordinary True Story Behind D-Day. Guilford, CT: Globe Pequot. ISBN 978-1-59921-383-5.
- Buckingham, William F. (2004). D-Day: The First 72 Hours. Stroad, Gloucestershire: Tempus. ISBN 978-0-7524-2842-0.
- Buckley, John (2006) [2004]. British Armour in the Normandy Campaign 1944. Abingdon, Oxfordshire: Taylor & Francis. ISBN 0-415-40773-7.
- Churchill, Winston (1949). Their Finest Hour. The Second World War. II. Boston; Toronto: Houghton Mifflin. OCLC 396145.
- Churchill, Winston (1951) [1948]. Closing the Ring. The Second World War. V. Boston: Houghton Mifflin. OCLC 396150.
- Copp, J. Terry (2000). Montgomery's Scientists: Operational Research in Northwest Europe: The Work of No. 2 Operational Research Section with 21 Army Group, June 1944 to July 1945. Waterloo, Ontario: Laurier Centre for Military, Strategic and Disarmament Studies, Wilfrid Laurier University. ISBN 978-0-9697955-9-9.
- Copp, J. Terry (2003). Fields of Fire: The Canadians in Normandy. Toronto: University of Toronto Press. ISBN 0-8020-3730-5.
- Corta, Henry (1952). Les bérets rouges [The Red Berets] (in French). Paris: Amicale des anciens parachutistes SAS. OCLC 8226637.
- Corta, Henry (1997). Qui ose gagne [Who dares, wins] (in French). Vincennes, France: Service Historique de l'Armée de Terre. ISBN 978-2-86323-103-6.
- Dear, I.C.B.; Foot, M.R.D., eds. (2005) [1995]. The Oxford Companion to World War II. Oxford; New York: Oxford University Press. ISBN 978-0-19-280666-6.
- D'Este, Carlo (2004) [1983]. Decision in Normandy: The Real Story of Montgomery and the Allied Campaign. London: Penguin. ISBN 0-14-101761-9. OCLC 44772546.
- Forty, George (2004). Villers Bocage. Battle Zone Normandy. Sutton Publishing. ISBN 0-7509-3012-8.
- Ellis, L.F.; Allen, G.R.G.; Warhurst, A.E. (2004) [1962]. Butler, J.R.M, ed. Victory in the West, Volume I: The Battle of Normandy. History of the Second World War United Kingdom Military Series. London: Naval & Military Press. ISBN 1-84574-058-0.
- Evans, Richard J. (2008). The Third Reich At War. New York: Penguin Group. ISBN 978-0-14-311671-4.
- Fenton, Ben (26 April 2004). "The disaster that could have scuppered Overlord". The Telegraph. Telegraph Media Group. Retrieved 16 February 2014.
- Flint, Edward R (2009). The development of British civil affairs and its employment in the British Sector of Allied military operations during the Battle of Normandy, June to August 1944 (Ph.D. thesis). Cranfield, Bedford: Cranfield University; Cranfield Defence and Security School, Department of Applied Science, Security and Resilience, Security and Resilience Group. OCLC 757064836.
- Ford, Ken; Zaloga, Steven J (2009). Overlord: The D-Day Landings. Oxford; New York: Osprey. ISBN 978-1-84603-424-4.
- Gaddis, John Lewis (1990) [1972]. Russia, the Soviet Union, and the United States: An Interpretive History. New York: McGraw-Hill. ISBN 978-0-07-557258-9.
- Giangreco, Dennis; Moore, Kathryn; Polmar, Norman (2004). Eyewitness D-Day: Firsthand Accounts from the Landing at Normandy to the Liberation of Paris. New York: Barnes & Noble. ISBN 978-0-7607-5045-2.
- Gilbert, Martin (1989). The Second World War: A Complete History. New York: H. Holt. ISBN 978-0-8050-1788-5.
- Goldstein, Donald M.; Dillon, Katherine V.; Wenger, J. Michael (1994). D-Day: The Story and Photographs. McLean, Virginia: Brassey's. ISBN 0-02-881057-0.
- Government of Luxembourg. "Les Luxembourgeois de la "Brigade Piron"" [The Luxembourg "Brigade Piron"] (in French). Retrieved 29 April 2014.
- Hastings, Max (2006) [1985]. Overlord: D-Day and the Battle for Normandy. New York: Vintage. ISBN 0-307-27571-X.
- Horn, Bernd (2010). Men of Steel: Canadian Paratroopers in Normandy, 1944. Toronto, CA: Dundurn Press. ISBN 978-1-55488-708-8.
- Hughes, Thomas Alexander (2010). Overlord: General Pete Quesada and the Triumph of Tactical A. New York City, NY: Simon and Schuster. ISBN 1-43911-853-1.
- Shulman, Milton (2007) [1947]. Defeat in the West. Whitefish, Montana: Kessinger. ISBN 0-548-43948-6.
- Stacey, C.P. (1948). The Canadian Army 1939–45: A Historical Summary. Ottawa: Published by Authority of the Minister of National Defence.
- Stacey, C.P. (1960). The Victory Campaign, The Operations in North-West Europe 1944–1945 (PDF). Official History of the Canadian Army in the Second World War. Vol. III. Ottawa: Published by Authority of the Minister of National Defence.
- Tamelander, Michael; Zetterling, Niklas (2003) [1995]. Avgörandets Ögonblick: Invasionen i Normandie [Determining the Decisive Moments: The Invasion of Normandy] (in Swedish). Stockholm: Norstedts. ISBN 978-91-1-301204-9.
- US Department of the Navy, Naval History and Heritage Command. "D-Day, the Normandy Invasion, 6 – 25 June 1944". Frequently asked questions. Retrieved 29 April 2014.
- Weinberg, Gerhard (1995) [1993]. A World At Arms: A Global History of World War II. Cambridge: Cambridge University Press. ISBN 978-0-521-55879-2.
- Whitmarsh, Andrew (2009). D-Day in Photographs. Stroud: History Press. ISBN 978-0-7524-5095-7.
- Williams, Jeffery (1988). The Long Left Flank: The Hard Fought Way to the Reich, 1944–1945. Toronto: Stoddart. ISBN 0-7737-2194-0.
- Wilmot, Chester (1997) [1952]. The Struggle For Europe. Ware, Hertfordshire: Wordsworth Editions. ISBN 1-85326-677-9.
- Zaloga, Steven J (2013). The Devil's Garden: Rommel's Desperate Defense of Omaha Beach on D-Day. Harrisburg, PA: Stackpole Books. ISBN 0-8117-1228-1.
Zaloga, Steven J (2015). Armored Champion: The Top Tanks of World War II. Mechanicsburg, PA: Stackpole Books. ISBN 978-0-8117-6113-0.
- Zetterling, Niklas (2000). Normandy 1944: German Military Organisation, Combat Power and Organizational Effectiveness. Winnipeg: J.J. Fedorowicz. ISBN 0-921991-56-8.
- Zuehlke, Mark (2004). Juno Beach: Canada's D-Day Victory: June 6, 1944. Vancouver: Douglas & McIntyre. ISBN 1-55365-050-6.
Further reading
- Ambrose, Stephen E. (1969). The Supreme Commander: The War Years of General Dwight D. Eisenhower. Garden City, New York: Doubleday. OCLC 660826327.
- Foot, M. R. D. (1984). SOE: An Outline History of the Special Operations Executive 1940–1946. London: BBC Publications. ISBN 978-0-563-20193-9.
- Keegan, John (1982). Six Armies in Normandy. New York: Penguin Books. ISBN 978-0-14-005293-0.
- Montgomery, Bernard (1946). Normandy to the Baltic. London: Hutchinson. OCLC 637320842.
- Neillands, Robin (2002). The Battle of Normandy, 1944. London: Cassell. ISBN 978-0-304-35837-3.
- Pogue, Forrest C. (1954). "Chapter XIV: The Pursuit Stops Short of the Rhine". United States Army in World War II: European Theater of Operations: The Supreme Command. Washington, D.C.: Office of the Chief of Military History, Department of the Army. LCCN 53-61717.
- Ryan, Cornelius (1959). The Longest Day: June 6, 1944. New York: Simon & Schuster. OCLC 1175409.
- Whitlock, Flint (2004). The Fighting First: The Untold Story of The Big Red One on D-Day. Boulder: Westview. ISBN 978-0-8133-4218-4.
- Zaloga, Steven (2001). Operation Cobra 1944: Breakout from Normandy. Osprey Campaign Series #88. Oxford: Osprey. ISBN 978-1-84176-296-8.
External links
- Ambrose, Stephen (5 June 1994). "D-Day: June 6, 1944: The Climactic Battle of World War II" (Video of interview). Booknotes. C-SPAN.
- Churchill, Winston (21 October 1940). "Dieu Protege (sic) la France" (Transcript of speech). London: The Churchill Society.
- Leighton, Richard M. (2000) [1960]. "Overlord Versus the Mediterranean at the Cairo-Tehran Conferences". In Greenfield, Kent Roberts. Command Decisions. Washington: United States Army Center of Military History. CMH Pub 70-7.
- "World War II: D-Day, The Invasion of Normandy". Eisenhower Presidential Center.
- e.shtml "Operations:D-Day and the Normandy Campaign" Check
|url=value (help). Democracy: Canadian Newspapers and the Second World War. Canadian War Museum. 19 September 2003.