Outpost Snipe
| ||||||||||||||||||||||||||||||||||||

The defence of Outpost Snipe in Egypt took place in the Second Battle of El Alamein, part of the Western Desert Campaign during the Second World War. On the night of 26/27 October 1942, the 2nd Battalion of the Rifle Brigade (part of the 7th Motor Brigade), with 13 × 6-pounder anti-tank guns and the 239th Battery, 76th Anti-Tank Regiment RA, with six more 6-pounders, was ordered to occupy a desert feature known as Snipe, a small depression in the landscape suitable for an outpost. Once consolidated, it could be used as a jumping-off point for an advance by the 24th Armoured Brigade.
From 26–27 October, the 2nd Rifle Brigade defeated numerous Axis armoured counter-attacks and withstood constant artillery-bombardments and machine-gun fire, while knocking out 52–57 Axis armoured vehicles, with intermittent support from the tanks and artillery of the 1st Armoured Division. The defence of Outpost Snipe managed to spoil the biggest Axis counter-attack against the positions captured by the Eighth Army, during Operation Lightfoot but the Battalion had 72 casualties. The fighting at Outpost Snipe led Rommel to write that an armoured attack, on ground which the defenders had been able to prepare, was unlikely to succeed.
Background
Operation Lightfoot
The Second Battle of El Alamein began with Operation Lightfoot, an Eighth Army plan for the main attack to be made in the north by XXX Corps (Lieutenant-General Willoughby Norrie) and a secondary attack in the south by XIII Corps (Lieutenant-General Oliver Leese), with X Corps (Lieutenant-General Herbert Lumsden) standing by to exploit success. Montgomery intended that two corridors were to be cut through the Axis minefields opposite the XXX Corps area. One corridor was to run south-west through the 2nd New Zealand Division (Lieutenant-General Bernard Freyberg, 1st Baron Freyberg) sector, towards the centre of Miteirya Ridge and the second was to run westwards, passing 2 miles (3.2 km) north of the west end of Miteirya Ridge and straddling the areas of the 9th Australian Division and the 51st (Highland) Division.[1]
Tanks would then pass through and defeat the German armoured divisions. Diversions at Ruweisat Ridge in the centre and in the south were intended to convince the Axis that the main British effort would be in the south and the 10th Armoured Division moved behind XIII Corps to add to the impression.[2] In the north, four infantry divisions of XXX Corps were to advance on a 26 km (16 mi) front to the Oxalic Line, an objective beyond the forward Axis outposts. Engineers would then clear and mark the two lanes through the minefields and the armoured divisions of X Corps would pass through to gain the Pierson line. The tanks would consolidate just west of the infantry positions, to intercept any armoured counter-attack against the infantry. The tanks would then advance to the next objective, Skinflint, deep inside the Axis defences and astride the Rahman track to confront the Axis tanks.[1] The Eighth Army infantry would continue to "crumble" the three lines of Axis fortifications and destroy any tanks that attacked them.[3]
Prelude
2nd Rifle Brigade

The 2nd Rifle Brigade (Lieutenant-Colonel Victor Turner) was one of two battalions in the 7th Motor Brigade of the 1st Armoured Division. The motor battalions were not equipped with four rifle companies and various support platoons, like normal infantry battalions. The 2nd Rifle Brigade had an establishment of an anti-tank company of 16 × 6-pounder anti-tank guns, three rifle companies, a scout platoon riding on eleven Bren Gun Carriers, a platoon of 3-inch mortars and a machine-gun platoon with Vickers medium machine-guns, a scale of equipment which could generate much more fire power than a normal infantry battalion. Losses during Operation Lightfoot had reduced the battalion to 22 Bren carriers and 76 riflemen, who had been reinforced by two troops of the 239th Battery, 76th Anti-tank Regiment RA with six more 6-pounders and 16 sappers from the 7th Field Squadron, which brought the battalion up to about 300 men.[4]
Operation Supercharge

The course of Operation Lightfoot led Rommel to commit the 90th Light Division from reserve to the north of the front. The move of the division in the coastal sector, suggested that Rommel expected the next Eighth Army attack there. Montgomery planned Operation Supercharge, an attack on a 4,000 yd (3,700 m) front south of Point 29, for the night of 31 October/1 November, as soon as the Eighth Army had completed a reorganisation to create reserves needed for the attack.[5][lower-alpha 1] To keep Axis attention on the coastal sector, Montgomery ordered the renewal of the 9th Australian Division attacks on the night of 28/29 October, as the rest of the infantry of XXX Corps consolidated the new line and tanks covered the Australian left flank. The Australian positions were taken over by a brigade of the 51st (Highland) Division and to the south, the 2nd New Zealand Division was withdrawn and replaced with the 1st South African Division by extending its right flank, as the 4th Indian Division further south did the same. In XIII Corps, the 7th Armoured Division was to conserve its strength, ready to move towards the coast as soon as the 21st Panzer Division was known to have moved north.[7]

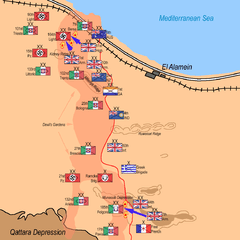
Major-General Raymond Briggs, the 1st Armoured Division commander, continued attempts to push forward the tanks to act as a shield for the infantry, by creating a firm base, despite the congestion caused by the division being superimposed on the 51st (Highland) Division. Arguments between the tank and infantry commanders as to the position of the front line had bedevilled co-operation, with the tank commanders insisting that their units were much further forward than the infantry commanders believed. The Eighth Army headquarters decided to end the bickering by having the troops light flares, which would be mapped from several locations to triangulate their positions but this took place too late to affect the operation. Two battalions of the 7th Motor Brigade (Brigadier T. J. B. Bosville) were to advance either side of Kidney Ridge and occupy ground from which Axis anti-tank emplacements could be dominated and create a path for the 2nd and 24th Armoured brigades to advance.[lower-alpha 2] Woodcock was 1 mile (1.6 km) north-west and Snipe the same distance south-west of the ridge.[9]
Arguments about the location of infantry and tank units after Operation Lightfoot had not been resolved by a reconnaissance during the morning, as the flare-firing exercise had not begun, which left Turner in doubt about the battalion start line and the position of the objective. After the flares had been lit the confusion persisted, because the tanks units refused to accept the evidence that their map-reading was even worse than that of the infantry. Late on 26 October, Turner referred this to the 7th Motor Brigade headquarters, who replied that it was too late to change plans. Turner ordered the battalion to follow the creeping barrage, which began at 10:55 p.m. on a bearing of 270°, rather than the 233° given by the battalion navigator, which delayed the infantry for ten minutes as they reassembled to follow it.[10] The battalion passed through the 5th Black Watch and then the 1st Gordon Highlanders by 2:00 a.m. on the morning of 27 October.[11]
Battle
26 October

The 2nd Rifle Brigade advanced on the new bearing at 11:10 p.m. and met little opposition apart from dust, which lay 18 inches (46 cm) deep in the lanes through the minefields, for the first 1,000 yards (910 m) and then came upon barbed wire, which turned out to line a dummy minefield.[11] Over the next 1,000 yards (910 m), the battalion took twenty prisoners, scattered several parties of Axis infantry and moved for about 500 yards (460 m) beyond a ridge, to what was thought to be Snipe, after a smoke shell was fired to mark the position by the British artillery but was a similar depression with an abandoned German engineer store, about 800–900 yards (730–820 m) south-east of the objective.[10] Turner ordered the battalion to dig in at 12:15 a.m. and fired the rocket signal for the heavier weapons to be brought forward. The lorries and Chevrolet portées carrying the anti-tank guns, encountered long sandy ridges which slowed the journey but 19 of the 27 × 6-pounders and the ammunition were unloaded and dug in by 3:45 a.m.[12]
The guns in small dips had cover and were on soft sand, which could be excavated; the five guns of B Company were dug in to the south-east, facing from 90°–225°. C Company had four guns which were to the south-west, covering the angles from 225°–315° and A Company had four guns facing north-west and north. Six guns of the 239th Battery, 76th Anti-Tank Regiment RA, faced north and north east.[13] The C Company carrier platoon patrolled to the west and found about 160 Axis soldiers ready to surrender but before infantry arrived to collect them, the platoon ran into a laager of about 35 Italian tanks (XII Armoured Battalion from the 133rd Armoured Division Littorio) and German tanks, Panzerjäger (tank destroyers) and infantry (Kampfgruppe Stiffelmayer). The British opened fire and set three lorries on fire but lost a carrier while withdrawing. Most of the prisoners ran away but 35 remained from Pioneer Battalion 220 of the 164th Light Afrika Division Pioneer Battalion 33 of the 15th Panzer Division.[14]
Camp fires showed that another laager with tanks of the 15th Panzer Division was 1,000 yards (910 m) to the north.[15][16] Kampfgruppe Stiffelmayer broke camp and formed two columns, one moving towards the laager to the north and one straight towards the south-west part of Outpost Snipe, where C and B companies were placing their anti-tank guns. The column was led by a Panzer IV Special, which was knocked out and set on fire by a C Company 6-pounder at 30 yards (27 m) range, as A Company hit a Panzerjäger and the column turned aside. The British Forward Observation Officer (FOO) went out to reconnoitre at 4:00 a.m. and disappeared. Just before dawn the lorries returned to the east with the prisoners. The depression and scrub was good cover and the infantry, some of whom had been in the desert since 1940, dug in deep. [15]
27 October
Morning

When dawn broke the battalion found that it was in scrubby desert, deployed in a north-east to south-west oval, about 1,000 yards (910 m) long and 500 yards (460 m) wide.[13] As movement was seen in the German laager, the gun-crews in the north-west face of Outpost Snipe prepared to receive an attack but the German tanks moved westwards, away from the front line, which exposed them broadside to the British guns. The gunners opened fire and for thirty minutes the north end of the outpost disappeared in smoke, flying sand and explosions as Axis artillery and tanks replied to the anti-tank fire until the tanks were out of range. Part of Kampfgruppe Stiffelmeyer had spent the night in a dip and reappeared 800 yards (730 m) to the south-west of Snipe, also moved with their sides exposed to the British 6-pounders. The British gunners claimed six German, eight Italian tanks and two Semoventi self-propelled guns destroyed and two tanks damaged; three anti-tank guns had been knocked out and one had sunk into the sand. Axis return fire caused several casualties and daylight showed that some of the guns were too exposed and needed to be re-sited.[17][14]
The armoured brigades had been intended to join the parties at Snipe and Woodcock but the failure at Woodcock caused confusion and hesitation among the British tank units. The 47th Royal Tank Regiment (RTR) of the 24th Armoured Brigade, was under command of the 10th Armoured Division and drove over a ridge at 7:30 a.m., saw a post surrounded by German tanks 2,000 yards (1,800 m) beyond, assumed it was a German laager and opened fire. Turner sent an officer back in a Bren Gun Carrier, who managed to get the most advanced tanks to stop after thirty minutes but the rest kept firing.[17][lower-alpha 3] As the British tanks moved forward, the Rifle Brigade gunners at the south end of Snipe, saw about 25 German tanks with long-barrelled guns (Panzer III or Panzer IV Specials), heading behind a ridge 1,500 yards (1,400 m) away to ambush the British tanks.[14]
The German tanks were broadside on again and the gunners immediately hit three which caught fire and the 47th RTR machine-gunned the crews as they tried to escape. By 8:30 a.m. the 47th RTR had arrived at Snipe, which attracted a storm of artillery-fire and the outpost disappeared again in smoke, fire, explosions and flying sand. German tanks fired smoke shells at the British tanks and then anti-tank and tank gunners aimed at the smoke, which was much easier to see than the camouflaged vehicles. Soon the 47th RTR was down to five Shermans and six Crusaders and at 9:00 a.m., the tanks were ordered to retire with the 41st RTR, which had lost another twelve tanks, ending a plan for the 24th Armoured Brigade to pivot to the south of Outpost Snipe into open ground. As the tanks moved, they were engaged from about 2,000 yards (1,800 m) to the north, by tanks and anti-tank guns; a British gunner was persuaded to open fire despite the range and knocked out a Panzer IV, for a loss of two 6-pounders.[19][20]

The battalion Medical Officer and the ambulances had been left behind at the start line on 26 October, since when they had been unable to move forward in daylight and the loss of the FOO during the night, made it impossible to direct plunging fire on the Axis artillery and tanks hidden in dips around the post. Much of the British artillery-fire fell around the outpost instead, until the 2nd Rifle Brigade managed to stop the guns at 12:30 p.m.. The outpost was also running short of ammunition so three carriers were loaded with the most badly wounded men, dashed for the ridge to the east and reached safety. The battalion ambulances and supply lorries were behind the ridge ready to move, along with a replacement FOO but nothing could make the return journey through the Axis artillery and machine-gun fire, which began as soon a vehicle appeared above the crest. Around 10:00 a.m., Italian infantry were seen assembling opposite the western face of the outpost and carriers from a scout platoon sallied from the post to disperse them, inflicting many casualties and destroying two vehicles towing captured 6-pounders. Two anti-tank guns were moved to the south-west perimeter from the north, despite the Bren Gun Carriers not having towing attachments and dust thrown up by the move was shelled by Axis artillery, which killed four men.[21][22]
Just as the guns were readied, thirteen Italian M13/40 tanks from the XIII Battalion appeared over the ridge to the west and about twenty German tanks of Kampfgruppe Stiffelmeyer used the attack as cover to advance from the hull-down ambush position to counter-attack the 24th Armoured Brigade, which had retired to similar positions behind the ridge to the east.[23] The anti-tank guns along the western flank of Snipe opened fire and hit four Italian tanks at once, causing the rest to return to cover. The German tanks came into the open and exposed their sides to the Rifle Brigade gunners and then half of the German tanks turned towards the outpost, to suppress the fire from the anti-tank guns, only to present their sides to the British tanks behind the ridge. The gunners at Snipe and the tank gunners ignored the vehicles heading towards them and concentrated on those which were broadside on. Eight German tanks were set on fire, several more began attempts to tow them away and the rest retreated.[24]
Afternoon
Conditions inside Snipe worsened in the midday heat as the number of casualties increased, with little more than shell-dressings and water to tend them. Just before noon, six Bren Gun Carriers were hit and caught fire, the heat and smoke drifting over the guns, adding to the poor visibility. Many of the gunners were among the casualties and guns were kept in action with improvised crews and by men moving from one to the other. Only thirteen guns were still operational to cover the 2,500 yards (2,300 m) perimeter and the guns along the south-west face became so short of ammunition, that two men drove Jeeps back and forth to share out the remainder. Three of the remaining carriers took out more wounded but one was knocked out during the journey and at 1:00 p.m., Axis artillery and machine-gun fire increased. Eight Italian M13/40s, a self-propelled gun and infantry appeared over a ridge to the south-west, where only one 6-pounder was still in action. Turner and another officer joined the sergeant in command of the gun and waited until the tanks were within 600 yards (550 m), then knocked out five tanks and the self-propelled gun, before the Italians had closed the range to 400 yards (370 m).[25]
.2.jpg)
With only two rounds left and the last three M13/40s pressing on, Lieutenant Toms left the gun to drive a Jeep to the nearest knocked-out gun for ammunition and arrived back at the gun through machine-gun fire, which set the petrol tank alight. Turner and an NCO rushed over to help unload the Jeep, by when the tanks were 200 yards (180 m) away, firing their machine-guns at the gun crew. Sergeant Calistan, the gun-layer, hit the three tanks and set them on fire, from which none of the crews escaped. After the attack, a lull fell apart from the shelling, which caused more casualties. Turner had been wounded unloading the Jeep but visited the gun positions, until effect of his wounds became too serious; by 4:00 p.m. most of the officers were casualties and the guns were commanded by wounded NCOs. Briggs ordered forward the 2nd Armoured Brigade artillery, the 11th RHA and they drove their M7 Priests up the east side of the ridge, to bombard Axis positions but managed to hit Snipe again, with 105 mm howitzer fire.[26]
Rommel could see the fighting around Snipe from his headquarters and had assembled the 90th Light Division and the 21st Panzer Division, which had been moved to the northern area of the battlefield overnight, with parts of the 15th Panzer Division, the 164th Light Afrika Division and a battlegroup of the 132nd Armoured Division Ariete. About 70 Axis tanks and self-propelled guns in two waves, about 1,200 yards (1,100 m) west of Outpost Snipe, were to attack the British tanks beyond the ridge to the east, after a five-minute bombardment and a Junkers Ju 87 Stuka attack. As the formation of 20 Stukas, escorted by 20 Fiat CR.42s and 20 Me-109s approached, it was intercepted by 16 Curtiss P-40s of the 64th Fighter Squadron and the 65th Fighter Squadron, USAAF, which claimed six Axis fighters. The Axis formation was then attacked by 24 Hurricanes of 33 Squadron and 213 Squadron RAF, which claimed two Stukas, four CR-42s and three Me-109s for a loss of three Hurricanes.[27]
Part of the Axis tank force advanced against Australian positions near Point 29 to the north of Snipe and to the south about thirty German and ten Italian tanks advanced towards part of the 2nd Armoured Brigade. The force in the north was deluged by artillery-fire and then dispersed by bombing and the southern force passed by the 239th Battery, with seven of the tanks only 200 yards (180 m) away. The anti-tank gunners knocked out nine tanks, damaged several and a 6-pounder crew from A Company claimed four more, after which the tanks withdrew to low ground near Kidney Ridge. The second wave of tanks attacked and fifteen Panzer III turned towards the north-west perimeter of Snipe, where only two guns were operational. A third gun was hauled round in time to join in but there were only thirty armour-piercing rounds left. The tanks advanced cautiously, along routes with cover and machine-gunned the 6-pounders as they came into view, driving the crews into slit trenches.[28][29]
When three tanks were 100 yards (91 m) away, a sergeant crawled 50 yards (46 m) to one of the guns and operated it alone, hitting the leading tank twice despite the machine-gun fire and then knocked out the next two, the third tank being hit by a shot which went through the second tank. The third tank drove into cover about 800 yards (730 m) back and was joined by the rest of the force, which had lost six tanks altogether. The tanks machine-gunned the position, without exposing themselves to return fire from the anti-tank guns for the rest of the day.[30] About seventy Axis armoured vehicles littered the area and the 2nd Rifle Brigade had lost 16 Bren Gun Carriers and ten 6-pounders, with another five damaged; at 6:44 p.m. a signal was sent to the 7th Motor Brigade about the tanks; reinforcements were promised but no armoured counter-attack was made. The 2nd Rifle Brigade burnt their codes and soon after, the light began to fade; at 7:40 p.m., the German tanks drove to the north-east, where some were silhouetted and the British fired their last anti-tank ammunition, hitting a tank. Survivors from the posts around the perimeter began to move towards the command post, dragging wounded with them, under streams of bullets from Axis machine-guns being fired horizontally across the outpost.[31]
28 October

After checking the 6-pounders to make sure they were incapable of firing, the last unwounded troops prepared for the relief but no sign of a relief party or the battalion transport appeared and at 10:30 p.m., the survivors of A and C companies withdrew with one 6-pounder, which was carried out on a damaged Chevrolet portée; as both sides were out rescuing wounded the party was not fired on.[30] British artillery opened fire soon after the retirement began and bombarded accurately the area around Outpost Snipe for the first time, which led to German tanks moving from the laagers straight towards the outpost, at which the battalion HQ with the remaining men retired for 2.5 miles (4.0 km) on foot and under fire. A relief force of the 5th Royal Sussex from the fresh 133rd Lorried Infantry Brigade (Brigadier A. W. Lee) had set when the brigade began to take over from the 7th Motor Brigade and the British bombardment had been fired as the 5th Royal Sussex advanced. As the 2nd Rifle Brigade had retired they had passed unseen the relieving battalion, which dug in before dawn, about 1,000 yards (910 m) south-east of Outpost Snipe.[32]
Aftermath
Analysis
The 2nd Rifle Brigade showed that with powerful anti-tank guns, dug in on well-chosen positions, British infantry could inflict disproportionate losses on tanks which came into range, which included the ability to knock out German tanks at 2,000 yards (1,800 m). Co-operation between the Rifle Brigade gunners and the tank gunners of the 24th Armoured Brigade on 27 October had been excellent but the imminence of Operation Supercharge and the fate of the tanks which reached Snipe on 27 October, left Briggs reluctant to risk more tanks. The attempt of the 1st Armoured Division to provide artillery support had backfired, due to the chronic inability of the British commanders to agree where their units were (even after the location exercise with flares).[33] Rommel had ordered a counter-attack by the Panzerarmee reserve, to restore the original German positions on a 6-mile (9.7 km) front from El Wishka in the south to Point 29 in the north, which had been lost during Operation Lightfoot.[34] Outpost Snipe was 1,000 yards (910 m) behind the German front line, across the route of the right flank of the counter-attack of 27 October; Rommel wrote later of the "murderous fire", which "struck into our ranks" and stopped the biggest Axis counter-attack against XXX Corps; an armoured attack on ground where the defender had been able to prepare, was unlikely to succeed.[35]
Casualties
The 2nd Rifle Brigade suffered 72 casualties but a month later, a committee of investigation concluded that the battalion had managed to knock out 52–57 Axis vehicles, of which 22 German and 10 Italian tanks had been destroyed, along with five self-propelled guns; Axis human losses were unknown but believed to be more than the Rifle Brigade losses.[36][37] In 1982, Pitt gave 34 tanks and self-propelled guns destroyed, plus an unknown number of armoured vehicles which had been recovered and in 2003, Latimer recorded 21 German and 11 Italian tanks.[38][39] In 1978, Cooper wrote that on 26 October, the fourth day of Operation Lightfoot, the tank strength of the Panzerarmee had fallen from 206 to 137 and on 27 October had been reduced to 114 operational tanks.[40]
Victoria Cross
Lieutenant-Colonel Victor Buller Turner was awarded the Victoria Cross for his part in the battle.[36]
Notes
- ↑ Supercharge was postponed for 24 hours.[6]
- ↑ Kidney Ridge was a feature marked on maps which resembled the outline of a kidney bean but was hard to see and some people doubted that it was a ridge at all.[8]
- ↑ The brigade was part of the 8th Armoured Division but due to the lack of a lorried infantry brigade, the armoured brigades had been attached to other divisions. The brigade was equipped with a mixture of Shermans, Grants and Crusaders but had lost many tanks during Operation Lightfoot.[18]
Footnotes
- 1 2 Playfair et al. 2004, p. 34.
- ↑ Playfair et al. 2004, p. 18.
- ↑ Hinsley 1994, pp. 430–431.
- ↑ Latimer 2003, pp. 242–243.
- ↑ Playfair et al. 2004, p. 59.
- ↑ Latimer 2003, p. 276.
- ↑ Pitt 1982, pp. 151–152.
- ↑ Latimer 2003, p. 241.
- ↑ Pitt 1982, pp. 152–153.
- 1 2 Pitt 1982, p. 153.
- 1 2 Latimer 2003, p. 243.
- ↑ Latimer 2003, p. 244.
- 1 2 Pitt 1982, pp. 154–155.
- 1 2 3 Latimer 2003, pp. 245–246.
- 1 2 Latimer 2003, p. 245.
- ↑ Playfair et al. 2004, p. 54.
- 1 2 Pitt 1982, pp. 155–156.
- ↑ Playfair et al. 2004, p. 9.
- ↑ Pitt 1982, pp. 156–157.
- ↑ Latimer 2003, pp. 246–247.
- ↑ Pitt 1982, pp. 157–158.
- ↑ Latimer 2003, pp. 247–248.
- ↑ Latimer 2003, p. 248.
- ↑ Pitt 1982, p. 158–159.
- ↑ Pitt 1982, pp. 159–160.
- ↑ Pitt 1982, pp. 160–161.
- ↑ Latimer 2003, pp. 249–250.
- ↑ Pitt 1982, pp. 161–162.
- ↑ Latimer 2003, pp. 251–252.
- 1 2 Latimer 2003, p. 253.
- ↑ Pitt 1982, pp. 162–163.
- ↑ Pitt 1982, pp. 163–165.
- ↑ Pitt 1982, pp. 155, 157, 161.
- ↑ Playfair et al. 2004, p. 55.
- ↑ Pitt 1982, pp. 161, 164.
- 1 2 Playfair et al. 2004, p. 56.
- ↑ Latimer 2003, p. 254.
- ↑ Pitt 1982, p. 164.
- ↑ Latimer 2003, pp. 253–254.
- ↑ Cooper 1978, pp. 381–382.
References
- Cooper, Matthew (1978). The German Army 1933–1945: Its Political and Military Failure. Briarcliff Manor, NY: Stein and Day. ISBN 0-8128-2468-7.
- Hinsley, F. H. (1994) [1993]. British Intelligence in the Second World War: Its influence on Strategy and Operations (abridged edition). History of the Second World War (2nd rev. ed.). London: HMSO. ISBN 0-11-630961-X.
- Latimer, Jon (2003) [2002]. Alamein. London: John Murray. ISBN 0-7195-6213-9.
- Lucas Phillips, C. E. (1972) [1965]. Alamein. British Battles (rev. ed.). London: Pan Books. ISBN 0-330-30011-3. OCLC 271436664.
- Pitt, B. (2001) [1982]. The Crucible of War: Montgomery's Command. III (Cassell ed.). London: Jonathan Cape. ISBN 0-304-35952-1.
- Playfair, Major-General I. S. O.; and Molony, Brigadier C. J. C.; with Flynn R.N., Captain F. C. & Gleave, Group Captain T. P. (2004) [HMSO 1966]. Butler, J. R. M., ed. The Mediterranean and Middle East: The Destruction of the Axis Forces in Africa. History of the Second World War United Kingdom Military Series. IV. Uckfield, UK: Naval & Military Press. ISBN 1-84574-068-8.
External links
| Wikimedia Commons has media related to Outpost Snipe. |