Actions of the Bluff, 1916
| ||||||||||||||||||||||||||||||||||

The Actions of the Bluff were local operations carried out in Flanders during the First World War by the German 4th Army and the British Second Army in 1916. The Bluff is a mound near St Eloi, south-east of Ypres in Belgium, created from a spoil heap during the digging of the Ypres–Comines Canal before the war. From 14–15 February and on 2 March 1916, the Germans and the British fought for control of the Bluff, the Germans capturing the mound and defeating counter-attacks only for the British to recapture it and a stretch of the former German front line, after pausing to prepare a set-piece attack.
The fighting at the Bluff was one of nine sudden attacks for local gains made by the Germans or the British between the appointment of Sir Douglas Haig as commander in chief of the BEF and the beginning of the Battle of the Somme. The BEF was at a tactical disadvantage against the German army, on low boggy ground, easily observed from German positions. A retirement to more defensible ground was impossible but rather than conserving manpower and resouces with a tacit truce, the British kept an active front and five of the German local attacks in the period were retaliation for three British set-piece attacks.
The Germans had better weapons and could move troops and equipment along the Western Front easier than the Franco-British. The German army still had many pre-war trained officers NCOs and soldiers. The British wartime volunteers gained experience in minor tactics but success usually came from firepower; in the underground war, the BEF tunnellers overtook the Germans in technological ability and ambition. Capturing a portion of the front line was possible but holding it depended on the opponent. When the Bluff was captured, the British retook it; Mount Sorrel and Tor Top were retaken by the Canadians and British gains at St Eloi and Vimy Ridge were lost to German attacks. Had the British occupied the front less densely, more training could have taken place and the wisdom of each policy was debated at the time and since.
Background
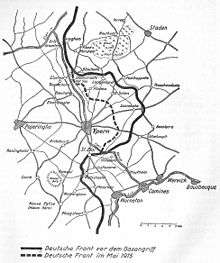
Ypres geography

Ypres is overlooked by Kemmel Hill in the south-west and from the east by low hills running south-west to north-east with Wytschaete (Wijtschate), Hill 60 to the east of Verbrandenmolen, Hooge, Polygon Wood and Passchendaele (Passendale). The high point of the ridge is at Wytschaete, 7,000 yd (6,400 m) from Ypres, while at Hollebeke the ridge is 4,000 yd (3,700 m) distant and recedes to 7,000 yd (6,400 m) at Polygon Wood. Wytschaete is about 150 ft (46 m) above the plain; on the Ypres–Menin road at Hooge, the elevation is about 100 ft (30 m) and 70 ft (21 m) at Passchendaele. The rises are slight apart from the vicinity of Zonnebeke, which has a 1:33 gradient. From Hooge and to the east, the slope is 1:60 and near Hollebeke, it is 1:75; the heights are subtle but have the character of a saucer lip around Ypres. The main ridge has spurs sloping east and one is particularly noticeable at Wytschaete, which runs 2 mi (3.2 km) south-east to Messines (Mesen) with a gentle slope to the east and a 1:10 decline to the west. Further south is the muddy valley of the Douve river, Ploegsteert Wood (Plugstreet to the British) and Hill 63. West of Messines Ridge is the parallel Wulverghem (Spanbroekmolen) Spur; the Oosttaverne Spur, also parallel, is to the east. The general aspect south of Ypres is of low ridges and dips, gradually flattening to the north into a featureless plain.[1]
Possession of the higher ground to the south and east of Ypres gives ample scope for ground observation, enfilade fire and converging artillery bombardment. An occupier has the advantage of artillery deployments and the movement of reinforcements, supplies and stores being screened from view. The ridge had woods from Wytschaete to Zonnebeke, giving good cover, some being of notable size like Polygon Wood and those later named Battle Wood, Shrewsbury Forest and Sanctuary Wood. The woods usually had undergrowth but the fields in gaps between the woods were 800–1,000 yd (730–910 m) wide and devoid of cover. Roads in this area were usually unpaved, except for the main ones from Ypres, ribboned with occasional villages and houses. The lowland west of the ridge was a mixture of meadow and fields, with high hedgerows dotted with trees, cut by streams and ditches emptying into canals. The main road to Ypres from Poperinge to Vlamertinge is in in a defile, easily observed from the ridge.[2]
The Bluff

Spoil banks had been created during the digging of the Ypres–Comines Canal, connecting the Yser lowlands with the Lys river valley. The canal cutting runs through a low point between Messines Ridge and the higher ground south-east of Ypres, about 1.5 miles (2.4 km) east of St Eloi and near Voormezele. At this point the canal is 120 feet (37 m) wide, in a cutting made higher by 20–30 ft (6.1–9.1 m) banks, extending on the north side to a feature marked on British maps as the Bluff and called the Grosse Bastion or Kanal Bastion by the Germans. The Bluff was 30 ft (9.1 m) high, steep on the west side, with a gentle slope to the east and one of the best vantage points in the Ypres Salient. To the north, the ground rises for 0.75 mi (1.2 km) to Hill 60 and Hooge.[3] After the First Battle of Ypres in 1914, the front line ran at a right angle across the canal, which was still full of water, the British front line on the north bank. just east of the Bluff. No man's land was about 150 yards (140 m) wide and narrowed to about 40 yards (37 m) opposite a German salient about 400 yards (370 m) north, called the Bean by the British and Der Helm by the Germans.[4]
Mining
In the spring of 1915, there was constant underground fighting in the Ypres Salient at Hooge, Hill 60, Railway Wood, Sanctuary Wood, St Eloi and the Bluff, which required new drafts of British tunnellers for several months after the formation of the first eight Tunnelling companies of the Royal Engineers.[5] During October and November 1915, the Germans blew two mines under the British lines about 150 yd (140 m) north of the canal.[4] In November 1915, John Norton-Griffiths proposed to sink 20 or 30 shafts, about 50–70 yd (46–64 m) apart, into the blue clay from the Bluff to St Eloi.[6] In late December 1915, the 27th Württemberg Division (General Graf von Pfeil und Klein-Ellguth) was transferred from the Argonne to Flanders to reform the XIII Württemberg Corps (General Theodor von Watter) with the 26th Württemberg Division and took over part of the line on 6 January 1916. The Württembergers relieved the 30th Division in about 2 mi (3.2 km) of the front line from the Ypres–Comines Canal to Zillibeke, south of the positions of the 26th Württemberg Division. The division found the defences in good repair and well-drained, although mostly sandbag breastworks rather than trenches. There was a vulnerable spot at the south end of the line, where the Bluff overlooked the German defences. Previously a mine had been exploded under the Bluff but to no effect and the division began a greater mining effort.[7] A bigger mine was detonated on the night of 21/22 January but all this achieved was a crater about 100 yd (91 m) wide, which the British occupied and made into another defensive position.[4] After the big mine explosion of 21/22 January the British fortified the front lip of the crater and the 172nd Tunnelling Company was diverted from its mining at St Eloi, to dig a defensive mine system to prevent the Germans trying again; waterlogging and the loose soil along the canal back caused the miners much difficulty.[4]
Prelude
German offensive preparations
As part of the German plan for the Battle of Verdun (21 February – 18 December 1916), the other German armies on the Western Front were ordered to divert attention from the 5th Army with line straightening operations and giving the impression that reinforcements had arrived. From 8–19 February, the 4th Army (Generaloberst [Colonel General] Albrecht, Duke of Württemberg) in Flanders, conducted several operations around the Ypres Salient, with artillery bombardments and bombardments followed by attacks. On 12 February, the Germans attacked near Boesinghe (Boezinge) as the 20th (Light) Division was relieving the 14th (Light) Division and got into the front line, until driven back by a prompt counter-attack, the British losing 184 casualties. The German attacked again during the evening and were repulsed. Another attack on 19 February also got into the front line for a short time. On 14 February, after a bombardment and the springing of several small mines, German infantry attacked several times against the 24th Division at Hooge and either side of Sanctuary Wood.[8] Watter had given orders for a methodical attack at the Bluff by Infantry Regiment 124, despite a judgement from General Berthold von Deimling, the previous corps commander, that the Bluff was easier to capture than to hold.[7]
British defensive preparations
The purpose of the German diversionary operations was unknown to the Second Army (General Horace Smith-Dorrien). Reconnaissance flights by the new II Brigade Royal Flying Corps (RFC) were made more difficult by the bad winter weather but 6 Squadron managed to see enough to report that a German offensive was unlikely. The RFC concentrated on artillery-observation for the British heavy artillery and in February arranged a standard call "general artillery action" at which all aircraft stopped routine operations for artillery-observation and reconnaissance sorties. The V Corps (Lieutenant-General Herbert Plumer) front ran from south of St Eloi to Hooge and was held by the 17th (Northern) Division, 50th Division and the 24th Division. The 17th Division had relieved the 3rd Division from 5–8 February on a 4,000 yd (3,700 m) either side of the Ypres–Comies Canal, with the 52nd Brigade on the south side responsible for the canal, the Bluff and New Year Trench on the north side and the 51st Brigade further north. The only crossing of the canal was a plank bridge some distance back from New Year Trench and although the rule that a topographical feature going through a position should not be used as a unit boundary was followed, only a platoon of the 10th Battalion, Lancashire Fusiliers held the Bluff, the rest of the battalion being on the south bank. The 50th Brigade was in the V Corps reserve which left only one battalion in reserve for the 17th Division.[9]
The 51st Brigade held a 1,300 yd (1,200 m) front with three battalions and one in reserve, half ready for an immediate counter-attack if the Bluff was captured. On battalion was moving up to relieve one of the front battalions, its bombers (after complaints from the Grenadier Guards, hand grenade specialists had been renamed bombers who had also been issued with steel helmets) and Lewis gunners having arrived on 13 February. During the relief, the Bluff was the responsibility of another brigade and two battalions were mixed up, also the brigade machine-gun companies, which had joined the division the day previous were still behind the front line. On the morning of 14 February, the left flank of the 52nd Brigade at the canal and the fronts of the 51st Brigade and the rest of the V Corps front to the north, were subjected to several bombardments by German heavy artillery and after 3:30 p.m. the shelling of the 51st Brigade and the 24th Division front at Hooge increased. The platoon of the 10th Lancashire Fusiliers on the Bluff took cover in The Tunnel, formerly a German mine gallery from the Bluff to the canal. Trench mortar and howitzer fire, which was usual before an infantry attack led the defenders to request hevy artillery support.[10]
Battle
14–16 February
By 5:45 p.m. the British front parapet had been demolished and a mine detonation buried the party sheltering in the Tunnel at the Bluff, killing all but three men; two mines were blown on the left of the 10th Sherwood Foresters (10th Sherwood) on the left of the 51st Brigade. IR 124 attacked on a 0.5 mi (0.80 km) front from the canal to a feature known as the Ravine, a stream parallel to the canal. The British front line was captured by 6:05 p.m. and by 6:32 p.m. all objectives had been taken, apart from a machine-gun post at the junction of trenches 31 and 32.[11] A platoon sent to replace the men buried in The Tunnel were all killed and the Buff captured as were the front trenches of the 10th Sherwood. Some Germans reached the support trenches at one point and were then forced out and parties of IR 124 also got into trenches and the Ravine on the left held by the 8th South Staffordshire. The Germans were also quickly forced back but the two companies reserved for an instant counter-attack on the Bluff were delayed by a command mix up, the men went forward piecemeal and conducted an indecisive bombing fight with the Germans for the rest of the night.[12]
By 7:30 a.m. IR 124 held the Bluff and the 51st Brigade line from the canal to the Ravine. During the afternoon the 52nd Brigade was relieved of responsibility for the north bank and two battalions of the 50th Brigade were sent forward for a counter-attack against the Bluff. During the night bombing attacks were made but attempts to follow up with infantry failed and at 6:00 a.m. on 16 February, the British commanders accepted that the counter-attacks had failed and that it would take a set-piece attack to succeed. Plumer gave the task to troops who knew the ground and on the night of 16/17 February the 76th Brigade (Brigadier-General E. St. G. Pratt) of the resting 3rd Division, with attached artillery and engineers took over from the 51st Brigade and began to consolidate a new line. The ground had been smashed up by artillery-fire and was cut with derelict trenches and the Bluff was enclosed by the canal and a stream on the north side which made the ground swampy. The terraces adjoining the canal limited a frontal approach to an embankment 80 yd (73 m) wide but which tapered to 30 yd (27 m), with no cover and visible from the German defences on the south side of the canal.[12]
17 February – 1 March
The 76th Brigade planned to attack against the width of the lost trenches at dusk, to have the maximum time for consolidation, preferably on 29 February. Both sides kept up the bombardment and German casualties were so severe that IR 124 was relieved from 20–22 February by Grenadier Regiment 123 (GR 123), which found that the German defences had been destroyed and had to take post in scraps of trench and shell-holes, living up to the waist in water. Over the night of 22/23 and 23/24 February, the 76th Brigade was relieved by the 52nd Brigade to rest for the attack and its four battalions were equipped with steel helmets, along with two battalions of the 51st Brigade attached for the operation. The force practised on a replica of the German positions copied from aerial photographs as the 52nd Brigade laboured on jumping-off trenches in the remnants of a sheltered wood, communication trenches, burying telephone cables and carrying ammunition and stores.[13]
German artillery bombardments slowed the work; stormy weather and then snowfalls from 27 February outlined the new trenches and on 28 February, the attack was put back to 2 March, after the cold and snow ended with a thaw which turned the ground into slush; the following days were cold and wet with sleet and snow.[14] The attackers could not wait for 15–18 hours but a dusk attack meant moving up the night before. Pratt wanted a long preparatory bombardment and Brigadier-General Herbert Uniacke, the corps artillery commander, proposed a surprise attack with no preliminary artillery-fire. The commanders agreed a plan to bombard the German defences until the original zero hour at dusk, cease fire, move up the attack force overnight and attack after a 90-minute dawn bombardment. No date set because of the weather and incomplete artillery registration but the attack would occur on the second morning after a day with good enough weather to finish registering the guns.[15] As the front line curved eastwards north of the 17th Division, four heavy guns were dug in and camouflaged on Observatory Ridge, to fire along the Germans trenches during the attack.[16] Plumer suggested that the 90-minute bombardment be dispensed with for surprise and at a conference it was agreed that there should be a bombardment at 5:00 p.m. on 1 March for 45 minutes, then a lift and a barrage to simulate an attack. After a cessation of the bombardment, Pratt was to decide at 2:00 a.m. if there was to be a 20-minute bombardment before the attack, depending on the German response.[17]
The British attack was to capture more than had been lost, by digging a new line across the Bean to protect a re-entrant in the old front line. The right-hand battalion was to retake New Year Trench, the Bluff and Loop Trench, the central and left-hand battalions to attack further north. Each battalion had attached sections of the 56th and East Riding companies RE and tunneller parties. A battalion was in support of the right-hand battalion and a second support battalion was to be available to all three, with two companies behind the centre battalion and a battalion was in reserve. On the far right of the attack, a raiding party was to demolish any German mine shafts found along the canal bank. Nine 1 1⁄2-inch, ten 2-inch, three 4-inch trench mortars and four Stokes mortars were placed in groups on either side of the canal; the bombardment began accurately on 1 March and Stokes mortars were able to hit areas that the howitzers could not reach. Observation revealed that nearly all the German defences on the Bluff had been destroyed but trenches to the north had been improved and re-wired. The hurricane bombardment was fired from 5:00–5:45 p.m. and an 18-pounder field gun was brought up to the front line on the left flank to demolish 40 yd (37 m) of the German front line as an obstacle.[18]
2 March
The attackers were guided forward from 4:15 a.m. and attacked on time at 4:30 a.m. Two minutes later the artillery began a barrage behind the objectives and took the Germans by surprise, except on the left where a German machine-gun crew cut down two platoons. The waves of infantry easily walked over the remaining wire unopposed. The German sentries at the Bluff were found under cover expecting the artillery salvo after the usual two-minute pause and the rest of the garrison in dug-outs in the western face of the large crater.[19] To the north, the attackers overran the objective on the Bean which they did not recognise because the trenches had been obliterated; parties went further forward and had many casualties. The troops were pulled back to the objective and consolidation began. Later on some Germans who had been bypassed opened fire but soon surrendered and 181 prisoners were sent to the rear. The troops on the left were reinforced and overcame the machine-gun nest by 5:10 a.m. The attackers took 252 prisoners although 47 of them were only taken from the dug-outs at the Bluff after resisting into the evening.[20][19]
The raiders blew in the gallery in no man's land to the Bluff but those from the 172nd Tunnelling Company were killed by machine-gun fire. The German artillery reply began at 9:30 a.m. and intense fire did not begin until 11:00 a.m., by when the British had emptied their front line and rapid progress had been made in consolidation. The German artillery continued a high rate of fire until 3:15 p.m. and severely damaged the old and new front lines, which took much work to repair. One of the trenches was named International Trench after dead from three armies were discovered. GR 123 had been exhausted by the 36-hour preparatory bombardment, which destroyed the German positions. In the evening bombers from GR 123 and parties from IR 124 and IR 127 counter-attacked but found that the British bombers had plenty of Mills grenades and were supported by plenty of machine-guns. (Each attacker had carried two grenades and 52,000 more had been dumped close by.)[21]
Aftermath
Analysis
The fighting at the Bluff was one of nine sudden attacks for local gains made by the Germans or the British between the appointment of Sir Douglas Haig as commander in chief of the BEF and the beginning of the Battle of the Somme. After the Second Battle of Ypres (22 April – 25 May 1915) and the Battle of Loos (25 September – 13 October) and the extension of the British front in early 1916, the BEF was at a tactical disadvantage against the German army, on wetter ground, easily observed from German positions. When the BEF took over more of the Western Front from the French, it was to be held lightly with outposts, while a better line was surveyed further back. The survey revealed that all of the French gains of 1915 would have to be abandoned, a proposal that the French rejected out of hand. For political reasons, giving up ground around Ypres in Belgium was also unacceptable, only an advance could be contemplated to improve the positions of the BEF. Since the French and British anticipated early advances in 1916, there seemed little point in improving defences, at a time when the Germans were building more elaborate defences, except at Verdun. Rather than continue the informal truces that had developed between French and German trench garrisons, the British kept an active front and five of the German local attacks in the period were retaliation for three British set-piece attacks.[22]
In early 1916, the Germans had an advantage in trench warfare equipment, being equipped with more and better hand grenades, rifle grenades and trench mortars. It was easier for the Germans to transfer troops, artillery and ammunition along the Western Front than the Franco-British, who had incompatible weapons and ammunition and a substantial cadre of German pre-war trained officers NCOs and soldiers remained. The British wartime volunteers gained experience in minor tactics but success usually came from machine-guns and the accuracy and quantity of artillery support, not individual skill and bravery but in the underground war, the BEF tunnellers overtook their German counterparts in technological ability and ambition. With sufficient artillery, the capture of a small part of the opponents' line was possible but holding it depended on the response of the opponent. When the Bluff was captured, the British retaliated and retook it and Mount Sorrel and Tor Top were retaken by Canadian troops; when the British took ground at St Eloi and Vimy Ridge, the Germans took it back. The constant local fighting was costly but enabled the mass of inexperienced British troops to gain experience, yet had the front been less densely occupied, more troops could have trained and the wisdom of each school of thought was debated at the time and ever since.[23]
Casualties
| Month | Total | ||
|---|---|---|---|
| December | 5,675 | ||
| January | 9,974 | ||
| February | 12,182 | ||
| March | 17,814 | ||
| April | 19,886 | ||
| May | 22,418 | ||
| June | 37,121 | ||
| Total | 125,141 | ||
From 14–17 February the 17th Division lost 1,294 casualties including 311 missing and from 2–4 March, the attacking battalions had 1,622 losses, 924 men in the 76th Brigade, 3rd Division and 698 in the 17th (Northern) Division.[lower-alpha 1] From 14–18 February, IR 124 lost 75 men killed, 229 wounded and 25 men missing. There were 908 German casualties on 2 March, GR 123 losing 41 men killed, 172 wounded and 321 men missing.[26]
Subsequent operations
The Germans dug long galleries beneath the Bluff and on 25 July 1916 the 1st Company, 24th Pioneers blew a mine under the ridge. The 1st Canadian Tunnelling Company gave warning of the German attempt and the 7th Canadian Battalion occupied the crater before the German infantry arrived. On 29 July, Canadian troops raided the German lines at St Eloi and inflicted about 50 casualties and repulsed a German raid at Hill 60 on 12 August.[27][28][29] Mining and tunnel warfare continued at the Bluff, carried out by tunnelling companies of the Royal Engineers.[30] After a prisoner drew a map of the German mine workings, the British dug a deep system under the galleries beyond the German lines. On 11 December, several big camouflets were sprung and the German mine galleries were captured, making it impossible for German tunnellers to retaliate and the area was declared safe.[31] On 7 June 1917, the Germans were driven from the area during the Battle of Messines Ridge.[31] The Germans re-took the Bluff during the Spring Offensive of 1918 and it changed hands for the last time on 28 September 1918, after an attack by the 14th (Light) Division.[32]
Commemoration
The wooded ridge is now a provincial nature reserve and picnic area, Provinciaal Domein Palingbeek.[33] There are three Commonwealth War Graves Commission (CWGC) war cemeteries in the area
Notes
Footnotes
- ↑ Edmonds 1925, pp. 128–129.
- ↑ Edmonds 1925, pp. 129–131.
- ↑ Hilliard Atteridge 2003, p. 72.
- 1 2 3 4 Edmonds 1993, p. 164.
- ↑ Barton, Doyle & Vanderwalle 2005, p. 165.
- ↑ Jones 2010, pp. 101–103.
- 1 2 Edmonds 1993, pp. 172–173.
- ↑ Edmonds 1993, pp. 162–164.
- ↑ Edmonds 1993, pp. 163–165.
- ↑ Edmonds 1993, pp. 165–166.
- ↑ Edmonds 1993, p. 173.
- 1 2 Edmonds 1993, pp. 166–167.
- ↑ Edmonds 1993, pp. 167, 173.
- ↑ Hilliard Atteridge 2003, p. 88.
- ↑ Edmonds 1993, p. 168.
- ↑ Hilliard Atteridge 2003, p. 87.
- ↑ Edmonds 1993, pp. 168–169.
- ↑ Edmonds 1993, pp. 169–170.
- 1 2 Edmonds 1993, pp. 170–171.
- ↑ Hilliard Atteridge 2003, p. 90.
- ↑ Edmonds 1993, pp. 171–173.
- ↑ Edmonds 1993, pp. 155–156.
- ↑ Edmonds 1993, pp. 156–157.
- ↑ Edmonds 1993, p. 243.
- ↑ Hilliard Atteridge 2003, p. 91.
- ↑ Edmonds 1993, pp. 167, 172–173.
- ↑ Nicholson 1962, p. 154.
- ↑ Jones 2010, p. 143.
- ↑ Vijver 2008.
- ↑ Edmonds 1993, pp. 162–163, 169–172.
- 1 2 Edmonds 1993, p. 172.
- ↑ Edmonds 1995, pp. 204–209.
- ↑ PWV 2008.
References
Books
- Barton, Peter; Doyle, Peter; Vanderwalle, Johan (2005). Beneath Flanders Fields: The Tunnellers' War 1914–1918. Staplehurst: Spellmount. ISBN 978-1-86227-237-8.
- Edmonds, J. E. (1925). Military Operations France and Belgium, 1914: Antwerp, La Bassée, Armentières, Messines and Ypres October–November 1914. History of the Great War Based on Official Documents by Direction of the Historical Section of the Committee of Imperial Defence. II. London: Macmillan. OCLC 220044986.
- Edmonds, J. E. (1993) [1932]. Military Operations France and Belgium, 1916: Sir Douglas Haig's Command to the 1st July: Battle of the Somme. History of the Great War Based on Official Documents by Direction of the Historical Section of the Committee of Imperial Defence. I (Imperial War Museum & Battery Press ed.). London: Macmillan. ISBN 978-0-89839-185-5.
- Edmonds, J. E. (1995) [1937]. Military Operations France and Belgium: 1918 March–April: Continuation of the German Offensives. History of the Great War Based on Official Documents by Direction of the Historical Section of the Committee of Imperial Defence. II (Imperial War Museum & Battery Press ed.). London: Macmillan. ISBN 978-0-89839-223-4.
- Edmonds, J. E. (1993) [1947]. Military Operations France and Belgium 1918: 8th August – 26th September: The Franco-British Offensive. History of the Great War Based on Official Documents by Direction of the Historical Section of the Committee of Imperial Defence. IV (Imperial War Museum & Battery Press ed.). London: HMSO. ISBN 978-0-89839-191-6.
- Hilliard Atteridge, A. (2003) [1929]. History of the 17th (Northern) Division (Naval & Military Press ed.). London: R. Maclehose. ISBN 978-1-84342-581-6.
- Jones, Simon (2010). Underground Warfare 1914–1918. Pen & Sword Military. ISBN 978-1-84415-962-8.
- Nicholson, G. W. L. (1962). Canadian Expeditionary Force 1914–1919 (PDF). Official History of the Canadian Army in the First World War. Ottawa: Queen's Printer and Controller of Stationery. OCLC 59609928. Retrieved 20 November 2016.
Websites
- "Palingbeek" (in Dutch). Provincie West-Vlaanderen. Archived from the original on 17 December 2007. Retrieved 5 May 2008.
- Van de Vijver, Sander. "Wereldoorlog I in de Westhoek" [World War I in Westhoek]. The Great War in Flanders Fields. Retrieved 5 May 2008.
Further reading
- Baker, Chris. "Fighting at the Bluff". The Long, Long Trail. Archived from the original on 11 April 2008. Retrieved 5 May 2008.
- Barrie, A. (1981) [1962]. War Underground. War in the Twentieth Century (Star ed.). London: Frederick Muller. ISBN 978-0-352-30970-9.
- Karel, Roose (3 February 2003). "Cycling Belgium's Waterways: Comines–Ieper". Gamber Net Home. Retrieved 5 May 2008.
- Work in the Field Under the Engineer-in-Chief, B. E. F.: Geological Work on the Western Front (PDF). The Work of the Royal Engineers in the European War, 1914–19. Chatham: The Secretary, Institution of Royal Engineers. 1922. OCLC 613625502. Retrieved 19 November 2016.
External links
| Wikimedia Commons has media related to Actions of the Bluff, 1916. |