Spanish ship Fenix (1749)
 Ship of the line Real Fénix by Rafael Berenguer, Naval Museum of Madrid | |
| History | |
|---|---|
| Name: | Fenix |
| Launched: | 1749 |
| Honours and awards: |
|
| Captured: | 16 January 1780, by Royal Navy |
| Name: | HMS Gibraltar |
| Acquired: | 16 January 1780 |
| Honours and awards: |
|
| Fate: | Broken up, 1836 |
| General characteristics [1] | |
| Class and type: | 80-gun third rate ship of the line |
| Tons burthen: | 2184 (bm) |
| Length: | 178 ft 10¾ in (54.5 m) (gundeck) |
| Beam: | 53 ft 3¾ in (16.2 m) |
| Depth of hold: | 22 ft 4 in (6.8 m) |
| Sail plan: | Full-rigged ship |
| Armament: | 80 guns of various weights of shot |
Fenix was an 80-gun ship of the line of the Spanish Navy, launched in 1749. As the flagship of Admiral Juan de Lángara, she fought at the Battle of Cape St Vincent on 16 January 1780, where she was captured by the Royal Navy and commissioned as the third rate HMS Gibraltar in March that year. She spent a short while in The Channel before joining Samuel Hood's squadron in the West Indies and taking part in Capture of Sint Eustatius in February 1781 and the Battle of Fort Royal the following month.
Gibraltar and five other ships were sent to stop a French invasion fleet bound for Tobago in May 1781, but found it too powerful and had to withdraw. In November, her 18-pound guns were replaced with twenty-fours, after which, in February 1782, she sailed to the East Indies and the following year, participated in the Battle of Cuddalore.
At the start of the French Revolutionary War, Gibraltar served in the Channel Fleet, fighting at the Glorious First of June in 1794, before being sent to the Mediterranean in May 1795. In June, she was in an action off Hyères, then in December 1796, she was badly damaged in a storm and had to return to England for major repairs. By June, she was back in the Mediterranean, serving in the navy's Egyptian campaign, where she remained during and beyond the Peace of Amiens, except for a short period when she was sent home for a re-fit.
Returning to The Channel in April 1807, Gibraltar joined the fleet under Admiral James Gambier which fought the Battle of the Basque Roads in 1809. This was her last major action; she was taken out of service in 1813 and converted to a powder hulk. She became a lazarette in 1824, then was broken up in November 1836 at Pembroke Dock.
Construction and armament
Fenix was a Spanish, two deck, ship of the line built in Havana from mahogany.[2] Launched in 1749, her dimensions were: 178 feet 10.75 inches (54.5 m) along the gun deck, 144 feet 6 inches (44.0 m) at the keel, with a beam of 52 feet 11.75 inches (16.1 m) and a depth in the hold of 22 feet 1.75 inches (6.8 m). This made her 2,184 35⁄94 tons burthen (bm).[2]
Classed as an 80-gun third-rate, Fenix was armed with thirty 24 pounders (11 kg) on her lower gun deck, thirty-two 18 pounders (8.2 kg) on her upper gun deck, twelve 9 pounders (4.1 kg) on the quarter deck and six on the forecastle.[2]
She was fitted out for British service and copper sheathed at Plymouth between April and August 1780 at a cost of £16,068.5.3d. The Admiralty had her armament increased twice: In November 1781 the 18-pounders on her upper deck were upgraded to 24 pounders (11 kg) and the same December, two 68 pounders (31 kg) carronades were added.[2]
Spanish service
By the time she was captured at the Battle of Cape St Vincent, Fenix was 31-years-old. She was neither a good sailer nor was she as well armed as her British counterparts which carried 32 pounders (15 kg).[2] As the flagship of Admiral Don Juan Langara, Fenix was leading a squadron comprising eleven ships of the line and two frigates on 16 January 1780 when seen by a British fleet commanded by Admiral George Brydges Rodney.[3]
The moonlight battle
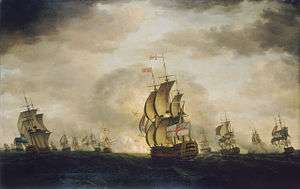
At 13:00, Rodney ordered his ships line abreast but after discovering the Spanish to be making for Cadiz, line ahead, changed the signal to general chase.[3] The chase lasted for several hours, and the battle finally began around 16:00. The Santo Domingo, trailing in the Spanish fleet, received broadsides from HMS Edgar, HMS Marlborough, and HMS Ajax before exploding at around 16:40.[3] Marlborough and Ajax then passed Princessa to engage other Spanish ships. Princessa was eventually engaged in an hour-long battle with HMS Bedford before striking her colours at about 17:30.[4] The chase continued into the dark. At 19:30, HMS Defence came upon Fenix, engaging her in a battle lasting over an hour. She was broadsided in passing by HMS Montagu and HMS Prince George, and Lángara was wounded in the battle. Fenix finally surrendered to HMS Bienfaisant, which arrived late in the battle and shot away her mainmast. At 21:15 the Montagu engaged the Diligente, which struck after her maintopmast was shot away.[4]
Around 23:00 San Eugenio surrendered after having all of her masts shot away by HMS Cumberland, but the difficult seas made it impossible to board a prize crew until morning. That duel was passed by HMS Culloden and Prince George, which engaged San Julián and compelled her to surrender around 01:00 the next day.[4] The last ship to surrender was Monarca. She nearly escaped, shooting away HMS Alcide's topmast, but was engaged in a running battle with the frigate HMS Apollo. Apollo managed to keep up the unequal engagement until about the time that Rodney's flagship Sandwich came upon the scene around 02:00. Sandwich fired a broadside, unaware that Monarca had already hauled down her flag.[5]
San Eugenio and San Julián were blown ashore and lost but the other four were taken into the Royal Navy. Four other Spanish vessels escaped from the action.[3]
British service
Fenix was commissioned under Captain John Carter Allen in February 1780 and renamed HMS Gibraltar on 23 April.[2] She joined George Darby's fleet in The Channel until 29 November when she left for Samuel Hood's squadron in the West Indies under Captain Walter Stirling.[2] In 1781, under Captain Charles Knatchbull, she became the flagship of Rear-Admiral Francis Samuel Drake and was present at the Capture of Sint Eustatius in February.[2] Following the outbreak of war between the Dutch Republic and Britain in December 1780, orders were sent from London to seize the island. A British expedition of 3,000 troops from Saint Lucia arrived off St Eustatius on 3 February. Rodney's ships took up position to neutralise any shore batteries. Two or three shots were fired from the only Dutch warship on the roadstead, the frigate Mars. Instead of disembarking the troops and launching an immediate assault, Rodney sent a message to Governor Johannes de Graaff suggesting that he surrender to avoid bloodshed. De Graaff agreed to the proposal and surrendered.[6]
Blockade of Martinique
Gibraltar was part of a 17-ship squadron, keeping four French ships of the line in Fort Royal, Martinique when on 29 April 1781, a 20-ship fleet and a merchant convoy under Contre-amiral François de Grasse arrived from Brest. Out of sight of the British, De Grasse put a man ashore to swap information and agree a plan of attack with the blockaded ships.[7]
De Grasse ordered his fleet to prepare for action on the morning of April 29, and sailed for Fort Royal with the convoy ships hugging the coast and the armed ships in battle line. Hood's fleet was seen bearing toward them around 08:00 but De Grasse held the weather gauge. At about 09:20, Hood was joined by the Prince William, a 64-gun ship that had been at St. Lucia. The two fleets continued to push for advantageous positions. Hood's leeward position prevented De Grasse from bringing the convoy to the harbour, but the four French ships there were able to sail out and further strengthen De Grasse's position.[8] Gibraltar, as Drake's flagship, led the British rear division.[7]
Around 1100, the French van began firing at long range, with little effect. By 12:30, the two fleets were aligned but De Grasse refused to close with Hood, despite Hood's efforts to bring the French to him. The fleets then exchanged cannonades and broadsides at a distance for the next hour.[8] The damage incurred on either side was modest although the four British ships on the southern end of the line suffered the most damage due to being targeted and outnumbered by eight French ships. HMS Russell suffered in particular and that night, Hood sent her to St Eustatius. Arriving on 4 May, she was able to brief Rodney about the engagement and French numbers.[9] British casualties amounted to 43 dead and 161 wounded of which Gibraltar's share was six and 16 respectively.[10]
In an attempt to force an action, Hood spent most of the next day struggling to get his ships to windward but finding two of his fleet too damaged to sail properly, he eventually broke off in a northerly direction. Rodney, who had left St Eustatius earlier that day in Sandwich with Triumph and the hurriedly repaired Russell, met with Hood on 11 May between St Kitts and Antigua. The reunited fleet turned south, putting in to Barbados on 18 May.[9]
Invasion of St Lucia and Tobago

Hood's withdrawal had left St Lucia exposed and on 10 May, 1200 French troops landed at Gros Islet, a village at the northern end of the island. The whole French fleet, less two ships-of-the-line, accompanied the expedition but the British batteries were able to keep them at bay and prevent the French troops from infiltrating the island further. On the same day, the remaining two ships from the French fleet and 1300 troops sailed for Tobago.[11] When it became clear that the St Lucia invasion was not succeeding, and on learning that the British fleet was at Barbados, De Grasse decided to reinforce his attack on Tobago; diverting his fleet there on 25 May and sending 3000 more troops from Martinique.[11]
While at Barbados, Rodney received news of Tobago and on 29 May, dispatched Drake in Gibraltar with five other ships. Drake intercepted the French the following day but being hopelessly out-numbered, retired to Barbados. He arrived on 3 June and Rodney immediately put to sea with the entire fleet. The British reached Tobago the following day, only to learn it had surrendered two days previous.[11]
Gibraltar carried Rodney back to England in August 1781 and was refitted at Plymouth that October. On completion, in January the following year, she was allocated to Captain Thomas Hicks as the flagship of Sir Richard Bickerton.[Note 1] In February, she sailed for the East Indies.[2]
Cuddalore

Following the death of French ally Hyder Ali in December 1782, British commanders at Madras decided to attempt the recapture of Cuddalore. The army marched south from Madras, circling around the city then encamping south of it. The British fleet, eighteen ships of the line including Gibraltar, under Admiral Sir Edward Hughes, anchored to the south to protect the army and its supply ships.[12] By early June 1783 The Siege Cuddalore was under way.[13]
French Admiral Bailli de Suffren with a fleet of fifteen ships sailed from Trincomalee to support the besieged city on 10 June. Arriving on 13 June the French found the British reluctant to fight, moving away and anchoring some five miles off. As the success of the siege would probably be decided by naval action, 1,200 troops were embarked onto Suffren's ships to increase his gunnery complement. Having been frustrated by contrary winds the French fleet was able to close with the British ships on 17 June. Hughes, not wishing to be caught at anchor, weighed and the two fleets began manouvring for advantage.[13]
Both fleets were at first frustrated by light and changeable winds. When a consistent west wind appeared on June 20th, Hughes lined up for battle and awaited Suffren's action. Lining up in a similar formation, Suffren gave to the order to attack, and battle began shortly after four in the afternoon. The action lasted around three hours resulting in no major damage to ships in either fleet, despite all ships being engaged. The British had 99 men killed and 434 wounded, French casualties amounted to 102 killed and 386 wounded.[14]
Spanish Armament and the outbreak of war
Gibraltar returned to England in July 1784, paid off, and in September she was laid up in ordinary. Repairs costing £36,713.0.6d were carried out between February 1788 and August 1790. During the Great Spanish Armament, when Spain laid claim to the Nootka Sound, she was brought back into service under Captain Samuel Goodall in May 1790.[2]
France declared war on Britain in February 1793 and Gibraltar was recommissioned under Captain Thomas Mackenzie in May 1793, In September, she was refitted at a cost of £17,485 before joining the Channel Fleet under Richard Lord Howe.[2] As part of this fleet, Gibraltar, on 2 May 1794, accompanied the East and West India and Newfoundland convoys along The Channel as far as Lizard Point. Howe then divided his force, sending eight ships of the line and four or five frigates to escort the convoys further.[15] The remaining 26 ships of the line, including Gibraltar, set off to search for a large Franco-American, grain convoy, known to be heading to France.[16]
Having had two frigates confirm that the French fleet was still at Brest, and realising that it would leave to protect the imminent convoy, Howe attempted an interception in advance by placing his ships where he thought an encounter likely. After thirteen days of searching, the British fleet returned on 19 May, to find the fleet in Brest, gone.[17][Note 2] On the same day, Howe’s fleet fell in with HMS Venus which had been attached to Rear-Admiral Sir George Montagu’s squadron. Also searching for the convoy, Montagu had been cruising between Cape Ortugal and Belle-Isle but knowing he would be hopelessly out-numbered, he had sent Venus to locate Howe and to ask for reinforcements.[18] At 04:00 the next morning, Howe ordered all sail in an attempt to reach Montagu before the French. The position of the French fleet was discovered on 21 May when Howe's fleet recaptured ten of a 16 ship convoy. Not wishing to reduce his numbers by allocating prize crews, Howe had the captured ships destroyed and ordered his fleet off in the direction of the French; realising that Montagu was no longer in danger.[19]
First of June
On 25 May a French ship was seen and followed which after three days, led the British to the main French fleet.[21] Howe gave the order to prepare for battle at 09:45 on 28 May and at 10:35 to form into two columns. In an attempt to force an action, some of the fastest ships were sent to attack the French rear which they did throughout the day, causing and receiving some damage.[22] The two fleets came together on 29 May and a limited engagement took place which petered out and became a general chase after an attempt to cut the French line was mistimed.[23] Thick fog prevented any further action for the next two days.[24]
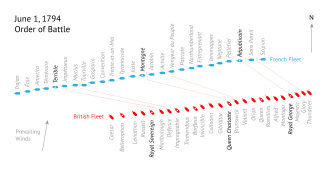
The weather cleared on the morning of 1 June and both fleets were drawn up line ahead, sailing in the same direction; Gibraltar in the centre, immediately before Hood's flagship, Queen Charlotte and behind Culloden. At around 08:15, the order was given for each ship to bear down upon and engage her opposite number.[25] Gibraltar was one of three ships that Howe signalled to put on more sail.[26] The tardiness of Gibraltar and Brunswick, on the other side of Queen Charlotte, meant that Howe found himself battling one 120-gun and two 80-gun ships simultaneously. Gibraltar was however able to stop a fourth enemy ship, Républicain, from joining in, by bringing down her main and mizzen masts from a distance.[27] By the end of the action, six French ships had been captured and another sunk. The remainder escaped.[28] In the three engagements, it was estimated that French casualties were between 3,000 and 7,000 dead and wounded, while British losses were recorded as 290 dead and 858 wounded.[29] Having been kept to windward for most of the battle, casualties aboard Gibraltar were light; two killed and 12 wounded.[30] After spending two days making repairs, the British fleet sailed for home with its prizes, having failed to stop the grain convoy which arrived in Brest on 12 June.[31][32]
Action of Hyères
Gibraltar was sent to the Mediterranean in May 1795, under Captain John Pakenham who had taken command in August the previous year.[2] Joining Admiral William Hotham's fleet on 14 June, Gibraltar fought in an action off the Hyères Islands in July.[33][2] The fleet was re-victualling in San Fiorenzo bay on 8 July when a small squadron under Commodore Horatio Nelson approached, being followed by the French Fleet from Toulon. The British fleet was not able to put to sea immediately due to contrary winds but was spotted by the French, who abandoned their chase. Hotham finished refitting and supplying his ships, and finally managed to set off after his quarry at 21:00; almost twelve hours later.[33] Following a storm the previous night, the British were carrying out repairs when they sighted the French fleet at dawn on 13 July. At 03:45, Hotham gave the order to make all possible sail in pursuit of their enemy, five miles off and heading for Fréjus.[34] The two fleets were close enough to exchange fire at 08:00 when the British van engaged the rearmost French ships, one of which struck after six hours. Before she could be taken possession of however, she caught fire and exploded. Just as Gibraltar was joining the action, Hotham signalled to disengage, believing the fleet to be running out of sea-room but being too far back to see that this was not the case.[35] Hotham resigned his position early the following year and was eventually replaced by Admiral John Jervis.[36]
Caught in a storm
The British fleet was anchored off The Rock on 10 December 1796, when a storm blew up. Culloden was obliged to get under way when her anchors failed to hold, narrowly missing Pearl Rock in the process, and at 21:00, Gibraltar was forced to cut her cable. [37] As she was attempting to get clear of Cabrita Point at 22:00, her fore topmast snapped and her foresail, mainsail, maintopmast staysail, and mizzen staysail tore. Having already lost her maintopsail, she became difficult to handle and struck the sandbank several times before being blown across it.[38] By midnight Gibraltar was out of danger and able to ride out the storm, and the next day at noon, she anchored in Tangier Bay.[38] The damage incurred during the storm, necessitated in her being sent to Plymouth in January 1797. During the repairs, which took until April and cost £12,818, a large piece of rock was removed from her hull.[2][39] Gibraltar returned to the Mediterranean in July 1797, under Captain William Hancock Kelly.[2]
Bruix' expedition
In May 1799, Gibraltar was one of 15 line-of-battle-ships in a fleet commanded by George Elphinstone, which had been blockading the port of Cadiz since the beginning of the year.[Note 3][41] On hearing from HMS Success that the French fleet had broken out of Brest and was on its way, Elphinstone immediately had all ships prepare for action, and dispatched HM brig-sloop Childers to warn Jervis at Gibraltar.[42][43] The French fleet under Vice-Admiral Étienne Eustache Bruix which escaped on 25 April, comprised 25 ships-of-the-line, and had already evaded Hood's Channel Fleet, when it appeared five leagues off Cadiz on 4 May.[44][43]
Bruix's orders were to combine the French and Spanish fleets and rescue Napoleon's army, stranded in Egypt following the Battle of the Nile, but the ships in Cadiz were prevented from joining there French allies by an opposing wind, and although the British offered their line-of-battle it was declined and the Brest fleet instead stood out for the Straits of Gibraltar.[43][45] Elphinstone followed as far as Cape Spartel before first returning to check on the fleet in Cadiz, then sailing to join Jervis at Gibraltar; arriving at 09:00 on 10 May.[46] Elphinstone made several further attempts to track down and bring the French to action, without sucess.[47] Bruix was able to amass a powerful fleet of 59 ships but failed to achieve his ultimate goal and returned to Brest on 8 August.[48][49]
Gibraltar in company with Renown, Dragon, Haerlem, Alexander, Athenian and Salamine, assisted in the capture of the Courageux on 28 March 1800.[50]
In January 1801, a large expedition of 16,000 troops and more than 100 vessels was assembled in Malta in preparation for an invasion of Egypt. Elphinstone's fleet, to which Gibraltar was attached, escorted the force to Aboukir Bay, arriving on 1 February 1801.[51] Bad weather prevented the army, under Sir Ralph Abercrombie, from landing for a week and the lack of water prevented Gibraltar and the larger ships from giving covering fire during debarkation; nevertheless the Battle of Alexandria was brought to a successful conclusion when the French surrendered on 2 September, following a long siege.[52] In 1850, a medal with the clasp "Egypt" was retrospectively awarded to the surviving members of Gibraltar's crew, for their part in the campaign.[53][54]
Ganteaume's expeditions

In March 1801, Gibraltar took part in the pursuit Contre-amiral Honoré Ganteaume, whose squadron made a further attempt to reinforce the French troops in Egypt.[2] Having sailed from Brest on 7 January, the French force of three 80-gun and four 74-gun ships-of-the-line, plus two frigates;[55] passed into the Mediterranean on 9 February where it captured the only British ship in the area, the 32-gun frigate, Success.[56] Rear-admiral Sir John Borlase Warren's squadron, comprising Gibraltar, Renown, Dragon, Généreux, Hector, and Haerlem; on hearing of the event, set off in pursuit.[57] Forced into Port Mahon on 27 February by a storm, the squadron remained there for several days while repairs were undertaken. The search continued on 4 March, minus Généreux; left to defend the island in the event of a surprise attack by French and Spanish forces. Having visited Naples and Palermo, Warren's squadron was reinforced on 18 and 22 March by Athénien and Alexander respectively. Now of seven ships-of-the-line, the British force turned towards Toulon; hoping to find Ganteaume there.[58]
At dawn on 25 March, while crossing the Tyrrhenian Sea, the French squadron was spotted, having been reduced to ten ships by a storm the previous night. Ganteaume turned his ships to the south-east and Warren gave chase. Gibraltar and Athenienne began to lag behind and Warren fearing his force would be come fragmented ordered his faster ships to slow down. The French were thus able to escape into the night, the British continuing on a south-east course while they quietly turned north, back to Toulon.[59]
Elba
Warren’s squadron was called upon to relieve the British garrison at Porto Ferrajo; under siege since the beginning of May 1801.[60] The arrival of the British ships on 1 August, caused the two French frigates blockading the port to retreat to Leghorn.[61] The two frigates were later brought to action on 2 September. Pomone, Phoenix and Minerve recaptured Succès and destroyed Bravoure after she had run aground.[Note 4][63]
Comprising Renown, Gibraltar, Dragon, Alexander, Généreux, Stately, of the line, Pomone and Pearl frigates, and brig-sloop Vincejo; Warren’s squadron supplied nearly 700 seamen and marines for an attack on the French batteries investing the town. The action took place on 14 September but was only partially successful, and eight days later the British ships left Elba. Porto Ferrajo remained in British hands until the end of the war however.[64]
Conflict renewed
During the Peace of Amiens, a short-lived mutiny took place aboard Gibraltar. The officers and marines were quickly able to regain control however and the instigators were hanged.[65] When war broke out again in May 1803, Gibraltar, commanded by Captain George Frederick Ryves, was one of only ten British ships in the Mediterranean. Under Sir Richard Bickerton, the squadron was stationed off Naples before sailing for Toulon on 4 June.[66] Overall command passed to Horatio Nelson when he arrived in HMS Amphion on 8 July and when Thomas Masterman Hardy joined in HMS Victory on 30 July, Nelson immediately moved his flag to her.[67]
By 1804, the British fleet in the Mediterranean had been reinforced and Gibraltar was paid off in July. She was refitted in Portsmouth in July 1805 at a cost of £30,643 and re-classed as a second-rate.[2] She returned to the Mediterranean at the end of the year, under Captain Mark Robinson; command later passing to Captain William Lukin.[2]
Gibraltar and two 36-gun frigates, HMS Penelope and HMS Tribune, spotted the 74-gun Vétéran off Belleisle, on 26 August 1806. Commanded by Jérôme Bonaparte, youngest brother of Napoleon, Vétéran was returning from the Bahamas. The British ships gave chase but Vétéran outran them and found a safe anchorage in Baie de La Forêt, Brittany.[68]
Basque Roads

When Captain John Halliday assumed command in April 1807, Gibraltar was serving in The Channel,[2] part of a fleet under Admiral James Gambier. On 17 March 1809, this fleet joined with Robert Stoppard’s squadron which was blockading the French fleet in the Basque Roads. Halliday was superseded at the beginning of April by Henry Lidgbird Ball who was Gibraltar's captain at the Battle of Basque Roads.[2][69]
The French ships had been anchored under the protection of the powerful batteries on the Isle d'Aix[70] when on 11 April, Lord Cochrane attacked them with fireships and explosive vessels.[71] Gibraltar's crew and officers helped man the fireships, which were limited in the damage they caused by a boom placed across the channel.[72] This was breached by one of the explosive vessels however and the French panicked, slipped their anchors, and drifted onto the shore.[73] Gibraltar's Lieutenant John Cookesley, who commanded one of the fireships, and Master's mate, John Conyer, were both badly burnt during the operation.[74][75]
Gambier's fleet spent the next two weeks attempting to capture or destroy the stranded French vessels, with some success. The attack came to an end on 29 April when the last French ship was re-floated and taken up the river to safety at Rochefort.[76]
Command of Gibraltar passed to Valentine Collard in June 1809, then Robert Plampin in 1810 when she returned to service in The Channel. Gibraltar's last commander was Captain George Scott, who took over in January 1812.[2]
Fate
Gibraltar was paid off some time in 1813 and laid up in ordinary at Plymouth. Towards the end of the year, she was converted to a powder hulk. She was moved to Milford in September 1824 where she was used as a lazarette, then broken up in November 1836 at Pembroke Dock.[2]
Notes
- ↑ Winfield's book gives the year as 1781. However this appears to be an obvious error; appearing between two 1782 dates. In addition, it is previously mentioned that in 1781, Gibraltar was under Charles Knatchbull and serving as Francis Samuel Drake's flagship.
- ↑ The French had in fact passed close by in thick fog, two days previous on 17 May[17]
- ↑ The blockaded Spanish fleet comprised 19 ships-of-the-line but only 17 were capable of going to sea at that particular time.[40]
- ↑ Succès was previously HMS Success, captured off Gibraltar by Ganteaume's force on 9 February 1801.[62]
Citations
- ↑ Lavery, Ships of the Line vol.1. p182.
- 1 2 3 4 5 6 7 8 9 10 11 12 13 14 15 16 17 18 19 20 21 22 Winfield p.37
- 1 2 3 4 Mahan p.449
- 1 2 3 Syrett, p. 240
- ↑ Syrett, p. 241
- ↑ Trew pp.102-103
- 1 2 Clowes (Vol.III) p.482
- 1 2 Clowes (Vol.III) p.484
- 1 2 Clowes (Vol.III) p.486
- ↑ The London Gazette: no. 12214. p. 5. 7 August 1781.
- 1 2 3 Clowes p.487
- ↑ Mahan p.561
- 1 2 Mahan p.562
- ↑ Mahan pp.262-263
- ↑ James (Vol.I} p.125
- ↑ James (Vol.I) pp.125-126
- 1 2 James (Vol.I) p.126
- ↑ James (Vol.I) p.128
- ↑ James (Vol.I) p.129
- ↑ James (Vol.I) p.147
- ↑ James (Vol.I) p.130
- ↑ James (Vol.I) pp.130-131
- ↑ James (Vol.I) pp.136-137
- ↑ James (Vol.I) pp.144-145
- ↑ James (Vol.I) pp.146-147
- ↑ James (Vol.I) p.148
- ↑ James (Vol.I) p.150
- ↑ James (Vol.I) p.152
- ↑ James (Vol.I) pp.152-153
- ↑ James (Vol.I) p.159
- ↑ James (Vol.I) p.169
- ↑ James (Vol.I) p.172
- 1 2 James (Vol.I) p.267
- ↑ James (Vol.I) p.268
- ↑ James (Vol.I) p.269
- ↑ James (Vol.I) p.308
- ↑ James (Vol.I) pp.316-317
- 1 2 James (Vol.I) p.317
- ↑ James (Vol.I) p.318
- ↑ James (Vol.II) p.256
- ↑ James (Vol.II) pp.256-257
- ↑ James (Vol.II) p.257
- 1 2 3 James (Vol.II) p.258
- ↑ James (Vol.II) pp.254-255
- ↑ Rodger p.462
- ↑ James (Vol.II) pp.259-260
- ↑ James (Vol.II) pp.260-265
- ↑ James (Vol.II) p.267
- ↑ Rodger p.463
- ↑ The London Gazette: no. 15809. p. 694. 21 May 1805.
- ↑ Long p.112
- ↑ Long p.113
- ↑ Long p.112
- ↑ The London Gazette: no. 21077. pp. 791–792. 15 March 1850.
- ↑ James (Vol.III) p.87
- ↑ James (Vol.III) p.90
- ↑ James (Vol.III) p.91
- ↑ James (Vol.III) p.92
- ↑ James (Vol.III) p.93
- ↑ James (Vol.III) p.95
- ↑ James (Vol.III) p.96
- ↑ James (Vol.III) p.97
- ↑ James (Vol.III) pp.96-97
- ↑ James (Vol.III) p.98
- ↑ Woodman p.147
- ↑ James (Vol.III) p.182
- ↑ James (Vol.III) pp.182-183
- ↑ Clowes (Vol.V) p.195
- ↑ James (Vol. V) pp. 103–104
- ↑ James (Vol. V) pp. 103–104
- ↑ James (Vol.V) p.105
- ↑ James (Vol.V) p.104
- ↑ James (Vol.V) pp. 108–109
- ↑ James (Vol.V) p.107
- ↑ Clowes (Vol.V) p.262
- ↑ James (Vol.V) p.122
References
- Clowes, William Laird (1996) [1900]. The Royal Navy, A History from the Earliest Times to 1900, Volume III. London: Chatham Publishing. ISBN 1-86176-012-4.
- Clowes, William Laird (1997) [1900]. The Royal Navy, A History from the Earliest Times to 1900, Volume V. London: Chatham Publishing. ISBN 1-86176-014-0.
- James, William (1837) [1827]. The Naval History of Great Britain, Volume I, 1797–1799. London: Richard Bentley.
- James, William (2002) [1827]. The Naval History of Great Britain, Volume II, 1797–1799. London: Conway Maritime Press. ISBN 0-85177-906-9.
- James, William (2002) [1827]. The Naval History of Great Britain, Volume III, 1800–1805. London: Conway Martime Press. ISBN 0-85177-907-7. 0811700232
- James, William (2002) [1827]. The Naval History of Great Britain, Volume V, 1808–1811. London: Conway Maritime Press. ISBN 0-85177-909-3.
- Richard, Woodman (2005). A Brief History of Mutiny. London: Constable and Robinson. ISBN 978-1-84119-737-1.
- Lavery, Brian (2003) The Ship of the Line - Volume 1: The development of the battlefleet 1650-1850. Conway Maritime Press. ISBN 0-85177-252-8.
- Long, W. H. (2010). Medals of the British Navy and how they were won. United Kingdom: Lancer Publishers. ISBN 978-1-935501-27-5.
- Mahan, Arthur T (1898). Major Operations of the Royal Navy, 1762–1783. Boston: Little, Brown. OCLC 46778589.
- Rodger, N.A.M (2005). The Command of the Ocean. London: Penguin Books. ISBN 0-140-28896-1.
- Syrett, David (2007). The Rodney Papers: Selections From the Correspondence of Admiral Lord Rodney. Burlington, VT: Ashgate Publishing. ISBN 978-0-7546-6007-1. OCLC 506119281.
- Trew, Peter (2006). Rodney and the Breaking of the Line. Barnsley: Pen and Sword Publishing. ISBN 978-1844151431.
- Winfield, Rif (2007). British Warships in the Age of Sail 1714–1792: Design, Construction, Careers and Fates. Seaforth Publishing. ISBN 978-1-84415-700-6.