After spending two years learning Solidity to develop dapps on
Ethereum, I discovered Tezos. I was immediately seduced by the
possibility that the Tezos blockchain brings with it, its scalability,
its decentralization and Michelson which makes smart contracts more
secure.
When I decided to learn how to write smart contracts for the Tezos
blockchain, I stumbled on the harsh reality: the Tezos ecosystem is
far from being as developed as Ethereum's. While Ganache is your best
friend when you develop smart contracts for Ethereum, there is no
equivalent for Tezos. During my research online, I found
Granary, but I haven't been able to make it work on my MacBook and it looks
like it is still under development (the last commit in their Github
repo was 5 months ago as of February 2020).
In addition of the scarce tooling, you will also find out that the
tutorials are also scarce. The documentations for learning high-level
languages for Tezos blockchain are most of the time incomplete (like
for
Fi) or requires good knowledge of functional programming (like
Ligo
or
Liquidity). There is also
SmartPy, which, I must admit, did a great job both in their documentation
and their online editor. But I am not a big fan of Python to begin
with and I wanted to take the challenge of learning a functional
language.
I chose
Liquidity. Although I am still a beginner in Liquidity, I decided that it
would be interesting to share my experience and write a basic
step-by-step guide to help other people coming from Solidity or a
programming language like JavaScript. The following tutorial is going
to expose basic concepts of Liquidity and functional programming. I am
going to use the
ReasonML
syntax as I feel it is closer to JavaScript which is a programming
language that a lot of programmers know and are comfortable with. If I
am wrong somewhere in the tutorial, please do not hesitate to correct
me :)
The first sentence is the version of the Liquidity compiler you are
using. It is not absolutely necessary (the examples provided in the
online editor compile with a version statement).
The second line is optional and is used to declare various types and
functions you will use in your contract later.
The third line is the storage declaration. The contract stores its
state in a single "variable" by creating a new "type". The different
parts of the storage can then be accessed using the dot notation (for
example
storage.users or storage.address). You MUST define a
type storage in every contract.
Next, you find the initialization function. This step is optional if
your storage is hard-coded, otherwise, you can use to set your storage
variables when you deploy the contract.
Following these steps, you find the entry points.
Each Liquidity contract is made of different entry points that matches
calls made to the smart contract. They must all have different names.
They all receive two arguments: the parameters sent when calling the
entry point and the current storage. Then, they all return two
arguments: a list of operations and the new storage. You can also
define a default entry point that will be executed when the
contract is called and no entry point is specified. For example, you
can use it to handle any tez sent to the contract.
Let's start now with our contract. It will be a very simple contract
that will receive a value and store it.
The Simple Storage contract
We will start by defining the version we want to use as good practice:
The storage will be a very simple one, we will start an integer and
increment it:
[%%version 2.0]
type storage = int;
Now we can initialize our storage when the contract will be deployed.
[%%version 2.0]
type storage = int;
let%init storage = 0;
After this step, our storage is initialized to zero.
Now let's write the entry point to increment the value:
[%%version 2.0]
type storage = int;
let%init storage = 0;
let%entry increment = (num: int, storage) => ([], storage +
num);
Let's break it down:
-
let%entry = this keyword indicates you are
declaring an entry point that can be called from outside.
-
increment = this is the name of your entry, it
must be unique to the contract.
-
(num: int, storage) = as explained above, each
entry point takes two arguments: the parameters passed to the
entry point and the storage. Here, the parameter is an integer
with the name "num".
-
([], storage + num) = each entry point returns
two values: a list of internal operations to perform after
execution of the contract and the final storage.
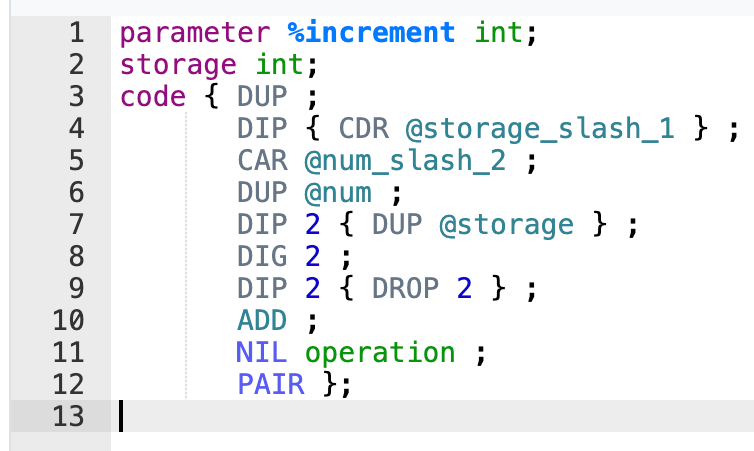
If everything goes well, you should get the following Michelson code
in the online Liquidity compiler:
Storing multiple values
Incrementing an integer in the storage is cool, but what about storing
"Hello world" in the contract?? Let's modify the previous contract to
save an integer and a string.
First, we must change the type of the storage. Remember, the storage
is one single value, so if we want to store multiple values, we will
have to use a type called a "record":
[%%version 2.0]
type storage = { count: int, greeting: string }
A record is very similar to JavaScript object, one of the main
differences is that you have to declare it explicitly. Open a set of
curly brackets and write the field name followed by the type. In our
case, we need a field name called "count" of type integer and
a field name called "greeting" of type string.
Now, it is time to write the initialization function:
[%%version 2.0]
type storage = { count: int, greeting: string }
let%init storage = (count: int, greeting: string) => {count,
greeting};
Like in the first version of the contract, we start with
let%init followed by the name of the storage. We will
give the possibility to the users to set their own values that will be
passed as parameters. We will force these values to be one integer and
one string. Thanks to ReasonML, we can use
punning
and write
{count, greeting} instead of
{count: count, greeting: greeting} to return our
initialized storage.
Next, we will rewrite the increment function. This time, as the
storage contains 2 values, we will have to be careful and update only
the "count" field:
[%%version 2.0]
type storage = { count: int, greeting: string }
let%init storage = (count: int, greeting: string) => {count,
greeting};
let%entry increment = (num: int, storage) => {
let
storage = storage.count = storage.count + num;
([],
storage);
}
You begin being familiar with the entry points now, the parameter(s)
and the storage as arguments and the list of operations and the new
storage as returned values. In the middle, we increment the "count"
field of the storage with the integer provided by the user.
The entry point to add a new greeting will look very similar:
[%%version 2.0]
type storage = { count: int, greeting: string }
let%init storage = (count: int, greeting: string) => {count,
greeting};
let%entry increment = (num: int, storage) => {
let
storage = storage.count = storage.count + num;
([],
storage);
}
let%entry greet = (greeting: string, storage) => {
let storage = storage.greeting = greeting;
([], storage);
}
Instead of an integer, we will expect a string and instead of
incrementing the field in the storage, we will just replace it with
the new value.
If everything goes well, when you compile the code, you should be
rewarded with the following Michelson code:

You did it! You wrote your first Liquidity code!