Zeppelin bend
| Zeppelin bend | |
|---|---|
 | |
| Names | Zeppelin bend, Rosendahl bend, Rosendahl's knot |
| Category | Bend |
| Related | Zeppelin loop, Hunter's bend, Ashley's bend, Alpine butterfly bend |
| Releasing | Non-jamming |
| Typical use | Connecting two ropes |
| Instructions | |
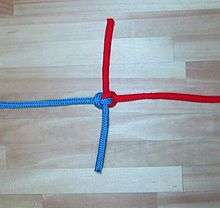
A Zeppelin bend (also Rosendahl bend) is a general-purpose bend knot. It is a secure, easily tied, and jam-resistant way to connect two ropes. Though its simplicity and security may be matched by other bends, it is unique in the ease with which it is untied, even after heavy loading.
History
Both names for this knot stem from its alleged use to moor airships: a Zeppelin being a rigid-bodied type of airship, and Charles Rosendahl being the US Navy officer who allegedly insisted it be used to moor airships under his command.[1] Such allegations, however, were seriously challenged when, upon seeking permission for reprinting the Paine article, it was disclosed that Rosendahl had responded to the original article to correct one location of training and he indicated no familiarity with the knot! Beyond the story, there is no evidence that this knot was ever used (and it's unclear why one would even need such a knot in mooring).
Despite being praised by some sources as a nearly ideal bend knot,[2][3] it is not very well known; Clifford Ashley, author of The Ashley Book of Knots, was apparently unaware of this bend.[4] Budworth (1998) names a similar-looking decorative knot the "blimp knot".[5]
Tying

- Form a loop in each of the ends of rope.
- Overlay one loop on the other, such that the working end of each rope faces "outwards" or away from the other hitch.
- Pull either loose end once around the loop in the other rope, and then through the "tunnel" created by the two hitches.
- Repeat with the other loose end.
- Pull on all four rope parts to tighten the knot.
- To untie, pull simultaneously on the two turns that go round the standing parts.
Another method of remembering this knot is to visualize a "69". To tie the knot, follow the steps below:
- Make a "6" with the line (rope) in your left hand. It is important that the working end (the free, short end) winds up on top of the standing end for the "6".
- Make a "9" with the line in your right hand. Make sure that the standing part crosses over the working end of the "9".
- While keeping both "numbers" intact, place the "6" over the "9", with the circle parts of each number lining up.
- Pass the "tail" of the "6" down, over itself, and up through the middle (circle) part of your "69".
- Pass the "tail" part of the "9" up over itself and down through the middle (circle) part of your "69".
- Pull each standing end while ensuring that the working ends are not pulled from the "69" holes.
Another method of tying a zeppeling bend was discovered by Robert Narracci in 2010. As opposed to the "69 Method" in which both ropes are slack, the "Clover Method" allows the knot to be tied with one rope in tension.
Double Zeppelin bend
A double Zeppelin bend can be "made by repeating the final tucks",[3] i.e. rather than just take each working end around and through once, do that twice for each of them.
See also
References
- ↑ Lee Paine; Bob Paine (Jan–Feb 1980). "The Forgotten Zeppelin Knot". Mother Earth News. Retrieved 2013-08-08.
- ↑ Brion Toss (1998). The Complete Rigger's Apprentice. Camden: International Marine. pp. 69–70.
- 1 2 "Zeppelin Bend". Notable Knot Index. Retrieved 2010-11-04.
- ↑ The chapter covering bend knots in The Ashley Book of Knots does not include this knot. See pages 257–274.
- ↑ Budworth, Geoffrey (1998). The Complete Book of Decorative Knots, p.34. Globe Pequot. ISBN 1558217916.