Battle of the Strait of Otranto (1917)
| Battle of the Strait of Otranto | |||||||
|---|---|---|---|---|---|---|---|
| Part of the Mediterranean Theater of World War I | |||||||
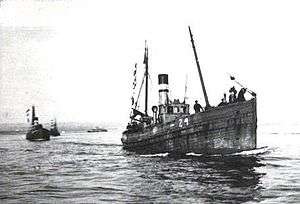
 SMS Novara in action | |||||||
| |||||||
| Belligerents | |||||||
|
|
| ||||||
| Commanders and leaders | |||||||
|
|
| ||||||
| Strength | |||||||
|
2 light cruisers 10 destroyers 47 drifters |
1 armored cruiser 3 light cruisers 4 destroyers | ||||||
| Casualties and losses | |||||||
|
1 light cruiser damaged 2 destroyers sunk 1 destroyer damaged 2 supply ships sunk 14 drifters sunk 4 drifters damaged | 2 light cruisers damaged | ||||||
The 1917 Battle of the Strait of Otranto was the result of an Austro-Hungarian raid on the Otranto Barrage, an Allied naval blockade of the Strait of Otranto. The battle took place on 14–15 May 1917, and was the largest surface action in the Adriatic Sea during World War I.[1] The Otranto Barrage was a fixed barrier, composed of lightly armed drifters with anti-submarine nets coupled with minefields and supported by Allied naval patrols.
The Austro-Hungarian navy planned to raid the Otranto Barrage with a force of three light cruisers and two destroyers under the command of Commander (later Admiral) Miklós Horthy, in an attempt to break the barrier to allow U-boats freer access to the Mediterranean, and Allied shipping. An Allied force composed of ships from three navies responded to the raid and in the ensuing battle, heavily damaged the Austro-Hungarian cruiser SMS Novara. However, the rapid approach of the Austro-Hungarian relief force persuaded Rear Admiral Acton, the Allied commander, to retreat.
Disposition of forces
Under the command of Horthy, three Austro-Hungarian cruisers: Novara, Saida, and Helgoland, modified to resemble large British destroyers, were to attack the drifters on the night of 14 May and attempt to destroy as many as possible before daybreak.[2] The destroyers Csepel and Balaton were to mount a diversionary raid off the Albanian coast in order to confuse any Allied counter-attack.[2] Two Austro-Hungarian U-boats—U-4 and U-27, along with the German U-boat UC-25—were to participate in the operation as well. A supporting force composed of the armored cruiser Sankt Georg, two destroyers, and four 250t-class torpedo boats was on standby if the raiders ran into trouble. The old pre-dreadnought battleship Budapest and three more 250t-class torpedo boats were also available if necessary.[2]
An Allied destroyer patrol was in the area on the night of 14 May, to the north of the Barrage. The Italian flotilla leader Mirabello was accompanied by the French destroyers Commandant Rivière, Bisson, and Cimeterre. The Italian destroyer Borea was also in the area, escorting a small convoy to Valona.[2] A support force was based in the port of Brindisi, consisting of the British cruisers Dartmouth and Bristol and several French and Italian destroyers.[3]
Raid on the drifters
The Italian convoy escorted by Borea was attacked by the Austro-Hungarian destroyers Csepel and Balaton at approximately 03:24. The Austro-Hungarians sank Borea and a munitions ship, and a second was set on fire and abandoned.[2]
The three cruisers were able to pass through the line of drifters, and at 03:30 began attacking the small barrage ships. The Austro-Hungarians frequently gave the drifter crews warning to abandon ship before opening fire.[4] In some instances, the drifter crews chose to fight: Gowan Lee returned fire on the Austo-Hungarian ships. The ship was heavily damaged, but remained afloat; her captain—Joseph Watt—was later awarded the Victoria Cross for his actions during the battle.[5]
There were 47 drifters in Barrage on the night of 14 May; the Austro-Hungarians managed to sink 14 drifters and damage four more.[5] The lack of sufficient Allied escorts forced the withdrawal of the remaining blockading ships, although only for a short time.[6]
Battle
By this time, the Allied naval forces in the area were aware of the raid, and were in a position to block the Austro-Hungarian retreat. Rear Admiral Alfredo Acton—the commanding officer of the Italian Scouting Division—ordered Mirabello's group southward at 04:35, while he embarked on the British light cruiser HMS Dartmouth.[5] By 06:45, the cruisers Dartmouth and Bristol—along with the Italian destroyers Mosto, Pilo, Schiaffino, Acerbi, and Aquila—were sailing north in an attempt to cut off the Austro-Hungarian cruisers. The Italian light cruiser Marsala, the flotilla leader Racchia, and the destroyers Insidioso, Indomito, and Impavido were readying to sail in support as well.[5]
The Mirabello group engaged the Austro-Hungarian cruisers at 07:00, but were heavily outgunned, and instead attempted to shadow the fleeing cruisers. At 07:45, Rear Admiral Acton's ships encountered the destroyers Csepel and Balaton. After 20 minutes, the Italian destroyers were able to close the distance to the Austro-Hungarian ships; the two groups engaged in a short artillery duel before a shot from Csepel struck Aquila and disabled the ship's boilers. By this time, the Austro-Hungarian destroyers were under the cover of the coastal batteries at Durazzo, and were able to make good their escape.[5]
At 09:00, Bristol's lookouts spotted the smoke from the Austro-Hungarian cruisers to the south of her position.[5] The Allied ships turned to engage the Austro-Hungarian ships; the British ships had both a superiority in numbers and in firepower; Dartmouth was armed with eight 6 in (150 mm) guns and Bristol had two 6 inch and ten 4 in (100 mm), compared to the nine 3.9 in (99 mm) guns on each of the Austro-Hungarian ships.[7] Unfortunately for the Allies, their numerical superiority was quickly lost, as their destroyers were either occupied with mechanical problems, or protecting those destroyers suffering from breakdowns.[7] The support forces of both sides—the Sankt Georg group for the Austro-Hungarians, and the Marsala group for the Allies—were quickly dispatched to the battle.

Dartmouth—faster than Bristol—closed to effective engagement range with the Austro-Hungarian ships, and opened fire. A shell from Dartmouth struck Novara, at which point the Austro-Hungarian ships laid a smoke screen in order to close the distance. Dartmouth was struck several times, and by 11:00, Acton ordered the ship to reduce speed to allow Bristol to catch up.[8] Novara was hit several more times, and her main feed pumps and starboard auxiliary steam pipe had been damaged, which caused the ship to begin losing speed. At 11:05, Acton turned away in an attempt to separate Saida from Novara and Helgoland. At this point, Sankt Georg was approaching the scene, which prompted Acton to temporarily withdraw to consolidate his forces. This break in the action was enough time for the Austro-Hungarians to save the crippled Novara; Saida took the ship under tow while Helgoland covered them.[8]
Unaware that Novara had been disabled, and fearing that his ships would be drawn too close to the Austrian naval base at Cattaro, Acton broke off the pursuit. The destroyer Acerbi misread the signal, and attempted to launch a torpedo attack, but was driven off by the combined fire of Novara, Saida, and Helgoland. At 12:05, Acton realized the dire situation Novara was in, but by this time, the Sankt Georg group was too close.[9] The Sankt Georg group rendezvoused with Novara, Saida, and Helgoland, and Csepel and Balaton reached the scene as well. The entire group returned to Cattaro together.[9]
At 13:30, the submarine UC-25 torpedoed Dartmouth, causing serious damage. The escorting destroyers forced UC-25 from the area, but Dartmouth had to be abandoned for a period of time, before it could be towed back to port. The French destroyer Boutefeu attempted to pursue the German submarine, but struck a mine laid by UC-25 that morning and sank rapidly.[9]
Aftermath

As a result of the raid, it was decided by the British naval command that unless sufficient destroyers were available to protect the barrage, the drifters would have to be withdrawn at night.[10] The drifters would only be operating for less than twelve hours a day, and would have to leave their positions by 15:00 every day.[11] Despite the damage received by the Austro-Hungarian cruisers during the pursuit by Dartmouth and Bristol, the Austro-Hungarian forces inflicted more serious casualties on the Allied blockade. In addition to the sunk and damaged drifters, the cruiser Dartmouth was nearly sunk by the German submarine UC-25, the French destroyer Boutefeu was mined and sunk, and a munitions convoy to Valona was interdicted.
However, in a strategic sense, the battle had little impact on the war. The barrage was never particularly effective at preventing the U-boat operations of Germany and Austria-Hungary in the first place. The drifters could cover approximately .5 mi (0.80 km) apiece; of the 40 mi (64 km)-wide Strait, only slightly more than half was covered. The raid risked some of the most advanced units of the Austro-Hungarian fleet on an operation that offered minimal strategic returns.[11]
Footnotes
References
- Burg, David F.; Purcell, L. Edward (2004). Almanac of World War I. University Press of Kentucky. ISBN 0-8131-9087-8.
- Halpern, Paul G. (1995). A Naval History of World War I. Annapolis: Naval Institute Press. ISBN 1-55750-352-4.
- Marshall Cavendish Corporation (2002). History of World War I. 2. Marshall Cavendish. ISBN 0-7614-7231-2. Retrieved 18 January 2009.
- Tucker, Spencer E. (2005). The Encyclopedia of World War I. ABC-CLIO. ISBN 1-85109-420-2.
Further reading
- Halpern, Paul G. (2004). The Battle of the Otranto Straits: Controlling the Gateway to the Adriatic in WWI. Bloomington, Indiana: Indiana University Press, 2004. ISBN 0-253-34379-8.
Coordinates: 40°13′10″N 18°55′32″E / 40.21944°N 18.92556°E