Battle of the Malacca Strait
| ||||||||||||||||||||||||||||||
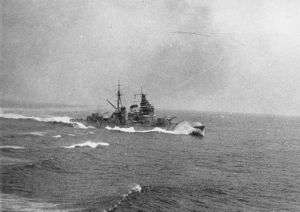
The Battle of the Malacca Strait, sometimes called the Sinking of the Haguro, and in Japanese sources as the Battle off Penang (ペナン沖海戦), was a naval battle that resulted from the British search and destroy operation in May 1945, called Operation Dukedom, that resulted in the sinking of the Japanese cruiser Haguro. Haguro had been operating as a supply ship for Japanese garrisons in the Dutch East Indies and the Bay of Bengal since 1 May 1945.
Background
On 9 May, Haguro left Singapore, escorted by the destroyer Kamikaze, to re-supply the Port Blair garrison on the Andaman Islands and to evacuate the troops in Port Blair back to Singapore. The Royal Navy was alerted to this by a decrypted Japanese naval signal,[3][4] subsequently confirmed by a sighting by the submarines HMS Statesman and Subtle. Force 61 of the Eastern Fleet set sail on 10 May from Trincomalee, Ceylon to intercept the Japanese flotilla. The Japanese were unwilling to risk any battle and, on receipt of an air reconnaissance warning, they returned to Singapore.
On 14 May, Haguro and Kamikaze tried again and left Singapore. The next day, they were spotted by aircraft from Force 61. The subsequent bombing attack by Grumman Avenger IIs of 851 Squadron caused only minor damage to Haguro, for the loss of an aircraft whose crew was taken prisoner by the Japanese.
Battle
Information was relayed to the Japanese that two British destroyer squadrons had been sighted heading towards them. Again, they reversed course to return to the Malacca Strait. This change had been anticipated, however, and the 26th Destroyer Flotilla (HMS Saumarez, Verulam, Venus, Vigilant, and Virago), commanded by Captain Manley Laurence Power (in Saumarez) steamed to intercept.
In heavy rain squalls with lightning, Venus made radar contact at 34 nmi (39 mi; 63 km).[5] The British destroyers arranged themselves in a crescent cordon and allowed the Japanese ships to sail into the trap.
.jpg)
At 01:05, Venus, parallel to Haguro as she raced past the north-westernmost ship in Power's force, found herself in a perfect attacking position. But the Torpedo Control Officer aboard Venus had made the wrong angle settings on her eight tubes, the opportunity was lost and Venus heeled hard over to port to clear the target area but still maintain the encirclement. Haguro, thinking Venus had launched torpedoes, altered course away to comb the tracks. In so doing, she turned south and deeper into the trap.[6]
Saumarez and Verulam were now well positioned to make their attacks. Haguro appeared fine off Saumarez's port bow at a range of 6,000 yards (3.4 miles), each ship closing at 30 knots. At the same time, the Japanese destroyer Kamikaze appeared off the starboard bow, crossing from starboard to port, only 3,000 yards away and on a collision course. Saumarez's second salvo from her two forward, radar-controlled 4.7in guns struck Kamikaze and 40mm Bofors shells from the British ship's aft twin-mounting ripped the 320ft length of the Japanese destroyer as Saumarez heeled to starboard. Haguro now fired her first broadside of ten 8in and four 5in guns at Saumarez.[6] Tremendous waterspouts thrown up alongside swamped the British flotilla leader's upper decks as Haguro was seen clearly three miles away in the light of both sides' star-shells.
At 01:11, just as she was about to fire torpedoes, Saumarez was hit. The top of her funnel disappeared over the side and a 5in shell penetrated No. 1 Boiler Room, severed a steam main and lodged inside the boiler. Five men were scalded but, as with the 8in shell hits, this shell failed to explode at such close range and was later thrown overboard.[6]
At 01:15, Haguro was hit by three torpedoes from Saumarez and Verulam. As Saumarez limped northward from the immediate battle area, a violent explosion created confusion. Power thought it was Kamikaze blowing up and men on Virago and Vigilant thought it was Saumarez, but it was probably two torpedoes colliding.[6] Venus hit Haguro with one torpedo at 01:25, and Virago stopped Haguro with two more torpedo hits two minutes later. The Japanese cruiser finally sank at 02:06 after receiving another torpedo from Vigilant, two more from Venus, and nearly an hour of gunfire from the 26th Flotilla.[5]
Aftermath
Kamikaze was also damaged, but escaped, returning the next day to rescue survivors. About 320 survived, but over 900 died, including the Japanese commanders, Vice-Admiral Hashimoto and Rear-Admiral Sugiura.[7]
Saumarez's main aerial and a funnel top had been shot away and an 8 in (200 mm) shell nicked the forecastle. Two men were killed and three burned in the boiler room when a 5 in (130 mm) shell severed the main steam pipe. There was no damage to the remainder of the 26th Flotilla.[5]
The 26th Destroyer Flotilla had fought the last major surface gun and torpedo action of World War II and carried out one of the finest sinkings of a heavy ship by destroyers alone. Lord Louis Mountbatten, himself a distinguished destroyer captain, gave the action his seal of approval when he described it in his Report to the Combined Chiefs of Staff (CCS) as 'an outstanding example of a night attack by destroyers.'[6]
Notes
- ↑ Hough, HMS Vigilant
- ↑ 900 were killed on Haguro and 27 on Kamikaze. Hackett and Nevitt, Combinedfleet.com.
- ↑ Jackson, Ashley (2006). The British Empire and the Second World War. London: Hambledon Continuum. p. 302. ISBN 1-85285-417-0.
- ↑ Norman Scott, “Solving Japanese Naval Ciphers 1943 – 45”, Cryptologia, Vol 21(2), April 1997, pp149–157
- 1 2 3 Calnan, Dennis, CDR RN. "The Saumarez and the Haguro". United States Naval Institute Proceedings, October 1968.
- 1 2 3 4 5 Thomas, David (1976). Hunting the Haguro, p. 48. Marshall Cavendish Ltd. ISSN 0307-2886.
- ↑ Expedition 'Operation Dukedom' An expedition report - of a 2010 diver survey of the wreck of HIJMS Haguro - on The Explorers Club web site
References
- Lacroix, Eric; Linton Wells (1997). Japanese Cruisers of the Pacific War. Naval Institute Press. ISBN 0-87021-311-3.
- Roskill, S. W. (1960). White Ensign, the British Navy At War, 1939-1945. United States Naval Institute. ASIN B000EJI8X8.
- Winton, John (1969). The Forgotten Fleet. Michael Joseph Ltd. ISBN 0-7181-0643-1.
- Winton, John (1981). Sink the Haguro. Saunders of Toronto Ltd. ISBN 0-85422-152-2.
- Chen, Peter (2004–2007). "Haguro". World War II Database. Retrieved 2007-02-22.
- Hackett, Bob; Sander Kingsepp (1997–2006). "HIJMS Haguro: Tabular Record of Movement". (Combinedfleet.com). Archived from the original on 10 March 2007. Retrieved 2007-02-22.
- Hough, Stan (1998). "H.M.S. VIGILANT. 1945". Stan Hough. Retrieved 2007-02-22. - Firsthand account of the battle by a member of HMS Vigilant's crew.
- Muir, Dan. "Order of Battle, Battle off Penang (Loss of IJN Haguro)". (navweaps.com). Retrieved 2007-02-22.
- Nevitt, Allyn D. (1998). "IJN Kamikaze: Tabular Record of Movement". (Combinedfleet.com). Archived from the original on 12 January 2007. Retrieved 2007-02-22.
- I Was There! - We Settled a Jap Cruiser in Malacca Straits, The War Illustrated, August 17, 1945. - Firsthand account of the battle by members of HMS Venus's crew.