HMS New Zealand (1911)
 New Zealand in Australia, May 1919 | |
| History | |
|---|---|
| Name: | HMS New Zealand |
| Namesake: | Dominion of New Zealand |
| Builder: | Fairfield Shipbuilding and Engineering, Govan |
| Laid down: | 20 June 1910 |
| Launched: | 1 July 1911 |
| Commissioned: | 19 November 1912 |
| Struck: | 19 December 1922 |
| Fate: | Sold for scrap, 19 December 1922 |
| General characteristics | |
| Class and type: | Indefatigable-class battlecruiser |
| Displacement: |
|
| Length: | 590 ft 3.5 in (179.9 m) |
| Beam: | 80 ft (24.4 m) |
| Draught: | 27 ft (8.2 m) |
| Installed power: | 44,000 shp (33,000 kW) |
| Propulsion: |
|
| Speed: | 25 knots (46 km/h; 29 mph) |
| Range: | 6,690 nautical miles (12,390 km; 7,700 mi) at 10 knots (19 km/h; 12 mph) |
| Complement: | 800[1] |
| Armament: |
|
| Armour: | |
HMS New Zealand was one of three Indefatigable-class battlecruisers built for the defence of the British Empire. Launched in 1911, the ship was funded by the government of New Zealand as a gift to Britain,[2] and she was commissioned into the Royal Navy in 1912. She had been intended for the China Station, but was released by the New Zealand government at the request of the Admiralty for service in British waters.
During 1913, New Zealand was sent on a ten-month tour of the British Dominions, with an emphasis on a visit to her namesake nation. She was back in British waters at the start of World War I, and operated as part of the Royal Navy's Grand Fleet, in opposition to the German High Seas Fleet. During the war, the battlecruiser participated in all three of the major North Sea battles—Heligoland Bight, Dogger Bank, and Jutland—and was involved in the response to the inconclusive Raid on Scarborough, and the Second Battle of Heligoland Bight. New Zealand contributed to the destruction of two cruisers during her wartime service and was hit by enemy fire only once, sustaining no casualties; her status as a "lucky ship" was attributed by the crew to a Māori piupiu (warrior's skirt) and hei-tiki (pendant) worn by the captain during battle.
After the war, New Zealand was sent on a second world tour, this time to allow Admiral John Jellicoe to review the naval defences of the Dominions. In 1920, the battlecruiser was placed in reserve. She was broken up for scrap in 1922 in order to meet Britain's tonnage limit in the disarmament provisions of the Washington Naval Treaty.
Design
The Indefatigable class was not a significant improvement on the preceding Invincible class; the main difference was the enlargement of the dimensions to give the ships' two wing turrets a wider arc of fire. The ships were smaller and not as well protected as the contemporary German battlecruiser SMS Von der Tann and subsequent German designs. While Von der Tann's characteristics were not known when the lead ship of the class, HMS Indefatigable, was laid down in February 1909, the Royal Navy obtained accurate information on the German ship before work began on New Zealand and her sister ship HMAS Australia.[3]
.jpg)
New Zealand had an overall length of 590 feet (179.8 m), a beam of 80 feet (24.4 m), and a draught of 29 feet 9 inches (9.1 m) at deep load. She displaced 18,500 long tons (18,800 t) at load and 22,130 long tons (22,490 t) at deep load.[4] The battlecruiser's Parsons direct-drive steam turbines were designed to produce 44,000 shaft horsepower (33,000 kW), propelling the ship at 25 knots (46 km/h; 29 mph). However, during trials in 1912, the turbines produced over 49,000 shp (37,000 kW), which allowed New Zealand to reach 26.39 knots (48.87 km/h; 30.37 mph). The ship carried approximately 3,200 long tons (3,300 t) of coal, and an additional 850 long tons (860 t) of fuel oil; this was sprayed on the coal to increase its burn rate.[5] This gave her a range of 6,690 nautical miles (12,390 km; 7,700 mi) at a speed of 10 knots (19 km/h; 12 mph).[1]
.jpg)
The ship carried eight BL 12-inch Mk X guns in four twin gun turrets. Two turrets were mounted fore and aft on the centreline, identified as 'A' and 'X' respectively. The other two were wing turrets mounted amidships and staggered diagonally: 'P' was forward and to port of the centre funnel, while 'Q' was situated starboard and aft. Each wing turret had a limited ability to fire to the opposite side, but if the ship was full broadside to her target she could bring all eight main guns to bear. Her secondary armament consisted of sixteen 4-inch BL Mk VII guns positioned in the superstructure.[6] She mounted two 18-inch submerged torpedo tubes, one on each side aft of 'X' barbette, and twelve torpedoes were carried.[7]
New Zealand's 'A' turret was fitted with a 9-foot (2.7 m) rangefinder at the rear of the turret roof. It was also equipped to control the entire main armament in the event that the normal fire control positions were knocked out or communication between the primary positions and the gun layers was disabled.[8]
Wartime modifications
The ship was fitted with a single QF 6 pounder Hotchkiss anti-aircraft (AA) gun from October 1914 to the end of 1915.[9] In March 1915, a single QF 3 inch 20 cwt[Note 1] AA gun was added. It was provided with 500 rounds. The battlecruiser's 4-inch guns were enclosed in casemates and given blast shields during a refit in November to better protect the gun crews from weather and enemy action. Two aft guns were removed at the same time.[10]
New Zealand received a fire-control director sometime between mid-1915 and May 1916; this centralised fire control under the director officer, who now fired the guns. The turret crewmen merely had to follow pointers transmitted from the director to align their guns on the target. This greatly increased accuracy, as it was easier to spot the fall of shells and eliminated the problem of the ship's roll dispersing the shells when each turret fired independently.[11] An additional inch of armour was added to the top of the magazines and turret roofs after the Battle of Jutland.[12]
By 1918, New Zealand carried two aircraft, a Sopwith Pup and a Sopwith 1½ Strutter, on flying-off ramps fitted on top of 'P' and 'Q' turrets.[7] The Pup was intended to shoot down Zeppelins while the 1½ Strutter was used for spotting and reconnaissance.[13] Each platform had a canvas hangar to protect the aircraft during inclement weather.[14]
Acquisition and construction
At the start of the 20th century, the British Admiralty maintained that naval defence of the British Empire, including the Dominions, should be unified under the Royal Navy.[15] Attitudes on this matter softened during the first decade, and at the 1909 Imperial Conference, the Admiralty proposed the creation of Fleet Units: forces consisting of a battlecruiser, three light cruisers, six destroyers, and three submarines.[16] While Australia and Canada were encouraged to purchase fleet units to serve as the core of new national navies, other fleet units would be operated by the Royal Navy at distant bases, particularly in the Far East; New Zealand was asked to partially subsidise a fleet unit for the China Station.[17]
To this end, the Prime Minister of New Zealand, Sir Joseph Ward, announced on 22 March 1909 that his country would fund a battleship (later changed to an Indefatigable-class battlecruiser) as an example to other countries.[18] It is unclear why this design was selected, given that it was known to be inferior to the battlecruisers entering service with the Imperial German Navy (German: Kaiserliche Marine). Historian John Roberts has suggested that the request may have been attributable to the Royal Navy's practice of using small battleships and large cruisers as flagships of stations far from Britain, or it might have reflected the preferences of the First Sea Lord and Admiral of the Fleet John Fisher, preferences not widely shared.[19] The New Zealand Government took out a loan to fund the cost of the ship.[20]
New Zealand's keel was laid at Fairfield Shipbuilding and Engineering's yard on the Clyde on 20 June 1910. Launched on 1 July 1911, the battlecruiser was commissioned into the Royal Navy four days before she was completed on 23 November 1912.[21][22]
Service
New Zealand was sent on a ten-month flag-waving tour of New Zealand via South Africa in 1913.[21][22] During this tour, the ship was seen by an estimated half-million New Zealanders—almost half the population[23]—and her captain was presented with a Māori piupiu[24][25] (a warrior's skirt made from rolled flax) and a greenstone hei-tiki (pendant), which were intended to ward off evil.[26]
The Admiralty requested that New Zealand return to the United Kingdom when the tour concluded, rather than remain in the Pacific region as originally planned. The New Zealand Government acceded to the request and, upon her arrival on 8 December 1913, New Zealand joined the 1st Battlecruiser Squadron (1st BCS) of the Grand Fleet. The squadron visited Brest in February 1914, and Riga, Reval and Kronstadt in the Russian Empire the following June. On 19 August 1914, shortly after World War I began, New Zealand was transferred to the 2nd Battlecruiser Squadron (2nd BCS).[22]
Battle of Heligoland Bight

New Zealand's first wartime action was the Battle of Heligoland Bight on 28 August 1914, as part of the battlecruiser force under the command of Admiral David Beatty. Beatty's ships were originally intended to provide distant support for the British cruisers and destroyers closer to the German coast, in case large units of the High Seas Fleet sortied in response to the British attacks once the tide rose. When the British light forces failed to disengage on schedule at 11:35 a.m.,[Note 2] the battlecruisers, led by Beatty aboard his flagship, HMS Lion, began to head south at full speed to reinforce the smaller British ships; the rising tide meant that German capital ships would be able to clear the sandbar at the mouth of the Jade estuary.[27]
The brand-new light cruiser HMS Arethusa had been crippled earlier in the battle and was under fire from the German light cruisers SMS Strassburg and SMS Cöln when Beatty's battlecruisers loomed out of the mist at 12:37 p.m. By this time, New Zealand had fallen behind the three newer and faster battlecruisers and was not in position to significantly participate in the battle. Strassburg was able to evade fire by hiding in the mists, but Cöln remained visible and was quickly crippled by the British squadron. Before the German ship could be sunk, Beatty was distracted by the sudden appearance of the elderly light cruiser SMS Ariadne off his starboard bow. He turned to pursue, but Ariadne was set afire after only three salvos fired from under 6,000 yards (5,500 m). At 1:10, Beatty turned north and made a general signal to retire. Shortly after turning north, the battlecruisers encountered the crippled Cöln, which was sunk by two salvos from Lion.[28] During the battle, New Zealand's captain, Lionel Halsey, wore the Māori piupiu over his uniform, setting a tradition followed for the duration of the war.[29] Two days after the battle, New Zealand was transferred back to the 1st BCS, when the battlecruiser Inflexible arrived from the Mediterranean.[22]
Raid on Scarborough
The German Navy had decided on a strategy of bombarding British towns on the North Sea coast in an attempt to draw out the Royal Navy and destroy elements of it in detail. An earlier raid on Yarmouth on 3 November 1914 had been partially successful, but a larger-scale operation was later devised by Admiral Franz von Hipper. The fast battlecruisers would conduct the bombardment, while the rest of the High Seas Fleet stationed itself east of Dogger Bank, so they could cover the battlecruisers' return and destroy any pursuing British vessels. Having broken the German naval codes, the British were planning to catch the raiding force on its return journey, although they were not aware of the High Seas Fleet's presence. Admiral Beatty's 1st BCS (now reduced to four ships, including New Zealand) and the 2nd Battle Squadron (consisting of six dreadnoughts) were detached from the Grand Fleet in an attempt to intercept the Germans near Dogger Bank.[30]
Admiral Hipper's raiders set sail on 15 December 1914, and successfully bombarded several English towns; British destroyers escorting the 1st BCS had already encountered German destroyers of the High Seas Fleet at 5:15 a.m. and fought an inconclusive action with them. Vice Admiral Sir George Warrender, commanding the 2nd Battle Squadron, had received a signal at 5:40 that the destroyer HMS Lynx was engaging enemy destroyers, although Beatty had not. The destroyer HMS Shark spotted the German armoured cruiser SMS Roon and her escorts at about 7:00, but could not transmit the message until 7:25. Admiral Warrender received the signal, as did New Zealand, but Beatty, aboard Lion, did not, even though New Zealand had been specifically tasked to relay messages between the destroyers and the flagship. Warrender attempted to pass on Shark's message to Beatty at 7:36, but did not manage to make contact until 7:55. On receiving the message, Beatty reversed course, and dispatched New Zealand to search for Roon. She was being overhauled by New Zealand when Beatty received messages that Scarborough was being shelled at 9:00. Beatty ordered New Zealand to rejoin the squadron and turned west for Scarborough.[31]
The British forces, heading west to cover the main route through the minefields protecting the coast of England, split up while passing the shallow Southwest Patch of Dogger Bank; Beatty's ships headed to the north, while Warrender passed to the south. This left a 15-nautical-mile (28 km; 17 mi) gap between them, through which the German light forces began to move. At 12:25 p.m., the light cruisers of the II Scouting Group began to pass the British forces searching for Hipper. The light cruiser HMS Southampton spotted the light cruiser SMS Stralsund and signalled a report to Beatty. At 12:30, Beatty turned his battlecruisers towards the German ships, which he presumed were the advance screen for Hipper's ships. However, those were some 50 kilometres (31 mi) behind. The 2nd Light Cruiser Squadron, which had been screening for Beatty's ships, detached to pursue the German cruisers, but a misinterpreted signal from the British battlecruisers sent them back to their screening positions.[Note 3] This confusion allowed the German light cruisers to escape, and alerted Hipper to the location of the British battlecruisers. The German battlecruisers wheeled to the north-east of the British forces and also made good their escape.[32]
New Zealand became flagship of the 2nd Battlecruiser Squadron (2nd BCS) of the Grand Fleet on 15 January 1915, and saw action the following week in the Battle of Dogger Bank.[22]
Battle of Dogger Bank
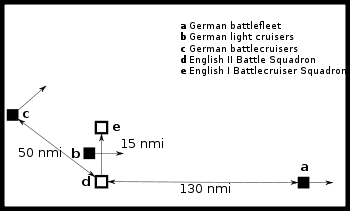
On 23 January 1915, a force of German battlecruisers under the command of Admiral Hipper sortied to clear Dogger Bank of any British fishing boats or small craft that might be there to collect intelligence on German movements. Alerted by decoded German transmissions, a larger force of British battlecruisers, including New Zealand, sailed under the command of Admiral Beatty to intercept. Contact was initiated at 7:20 a.m. on the 24th, when Arethusa spotted the German light cruiser SMS Kolberg. By 7:35, the Germans had spotted Beatty's force and Hipper ordered a turn south at 20 knots (37 km/h; 23 mph), believing that this speed would outdistance any British battleships to the north-west; he planned to increase speed to the armoured cruiser SMS Blücher's maximum of 23 knots (43 km/h; 26 mph) if necessary to outrun any battlecruisers.[33]
Beatty ordered his battlecruisers to make all practical speed to catch the Germans before they could escape. New Zealand and Indomitable were the slowest of Beatty's ships, and gradually fell behind the newer battlecruisers. Despite this, New Zealand was able to open fire on Blücher by 9:35, and continued to engage the armoured cruiser after the other British battlecruisers had switched targets to the German battlecruisers. After about an hour, New Zealand had knocked out Blücher's forward turret, and Indomitable began to fire on her as well at 10:31. Two 12-inch shells pierced the German ship's armoured deck and exploded in an ammunition room four minutes later. This started a fire amidships that destroyed her two port 21 cm (8.3 in) turrets, while the concussion damaged her engines so that her speed dropped to 17 knots (31 km/h; 20 mph), and jammed her steering gear. At 10:48, Beatty ordered Indomitable to attack her, but the combination of a signalling error by Beatty's flag lieutenant and heavy damage to Beatty's flagship Lion, which had knocked out her radio and caused enough smoke to obscure her signal halyards, caused the rest of the British battlecruisers, temporarily under the command of Rear Admiral Sir Gordon Moore in New Zealand, to think that that signal applied to them. In response, they turned away from Hipper's main body and engaged Blücher.[34] New Zealand fired 147 shells at Blücher before the German ship capsized and sank at 12:07 after being torpedoed by Arethusa.[35] Captain Halsey had again worn the piupiu over his uniform during the battle, and the lack of damage to New Zealand was once more attributed to its good luck properties.[29]
New Zealand was relieved by Australia as flagship of the 2nd BCS on 22 February 1915.[36] The squadron joined the Grand Fleet in a sortie on 29 March, in response to intelligence that the German fleet was leaving port as the precursor to a major operation. By the next night, the German ships had withdrawn, and the squadron returned to Rosyth. On 11 April, the British fleet was again deployed on the intelligence that a German force was planning an operation. The Germans intended to lay mines at the Swarte Bank, but after a scouting Zeppelin located a British light cruiser squadron, they began to prepare for what they thought was a British attack. Heavy fog and the need to refuel caused Australia and the British vessels to return to port on 17 April, and although they were redeployed that night, they were unable to stop two German light cruisers from laying the minefield. From 26 to 28 January 1916, the 2nd BCS was positioned off the Skagerrak while the 1st Light Cruiser Squadron swept the strait in an unsuccessful search for a possible minelayer.[37]
On the morning of 21 April 1916, the 2nd BCS sailed again for the Skagerrak, this time to support efforts to disrupt the transport of Swedish ore to Germany. The planned destroyer sweep of the Kattegat was cancelled when word came that the High Seas Fleet was mobilising for an operation of their own (later learned to be timed to coincide with the Irish Easter Rising), and the British ships were ordered to a rendezvous point in the middle of the North Sea, while the rest of the Grand Fleet made for the south-eastern end of the Long Forties. On the afternoon of 22 April, the Battlecruiser Fleet was patrolling to the north-west of Horn Reefs when heavy fog came down. The ships were zigzagging to avoid submarine attack when Australia collided with sister ship New Zealand twice in three minutes.[38] Australia was damaged badly enough to be put out of action for several months, but New Zealand returned to the fleet on 30 May, a day before the start of the Battle of Jutland, relieving Indefatigable as flagship.[36]
Battle of Jutland

On 31 May 1916, the 2nd BCS consisted of New Zealand (flagship of Rear Admiral William Christopher Pakenham) and Indefatigable; Australia was still under repair following her collision with New Zealand.[39] The squadron was assigned to Admiral Beatty's Battlecruiser Fleet, which had put to sea to intercept a sortie by the High Seas Fleet into the North Sea. The British were able to decode the German radio messages and left their bases before the Germans put to sea. Hipper's battlecruisers spotted the Battlecruiser Fleet to their west at 3:20 p.m., but Beatty's ships didn't spot the Germans to their east until 3:30. Two minutes later, he ordered a course change to east-south-east to position himself astride the German's line of retreat and called his ships' crews to action stations. He also ordered the 2nd BCS, which had been leading, to fall in astern of the 1st BCS. Hipper ordered his ships to turn to starboard, away from the British, to assume a south-easterly course, and reduced speed to 18 knots (33 km/h; 21 mph) to allow three light cruisers of the 2nd Scouting Group to catch up. With this turn, Hipper was falling back on the High Seas Fleet, then about 60 miles (97 km) behind him. Around this time, Beatty altered course to the east as it was quickly apparent that he was still too far north to cut off Hipper.[40]
Thus began the so-called "Run to the South" as Beatty changed course to steer east-south-east at 3:45, paralleling Hipper's course, now that the range closed to under 18,000 yards (16,000 m). The Germans opened fire first at 3:48, followed by the British. The British ships were still in the process of making their turn, and only the two leading ships, Lion and HMS Princess Royal, had steadied on their course when the Germans opened fire. The British formation was echeloned to the right with Indefatigable in the rear and the furthest to the west, and New Zealand ahead of her and slightly further east. The German fire was accurate from the beginning, but the British overestimated the range as the German ships blended into the haze. Indefatigable aimed at SMS Von der Tann, while New Zealand, unengaged herself, targeted SMS Moltke. By 3:54, the range was down to 12,900 yards (11,800 m) and Beatty ordered a course change two points to starboard to open up the range at 3:57. Indefatigable was destroyed at about 4:03, when her magazines exploded.[41]
After Indefatigable's loss, New Zealand shifted her fire to Von der Tann in accordance with Beatty's standing instructions. The range had grown too far for accurate shooting, so Beatty altered course four points to port to close the range again between 4:12 and 4:15. By this time, the 5th Battle Squadron, consisting of four Queen Elizabeth-class battleships, had closed up and was engaging Von der Tann and Moltke. At 4:23, a 13.5-inch (340 mm) shell from HMS Tiger struck near Von der Tann's rear turret, starting a fire among the practice targets stowed there that completely obscured the ship and caused New Zealand to shift fire to Moltke.[42] At 4:26, the ship was hit by a 28-centimetre (11 in) shell, fired by Von der Tann, on 'X' barbette that detonated on contact and knocked loose a piece of armour that briefly jammed 'X' turret and blew a hole in the upper deck.[43] Four minutes later, Southampton, scouting in front of Beatty's ships, spotted the lead elements of the High Seas Fleet charging north at top speed. Three minutes later, she sighted the topmasts of Vice-Admiral Reinhard Scheer's battleships, but did not transmit a message to Beatty for another five minutes. Beatty continued south for another two minutes to confirm the sighting himself before ordering a sixteen-point turn to starboard in succession. New Zealand, the last ship in the line, turned prematurely to stay outside the range of the oncoming battleships.[44]
New Zealand was straddled several times by the battleship SMS Prinzregent Luitpold but was not hit.[45] Beatty's ships maintained full speed in an attempt to increase the distance between them and the High Seas Fleet, and gradually moved out of range. They turned north and then north-east to try to rendezvous with the main body of the Grand Fleet. At 5:40, they opened fire again on the German battlecruisers. The setting sun blinded the German gunners, and as they could not make out the British ships, they turned away to the north-east at 5:47.[46] Beatty gradually turned more towards the east to allow him to cover the deployment of the Grand Fleet in battle formation and to move ahead of it, but he mistimed his manoeuvre and forced the leading division to fall off towards the east, further away from the Germans. By 6:35, Beatty was following Indomitable and HMS Inflexible of the 3rd BCS as they were steering east-south-east, leading the Grand Fleet, and continuing to engage Hipper's battlecruisers to their south-west. A few minutes earlier, Scheer had ordered a simultaneous 180° starboard turn and Beatty lost sight of the High Seas Fleet in the haze.[47] Twenty minutes later, Scheer ordered another 180° turn which put them on a converging course again with the Grand Fleet, which had altered course to the south. This allowed the Grand Fleet to cross Scheer's T, forming a battle line that cut across his battle line and badly damaging his leading ships. Scheer ordered yet another 180° turn at 7:13 in an attempt to extricate the High Seas Fleet from the trap into which he had sent them.[48]
This was successful, and the British lost sight of the Germans until 8:05, when HMS Castor spotted smoke bearing west-north-west. Ten minutes later, she had closed the range enough to identify German torpedo boats, and engaged them. Beatty turned west upon hearing gunfire and spotted the German battlecruisers only 8,500 yards (7,800 m) away. Inflexible opened fire at 8:20, followed by the rest of Beatty's battlecruisers.[49] New Zealand and Indomitable concentrated their fire on SMS Seydlitz, and hit her five times before she turned west to disengage.[50] Shortly after 8:30, the pre-dreadnought battleships of Rear Admiral Mauve's II Battle Squadron were spotted and fire switched to them. The Germans had poor visibility and were able to fire only a few rounds at them before turning away to the west. The British battlecruisers hit the German ships several times before they blended into the haze around 8:40.[51] After this, Beatty changed course to south-south-east and maintained that course, ahead of both the Grand Fleet and the High Seas Fleet, until 2:55 the next morning, when the order was given to reverse course and head home.[52]
New Zealand fired 420 twelve-inch shells during the battle, more than any other ship on either side. Despite this, only four successful hits were credited to the battlecruiser: three on Seydlitz and one on the pre-dreadnought SMS Schleswig-Holstein.[53] She was hit only once during the battle, confirming for the crew the piupiu and tiki worn by her new captain, J.F.E. (Jimmy) Green, brought good luck.[29]
Post-Jutland career
New Zealand was relieved by Australia as flagship on 9 June and temporarily attached to the 1st Battlecruiser Squadron, until HMS Renown relieved her in September.[54] On the evening of 18 August, the Grand Fleet put to sea in response to a message deciphered by Room 40 that indicated that the High Seas Fleet, minus II Squadron, would be leaving harbour that night. The German objective was to bombard Sunderland on 19 August, based on extensive reconnaissance provided by airships and submarines. The Grand Fleet sailed with 29 dreadnought battleships and six battlecruisers. Throughout the next day, Jellicoe and Scheer received conflicting intelligence; after reaching the location in the North Sea where the British expected to encounter the High Seas Fleet, they turned north in the erroneous belief that they had entered a minefield. Scheer turned south again, then steered south-eastward to pursue a lone British battle squadron sighted by an airship, which was in fact the Harwich Force of cruisers and destroyers under Commodore Tyrwhitt. Realising their mistake, the Germans changed course for home. The only contact came in the evening when Tyrwhitt sighted the High Seas Fleet but was unable to achieve an advantageous attack position before dark, and broke off contact. The British and the German fleets returned home; the British lost two cruisers to submarine attacks, and one German dreadnought had been torpedoed.[55] New Zealand underwent a refit at Rosyth in November 1916. She temporarily replaced Australia as squadron flagship between 29 November and 7 January 1917.[36]
The ship's company were firm believers both in the old chief's prophecy and in the ability of the piu piu and tiki to ward off trouble. More than a year after the Battle of Jutland, on the last occasion that New Zealand sighted enemy ships and went to action stations, a seaman was seen to climb a ladder to the bridge and take a quick look around. "It's all right," he called to his mates below, "he's got them on" – a shout that assured them that the captain was wearing the piu piu and tiki.
Grant Howard, The Navy in New Zealand[56]
German minesweepers and escorting light cruisers were attempting to clear British-laid minefields in the Heligoland Bight in late 1917. The Admiralty planned a large operation for 17 November to destroy the ships, and allocated two light cruiser squadrons and the 1st Cruiser Squadron covered by the reinforced 1st Battlecruiser Squadron and, more distantly, the 1st Battle Squadron of battleships. New Zealand was attached to the 1st BCS for this operation, which became known as the Second Battle of Heligoland Bight. New Zealand did not fire her guns during the battle.[57] As in previous engagements, Captain Green wore the piupiu and tiki for luck.[56]
During 1918, New Zealand and the Grand Fleet's other capital ships were used on occasion to escort convoys between Britain and Norway. The 2nd BCS spent the period from 8 to 21 February covering these convoys in company with battleships and destroyers, and put to sea on 6 March in company with the 1st BCS to support minelayers. The 2nd BCS again supported minelayers in the North Sea from 25 June or 26 June to the end of July. During September and October, New Zealand and the 2nd BCS supervised and protected minelaying operations north of Orkney.[58] The battlecruiser was present at the surrender of the High Seas Fleet as part of the 2nd BCS.[59]
Dominion tour
Following the war, Admiral Jellicoe was tasked with helping to plan and coordinate the naval policies and defences of the British Dominions. New Zealand was made available for his transportation, and was refitted between December 1918 and February 1919 for the tour; the main changes were the removal of her flying-off platforms and the lower forward four-inch guns.[60][61] The first stop was India, with New Zealand arriving in Bombay on 14 March 1919 and departing six weeks later. The battlecruiser arrived at Albany, Western Australia, on 15 May, where Jellicoe and his staff disembarked to take an overland route across the country. New Zealand sailed via Melbourne and Hobart to depart from Sydney for New Zealand on 16 August.[62]
.jpg)
The ship called upon Christmas Island, southeast of Fanning Island, on 19 November 1920, thinking it uninhabited. Instead, they were greeted by Joe English, of Medford, Massachusetts, who had been manager of a copra plantation on the island, but had become marooned with two others, when the war had broken out. The men were rescued.[63]

The ship was particularly popular in New Zealand, where crowds flocked to visit her as they had done in 1913. Jellicoe, too, was popular and he later returned to New Zealand to serve as Governor-General from 1920 to 1924.[64] The ship stopped off at Fiji and Hawaii before arriving on 8 November in Canada, the final country to be assessed.[64] After returning to the United Kingdom, the battlecruiser was paid off into reserve on 15 March 1920. New Zealand was regarded as obsolete by the Royal Navy, because her 12-inch guns were inferior to the 15-inch (381 mm) guns deployed on the latest generation of battlecruisers. She was sold for scrap on 19 December 1922 to meet the tonnage restrictions set on the British Empire by the Washington Naval Treaty.[36] The New Zealand Government completed paying off the loan used to fund the ship in the 1944/45 financial year.[20]
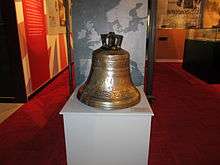
Many items from the battlecruiser were sent to New Zealand after she was scrapped. Equipment including several 4-inch guns, a range finder and laundry equipment, were used by military units while other artifacts were placed on display in museums.[20] During World War II, the 4-inch guns were the main armament of the land batteries which protected the entrances to the harbours at Auckland, Wellington and Lyttelton.[65] The captain's piupiu was returned to New Zealand in 2005, and is on display at the Torpedo Bay Navy Museum in Auckland alongside the ship's bell and other artifacts.[2][20] The Museum of New Zealand Te Papa Tongarewa in Wellington also holds several items from the ship in its collection.[20]
Footnotes
- ↑ "cwt" is the abbreviation for hundredweight, 20 cwt referring to the weight of the gun.
- ↑ The times used in this section are in UT, which is one hour behind CET, which is often used in German works.
- ↑ Beatty had intended on retaining only the two rearmost light cruisers from Goodenough's squadron; however, HMS Nottingham's signalman misinterpreted the signal, thinking that it was intended for the whole squadron, and thus transmitted it to Goodenough, who ordered his ships back into their screening positions ahead of Beatty's battlecruisers.[32]
Citations
- 1 2 3 4 5 6 7 8 9 10 Burt, p. 91.
- 1 2 New Zealand Defence Force. "A Nation's Gift - The HMS New Zealand Story". Press release. Scoop Independent News. Retrieved 11 June 2012.
- ↑ Roberts, pp. 28–29
- ↑ Roberts, pp. 43–44
- ↑ Roberts, pp. 76, 80
- ↑ Roberts, pp. 81–84
- 1 2 Campbell (1978), p. 14
- ↑ Roberts, pp. 90–91
- ↑ Roberts, p. 83
- ↑ Campbell (1978), p. 13
- ↑ Roberts, pp. 92–93
- ↑ Roberts, p. 113
- ↑ Layman, pp. 114–15
- ↑ Roberts, p. 92
- ↑ Frame, p. 71
- ↑ Lambert, p. 64
- ↑ Lambert, pp. 64–5
- ↑ Lambert, pp. 64–67
- ↑ Roberts, pp. 29–31
- 1 2 3 4 5 "HMS New Zealand: 'A Grim and Formidable Fighting Machine'". Collections. Te Papa. Retrieved 11 June 2012.
- 1 2 "RNZN Museum - HMS New Zealand". Royal New Zealand Navy. Archived from the original on 23 May 2010. Retrieved 21 May 2010.
- 1 2 3 4 5 Burt, p. 103
- ↑ "Regions of New Zealand". statoids.com. 31 October 2009. Retrieved 21 May 2010.
- ↑ "Maori Chiefs Visit Warship", 18 April 1913, Evening Post
- ↑ "An historic piupiu", TeAra
- ↑ "HMS New Zealand in Wellington". Ministry for Culture and Heritage. 7 April 2008. Retrieved 21 May 2010.
- ↑ Tarrant, p. 24
- ↑ Massie, pp. 109–13
- 1 2 3 "Admiral Sir Lionel Halsey, GCMG, GCVO, KCIE, CB, DLJP 1872–1949". Naval Historical Society of Australia. Retrieved 26 December 2009.
- ↑ Massie, pp. 333–34
- ↑ Massie, pp. 342–43
- 1 2 Tarrant, p. 31
- ↑ Massie, pp. 376–84
- ↑ Massie, pp. 385–406
- ↑ Gardiner and Gray, p. 27
- 1 2 3 4 Roberts, p. 123
- ↑ Jose, pp. 269–71
- ↑ Jose, pp. 272–74
- ↑ Burt, p. 104
- ↑ Tarrant, pp. 69, 71, 75
- ↑ Tarrant, pp. 80–85
- ↑ Tarrant, pp. 89–90
- ↑ Campbell (1998), pp. 48, 76
- ↑ Massie, pp. 595–600
- ↑ Tarrant, p. 100
- ↑ Tarrant, p. 109
- ↑ Tarrant, pp. 130–38
- ↑ Tarrant, pp. 149, 157
- ↑ Tarrant, p. 175
- ↑ Campbell (1998), p. 272
- ↑ Tarrant, pp. 177–78
- ↑ Tarrant, pp. 178, 224
- ↑ Campbell (1978), p. 18
- ↑ Parkes, p. 517
- ↑ Marder, pp. 287–96
- 1 2 Howard, Grant (1981). The Navy in New Zealand: An Illustrated History. Wellington and Sydney: A. H. and A. W. Reed. pp. 30–31. ISBN 0-589-01355-6.
- ↑ Newbolt, pp. 164–65
- ↑ Jose, pp. 279, 282, 303
- ↑ "Operation ZZ". World War One: The Great War at Sea. Retrieved 13 May 2010.
- ↑ Gordon, pp. 11–12
- ↑ Burt, p. 102
- ↑ Gordon, pp. 14, 18, 21
- ↑ Bailey, p48
- 1 2 Gordon, p. 21
- ↑ Henderson et al., pp. 312–13
References
- Bailey. The Christmas Island Story,1977. The Gilbert Islands Government. ISBN 0-905743-08-3.
- Burt, R. A. (1986). British Battleships of World War One. Annapolis, Maryland: Naval Institute Press. ISBN 0-87021-863-8.
- Campbell, John (1998). Jutland: An Analysis of the Fighting. New York: Lyons Press. ISBN 1-55821-759-2.
- Campbell, N. J. M. (1978). Battle Cruisers. Warship special. 1. Greenwich, UK: Conway Maritime Press. ISBN 0-85177-130-0.
- Frame, Tom (2004). No Pleasure Cruise: The Story of the Royal Australian Navy. Crows Nest, Australia: Allen & Unwin. ISBN 1-74114-233-4. OCLC 55980812.
- Gardiner, Robert; Gray, Randal, eds. (1984). Conway's All the World's Fighting Ships: 1906–1922. Annapolis, Maryland: Naval Institute Press. ISBN 0-85177-245-5.
- Gordon, Andrew, Dr. (2006). "The Best Laid Staff Work: An Insider's View of Jellicoe's 1919 Naval Mission to the Dominions". In Forbes, Andrew; Lovi, Michelle. Australian Maritime Issues 2006: SPC-A Annual (PDF). Papers in Australian Maritime Affairs; No. 19. Canberra, Australia: Sea Power Centre – Australia. pp. 11–23. ISBN 0-642-29644-8.
- Henderson, Alan; et al. (2008). The Gunners : A History of New Zealand Artillery. Auckland: Penguin Group (New Zealand). ISBN 978-0-7900-1141-7.
- Jose, Arthur W. (1941) [1928]. The Royal Australian Navy 1914–1918. The Official History of Australia in the War of 1914–1918. IX (9th ed.). Sydney, Australia: Angus and Robertson. OCLC 215763279. Retrieved 22 March 2010.
- Lambert, Nicholas (1996). "Economy or Empire?: The Fleet Unit Concept and the Quest for Collective Security in the Pacific, 1909–14". Far-Flung Lines: Essays on Imperial Defense in Honour of Donald Mackenzie Schurman. London: Frank Cass. ISBN 0-7146-4216-9.
- Layman, R. D. (1996). Naval Aviation in the First World War. Annapolis, Maryland: Naval Institute Press. ISBN 1-55750-617-5.
- Marder, Arthur J. (1978). From the Dreadnought to Scapa Flow, The Royal Navy in the Fisher Era, 1904–1919. III: Jutland and After, May 1916 – December 1916 (Second ed.). London: Oxford University Press. ISBN 0-19-215841-4. OCLC 3516460.
- Massie, Robert (2004). Castles of Steel: Britain, Germany and the Winning of the Great War. London: Random House. ISBN 0-224-04092-8.
- Newbolt, Henry (1996). Naval Operations. History of the Great War Based on Official Documents. V (reprint of the 1931 ed.). Nashville, Tennessee: Battery Press. ISBN 0-89839-255-1.
- Parkes, Oscar (1990). British Battleships (reprint of the 1957 ed.). Annapolis, Maryland: Naval Institute Press. ISBN 1-55750-075-4.
- Roberts, John (1997). Battlecruisers. Annapolis, Maryland: Naval Institute Press. ISBN 1-55750-068-1.
- Tarrant, V. E. (1999). Jutland: The German Perspective: A New View of the Great Battle, 31 May 1916 (reprint of the 1995 ed.). London: Brockhampton Press. ISBN 1-86019-917-8.
External links
| Wikimedia Commons has media related to HMS New Zealand (ship, 1911). |
- Record of HMS New Zealand from RNZN History
- Objects related to HMS New Zealand from the collection of the Museum of New Zealand Te Papa Tongarewa
- "The Bulldog and the Battlecruiser : The 1913 Voyage of HMS New Zealand". Auckland War Memorial Museum Te Paenga Hira and Torpedo Bay Navy Museum Te Waka Huia O Te Taua Moana O Aotearoa.
| |
| |