Bridge near Kemer
| Bridge near Seydikemer | |
|---|---|
 Third arch of the Seydikemer Bridge. Above the arch vault is the hollow chamber. The circular ducts supported the Roman scaffolding and falsework during construction. At the bottom left a small, arched floodway is visible. | |
| Coordinates | 36°41′36″N 29°21′43″E / 36.693333°N 29.361944°ECoordinates: 36°41′36″N 29°21′43″E / 36.693333°N 29.361944°E |
| Crosses | Xanthos river (Koca Çayı) |
| Locale | Near Xanthos, Lycia, Turkey |
| Characteristics | |
| Total length | 500+ m |
| Width | 4.5 m |
| History | |
| Construction end | Presumably 3rd century AD |
 Bridge near Seydikemer Location in Turkey | |
The Bridge near Seydikemer was a Roman segmental arch bridge near the ancient city of Xanthos in Lycia, in modern-day southwestern Turkey. Its remains are located on the upper reaches of the Xanthos river (Koca Çayı), 4 km upstream from the town of Seydikemer, at a site where the gravel river bed reaches a width of 500 m.[1] Only a 29 m long and 4.5 m wide section on the right river bank, outside of the inundation zone, is left today, having once served as approach to the bridge proper.[2] Despite its near-complete destruction, the bridge represents a noteworthy example of the early use of segmental arches and hollow chambers in bridge building.
Structure
The visible remains still allow the identification of some, for their time, unusual construction techniques. The extant ramp features three arches of 4 to 4.45 m clear span, two of which, with an apex height of only 1 m, show a particularly flat profile.[3] Segmental arches are known only from a limited number of Roman bridges, and came into widespread use not until the late medieval period (see e.g. Ponte Vecchio). The third arch, in contrast, possesses the typically Roman semi-circular shape, with a span-to-rise ratio of 2 to 1.[3]
The arch vaults were constructed from locally hewn limestone ashlar which was bound by mortar; the interior of the bridge body was built of a rock-hard mixture of rubble and fluid mortar, which today lays bare at many places, shining through the crumbled facing.[3] The mortar consists of hard building lime with an admixture of fine gravel.[3] The pavement of the roadway has completely disappeared, but the constant gradient of the ramp indicates that the ancient paving stones lay directly on the present-day surface.[3]
Another remarkable feature of the Seydikemer Bridge is the hollow chamber above the third arch vault, where the 2 m large gap between the arch crest and the roadway is not filled with the mortar mixture, but features in its interior a cut-out chamber measuring 3.5 m in length, 3.2 m in width and 1.5 m in height;[4] its purpose was to reduce the load resting on the arches, and to save building material.[3] A second, smaller inner chamber was found in the upper part of the second pier.[5] Similar hollow chamber systems are known from at least three other Roman bridges in Asia Minor, such as the Makestos Bridge, the Aesepus Bridge and the White Bridge.[6]

Circular ducts with a diameter of approximately 26 cm, which run through the length and width of the bridge, are interpreted as hollow forms of round construction timber of the Roman scaffolding and falsework.[7] In the third pier, which stands closest to the river bed, a small, arched floodway is integrated to let water pass.[7] Although the surviving ramp does not allow to determine the number and type of the arches of the bridge proper, the ancient structure must have been a rather impressive engineering feat, judging from its current height of 8 m above the sediments and the 500 m wide river bed which needed to be spanned.[7]
A well-preserved example of an ancient segmental arch bridge in Lycia is the twenty-eight arch Limyra Bridge which was also investigated by the German archaeologists Wolfgang W. Wurster und Joachim Ganzert.
Dating
A possible starting point for the dating of the Seydikemer bridge provides a Roman road in the area which is known to have existed at the beginning of the 3rd century AD.[7] According to this interpretation, the bridge may have been part of a westward route from Kadyanda (Üzümlü), which descended further upstream into the Xanthos valley.[8] Possibly, the bridge can be also linked with the pass trail to Oinoanda.[8]
Gallery

Remains seen from river 
View from west 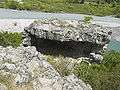
Hollow chamber below roadway 
Second segmental arch
See also
References
- ↑ Wurster & Ganzert 1978, pp. 304, 307
- ↑ Wurster & Ganzert 1978, pp. 304, 306
- 1 2 3 4 5 6 Wurster & Ganzert 1978, p. 306
- ↑ O’Connor 1993, p. 126
- ↑ Wurster & Ganzert 1978, p. 305, fig. 19
- ↑ Wurster & Ganzert 1978, p. 306, fn. 31
- 1 2 3 4 Wurster & Ganzert 1978, p. 307
- 1 2 Wurster & Ganzert 1978, p. 304
Sources
- O’Connor, Colin (1993), Roman Bridges, Cambridge University Press, p. 126 (E22), ISBN 0-521-39326-4
- Wurster, Wolfgang W.; Ganzert, Joachim (1978), "Eine Brücke bei Limyra in Lykien. Anhang: Reste einer Brücke oberhalb von Kemer am Oberlauf des Xanthos", Archäologischer Anzeiger (in German), Berlin: German Archaeological Institute, pp. 304–307, ISSN 0003-8105
External links
![]() Media related to Kemer Seydikemer at Wikimedia Commons
Media related to Kemer Seydikemer at Wikimedia Commons