Andrew Moray
| Andrew Moray | |
|---|---|
| Died | sometime in late 1297 |
| Cause of death | due to wounds received at the Battle of Stirling Bridge |
| Residence | Avoch Castle, Hallhill manor, Gauldwell Castle and Bothwell Castle |
| Nationality | Scots |
| Known for | Jointly leading the Scots to victory with William Wallace at the Battle of Stirling Bridge |
| Children | Sir Andrew Murray, later lord of Petty and Bothwell, and Guardian of Scotland. |
| Parent(s) | Father: Sir Andrew Moray of Petty, d. 8 April 1298; Mother: unnamed daughter of John (I) Comyn of Badenoch |
| Relatives | Uncle: Sir William Moray of Bothwell, d.c.1300; Uncle: David Moray, bishop of Moray, d.1326. |
Andrew Moray (Norman French: Andreu de Moray; Latin: Andreas de Moravia), also known as Andrew de Moray, Andrew of Moray, or Andrew Murray, an esquire,[1] was prominent in the Scottish Wars of Independence. He led the rising in north Scotland in the summer of 1297 against the occupation by King Edward I of England, successfully regaining control of the area for King John Balliol. He subsequently merged his forces with those led by William Wallace and jointly led the combined army to victory at the Battle of Stirling Bridge. Moray was mortally wounded in the fighting, dying at an unknown date and place later that year.
Origins of the Morays of Petty
Andrew Moray was born late in the second half of the 13th century.[2] The date and place of his birth, and whether he had any siblings, are unknown. Andrew's father was Sir Andrew Moray of Petty, Justiciar of Scotia (1289?–1296),[3] a younger son of Walter Moray of Petty—Justiciar of Lothian (1255?–1257)—and his wife, the heiress of Bothwell, a member of the Olifard family.[4] Andrew's mother was the fourth daughter of John (I) Comyn of Badenoch, who died c.1273,[5] her name was not recorded. The Morays of Petty were a wealthy and politically influential baronial family whose power base was located in the province of Moray in northeastern Scotland. They traced their origins to Freskin, a man believed to have Flemish origins. He was granted lands in the Laich of Moray during the 12th-century reign of King David I of Scotland,[6] where he built a motte-and-bailey castle at Duffus on the northern shore of Loch Spynie (this sea-loch was almost completely drained in the 18th and 19th centuries to release hundreds of acres of land for agricultural use).

The province of Moray long resisted incorporation into the Scots kingdom, defeating several royal armies in this struggle. Amongst the kings thwarted by the men of Moray was King Dub, who was killed when his army was defeated at Forres in 967. Moray was especially problematic for the Canmore kings of Scotland (whose dynasty sprang from King Malcolm Canmore). It was the heartland of rivals, the MacWilliams and MacHeths. Resistance to royal rule lingered into the 12th century. In 1130 a rebellion was led by Mormaer Óengus of Moray. King David responded to the rebellion by ‘planting’ of Flemish and other Anglo-Norman loyalists in the area. One such man was Freskin. Rebels were forced from their lands. In the aftermath of Óengus's defeat at the Battle of Stracathro, the province of Moray was taken under royal control. It remained in the king's hands until 1312 when Robert the Bruce granted the earldom of Moray to his nephew, Thomas Randolph.
Although King David and his successors sought to impose their authority on Moray, resistance continued. King Malcolm IV, David's grandson and successor, uprooted and expelled the local populace. The Chronicle of Holyrood records that in 1163: "King Malcolm transferred men of Moray".[7] It was not until 1229, when William Comyn of Buchan, led a royal army into Moray and finally, brutally, pacified the province for King Alexander II; he was rewarded by a grateful king with the lordship of Badenoch. The final, and most unmerciful, action in the mac Malcolm kings' long campaign against the rival royal dynasty was perpetrated against the infant in whom its claim resided: the three-year-old girl was publicly murdered by King Alexander's men, who, having read a proclamation, smashed her head against the market-cross in the burgh of Forfar. Moray now finally accepted the rule of the mac Malcolm kings of Scots.
The Morays' place in Scottish society
At the outbreak of the Anglo-Scottish Wars of the late 13th century (popularly known as the Scottish Wars of Independence) the Moray family was well established in northern and southern Scotland. Sir Andrew Moray, the head of the Petty branch of the family, held extensive lands in the province of Moray, including the lordship of Petty,[8] which was controlled from Hallhill manor on the southern bank of the Moray Firth, the lordship of Avoch in the Black Isle,[8] which was controlled from Avoch Castle situated to the east of Inverness and overlooking the Moray Firth, and the lordship of Boharm,[8] which was controlled from Gauldwell castle. Amongst Sir Andrew's estates at Petty were lands at Alturile, Brachlie and Croy, and at Boharm were lands at Arndilly and Botriphnie.[9] Andrew Moray the younger was heir to these lands and castles.[10]
This wealth was accompanied by significant political influence. Sir Andrew acted from 1289 as the king's chief law-officer in northern Scotland (the Justiciar)[8] and may have been co-opted to the guardianship following in the aftermath of the premature death of King Alexander III.[11] Sir Andrew's personal connections went to the top of most powerful family in Scottish society. In the 1280s he married his second wife - Andrew's stepmother - Euphemia Comyn,[12] the sister of John Comyn, Lord of Badenoch, nephew of King John Balliol and one of the most politically influential men in Scotland. The Morays of Petty also possessed connections to the Douglases of Douglasdale.[13]
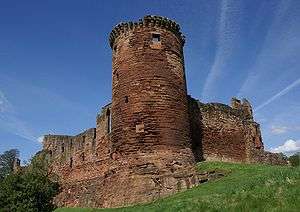
The influence of the Moray family was not confined to northeastern Scotland. Sir William Moray of Bothwell, Sir Andrew's elder brother, held extensive lands in Lanarkshire and at Lilleford in Lincolnshire.[14] Sir William, who was known as le riche due to his extensive personal wealth, was constructing Bothwell Castle overlooking the River Clyde. Its design was influenced by the latest trends to be found in continental Europe in castle construction and was clearly intended as an unequivocal statement of his power and influence. Moray the younger was also heir to his uncle's wealth.[10]
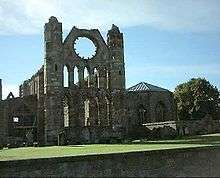
The Morays of Petty also possessed influence in the Scottish medieval church. A forebear of Andrew Moray, also named Andrew, had been bishop of Moray early in the 13th century and was responsible for the transfer of the seat of the bishopric to Elgin in 1224 and the establishment of the town’s fine cathedral. The Morays continued to possess links with the church. A younger brother of Sir Andrew, David, was currently a rector of Bothwell church in central Scotland and a canon of Moray.[15] He would subsequently be consecrated in the summer of 1299 as Bishop of Moray by Pope Boniface VIII,[16] and become one of the staunchest supporters of King Robert Bruce's kingship.
A Kingdom in Turmoil
The late 13th-century was a time of profound upheaval for Scotland. On 19 March 1286, King Alexander III died after being thrown from his horse as he made his way to Kinghorn, in Fife, from Edinburgh Castle to be with his young Flemish queen, Yolande.[17] Although the king had previously been married to Joan, an English princess and sister of the future King Edward I, his children from that marriage had predeceased him. At the time of the king's death, there was no issue from his latest marriage.[18] In the aftermath of Alexander’s death, the Crown passed to his three-year-old granddaughter, Margaret, Maid of Norway. The child-queen was never enthroned, dying during the sea-passage to Scotland.[19]
Scotland entered an uncertain period as the leading nobles vied for the vacant crown. The Bruces of Annandale made an attempt in November 1286 to seize it in an armed coup.[20] It was quickly suppressed by the Scottish political community. In this time of violence and confusion, Scotland's leaders turned for support to their nearest neighbour and the brother-in-law of their late king, King Edward I of England.
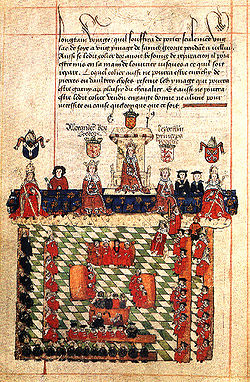
Edward was a mature and widely respected king. The relationship between him and recently deceased King Alexander had been good. Only later would he become the notorious ‘Hammer of the Scots’. The power and influence that Edward I possessed allowed him to preside over a court to assess the merits of the claims to the crown and the military might of his kingdom meant he could enforce its decision. Assistance came at a price: the claimants had to acknowledge him as Overlord of Scotland. The most serious claims, in what became known as 'The Great Cause', were advanced by John Balliol, the half-English lord of Galloway, and Robert Bruce, lord of Annandale and grandfather of the future king. After lengthy deliberation, King Edward's court found in favour of Balliol.
The newly enthroned king acknowledged King Edward as his feudal superior and thus sowed the seeds of his demise. King Edward was determined to ensure that his newly established status as overlord was not ignored and he did this by remaining a constant presence in Scottish legal and political affairs. King Edward's presence was a profound shock to the Scottish political community and by late 1295 King John had renounced his fealty and entered into a treaty with France. King Edward was enraged by such defiance, making hostilities between the kingdoms inevitable.
Invasion and Defeat
In the spring of 1296, Andrew Moray, together with his father and uncle, joined the Scottish feudal host assembling in preparation for the impending conflict. A small force, led by the earls of Atholl, Ross, and Mar and John Comyn the younger of Badenoch, entered Cumberland and marched to Carlisle. They wreaked destruction. The St. Edmundsbury Chronicle records the destruction of 120 villages and townships. When the raiders reached Carlisle it was held against them by Robert Bruce of Annandale, the son of the recently deceased Bruce-claimant to the Crown. Bruce kept the gates of Carlisle shut. More raiders crossed from Jedburgh and rampaged through Northumberland, burning homes and farms as they went. Pierre de Langtoft, an English chronicler, records:[21]

| “ | Mar, Ross, Menteith ... have destroyed Tindale to cinders and coals, The town of Corbridge, and two monasteries, Of Hexham and Lanercost, they have annihilated by burning; They have made slaughter of the people of the country, Carried off the goods driven away the canons. | ” |
King Edward assembled a large army on the Anglo-Scottish border for the invasion of Scotland. He could depend on the support of a faction of Scottish lords. On 25 March 1296, a number of them, including Robert Bruce of Annandale, and his son, Robert, the twenty-one-year-old earl of Carrick and the future king, swore fealty to him and solemnly pledged on "the Holy Gospels" that they would "be faithful and loyal ... to King Edward, King of England".[22]
King Edward's army initially marched on the prosperous Scottish port of Berwick and by 30 March was camped outside it. The king personally led the assault against its limited defences, and a bloody slaughter ensued. It continued for three days before the king called an end to it. The English Lanercost Chronicle condemned the slaughter as a "crime" and recorded that fifteen thousand "of both sexes perished, some by the sword, others by fire, in the space of a day and a half".[23] The Scottish army was overmatched by this English host. It had been many years since Scotland had mobilized for war, and at the Battle of Dunbar the Scots were overwhelmed quickly by elements of King Edward's army led by John de Warenne, Earl of Surrey. The author of the Chronicle of Bury St. Edmunds records the death of eight thousand Scots soldiers at Dunbar.
Scotland quickly now capitulated. Edward I deposed King John at Montrose Castle: the symbols of the Scottish kingship were stripped from him, including the ripping of the royal coat of arms from his surcoat (thereby earning him the enduring title Toom Tabard ('Empty Coat')). King Edward rode north from Montrose on an extended march that took him all the way to Elgin, which he reached on 26 July 1296. He remained in the town’s castle for a few days, taking the fealty of a number of Scots nobles, including Bishop Robert Wishart of Glasgow,[24] before returning to England.
While King Edward marched through the subdued realm, the Scots nobles captured at Dunbar were taken south in chains. The most important prisoners, such as Sir Andrew Moray of Petty, were taken to the Tower of London.[25] Sir Andrew spent the remainder of his life in English imprisonment, dying in the Tower on 8 April 1298.[26] Andrew Moray the younger, a prisoner of less significance, was imprisoned in Chester Castle,[25] the northernmost stronghold to which the Dunbar captives were taken; he would not, however, long remain a captive.
Rebellion
King Edward quickly imposed an English administration on Scotland with the Earl of Surrey at its head.[27] Sir Hugh de Cressingham, an efficient administrator with a history of service to the English Crown, was appointed Treasurer of Scotland, with Walter Amersham installed as Chancellor. Under this hierarchy Edward filled the offices of Justiciars for Lothian, Scotia (i.e. the territories north of the Forth), and Galloway with English appointees.[28][29] Most of the strategic royal castles were placed in the keeping of Edward's nobles.[30] English tax collectors followed in their wake, imposing heavy taxes to fill their king's coffers, and corruptly exploiting the Scots populace to enrich themselves.[31] Cressingham energetically collected taxes, and by the end of May 1297, had dispatched £5,188 6s. 8d. to the English treasury.[32] Edward sought to conscript Scots, including the nobility of the defeated realm, into the armies being raised to fight in Flanders.[33] News of this plan caused widespread alarm. A combination of these factors contributed to a growing restlessness under English rule.
While the Scots suffered English occupation, Andrew Moray continued to endure imprisonment. Sometime in the winter of 1296-97, he escaped from Chester. It is not known how, or by what means, he made his escape. Moray made his way back to his father's lands in the north of Scotland. Although it is impossible to know how imprisonment affected him, it quickly became clear that it was a determined man that returned to Scotland.
"In the month of May of the same year [1297]", the Hemingsburgh Chronicle notes, "the perfidious race of Scots began to rebel." This first act of this rebellion was marked by two events: Andrew Moray proclaiming his defiance of English rule at Avoch; and the murder of William Hesilrig, the English sheriff of Lanark, on 3 May 1297, during an attack on the town led by William Wallace and Richard Lundie.[34] News of Moray's actions quickly drew supporters to him. Sir William fitz Warin, the English constable of Urquhart Castle on the shores of Loch Ness, wrote to King Edward in July 1297: "Some evil disposed people have joined Andrew Moray at the castle of [Avoch] in Ross." Amongst them were Alexander Pilchie, a burgess from Inverness, and a number of burgesses from the town. Although Sir Andrew Moray of Petty remained imprisoned in the Tower of London - where he apparently died as King Edward's prisoner - many of his tenants willingly joined his son.
Attack on Castle Urquhart

Although the Scottish kingdom had been easily conquered by King Edward, it lay restless under his rule. The early months of 1297 saw outbreaks of violence against the English occupiers and their Scottish allies, some of which were so serious, officials on the ground sought assistance from the king. Argyll and Ross were both riven by violence. On the west coast, Lachlann Mac Ruaidhrí and Ruaidhrí Mac Ruaidhrí were in rebellion, killing royal officials and destroying royal property.[35] This violence was not limited to north Scotland. Rebellion gripped Galloway in south-western Scotland, with the rebels seizing castles held by King Edward's men.[36] There was also strife in Fife, where MacDuff of Fife and his sons led the rising.[37]
News of this violence began to reach the English Court. The king responded by ordering a firm response. Edward's loyal supporters in Argyll and Ross were to assist "his chosen and faithful subject Alexander of the Isles" to suppress the rebels.[38] Donald mac Can and other chieftains were thanked by the king on 13 June for their work suppressing the rising in Galloway.[39] The English Sheriff of Aberdeen, Sir Henry de Latham, was ordered on 11 June to deal with rebels in the north-east.[40] The situation was considered so serious that men were dispatched from England, including Henry Percy and Walter Clifford, to assist in the suppression of the rebellion.[41]
Andrew Moray had plunged the province of Moray into rebellion. King Edward's principal follower in the area was Sir Reginald Cheyne, the Scots sheriff of Elgin. The active support of some Scottish lords allowed King Edward to rule Scotland without deploying a large occupying force, but their ultimate loyalty was frequently questioned by English officials and chroniclers. Cheyne was alarmed by the growth of Moray's rebellion. He wrote to the king requesting assistance, who responded by instructing him to vigorously suppress the rebels.[42] Sir Reginald ordered his principal lieutenants to a meeting at Inverness Castle on 25 May 1297 to discuss how to deal with Andrew Moray. One participant was Sir William fitz Warin, constable of Urquhart Castle standing on the western shore of Loch Ness.[43]
After the meeting Sir William fitz Warin returned to Urquhart Castle accompanied his escort of men-at-arms. A few miles to the south of Inverness, Sir William was ambushed by a force led by Andrew Moray and Alexander Pilche. He was fortunate to escape with his life to the safety of the loch-side stronghold. Next day, Sir William awoke to find his castle besieged by Moray, who demanded its surrender. The Countess of Ross unexpectedly arrived on the scene with her retinue. The countess, whose husband was held by King Edward in the Tower of London,[25] advised him to surrender. She did not move against Moray. Although her advice was ignored, her actions were later commended to the king by Sir William. Moray, with no heavy siege equipment available to him, tried to take the castle in a night attack and having failed, was forced to abandon siege. He left Sir William in possession of the castle to lick his wounds and send an account of this mêlee to his king.[43]
King Edward fights back
Although Andrew Moray was thwarted by the walls of Urquhart Castle, he continued to prosecute a vigorous campaign against his enemies in Moray. The fate of Sir Reginald Cheyne's lands was reported to King Edward[44]
| “ | a very large body of rogues swept through the province of Moray towards the Spey, destroying the lands of Duffus, laid waste and captured the castle. | ” |

Moray's campaign during the summer of 1297 bore fruit as he drew new supporters to his banner and English-held castles across Moray and northern Scotland fell to him. Eventually, even Castle Urquhart fell. Little of Moray's spectacularly successful campaign is recorded. Indeed, some of his deeds were apparently co-opted by 'Blind Hary' and attributed to William Wallace. One such event was Wallace's attack on the port of Aberdeen, in which, according to Hary, he burned English ships moored in the harbour. There is no evidence that Wallace actually ever attacked Aberdeen and it has been recognised that this deed is more likely to have been the work of Andrew Moray.[45]
King Edward I of England, whose main concern was preparing for his impending campaign in Flanders, sought to deal with the threat posed by Andrew Moray by making use of loyal Scots nobles released from his prisons to serve in Flanders. The king, in response to Sir William FitzWarin's description of the assault on his castle, issued orders on 11 June 1297 to a number of Scots lords to raise their retinues and march into Moray to relieve fitz Warin and to restore royal authority. Amongst those in receipt of the king's orders were Henry Cheyne, Bishop of Aberdeen, Sir Gartnait of Mar, heir to the earldom of Mar and whose father was currently held in the Tower of London,[25] and John Comyn, Earl of Buchan and Constable of Scotland, together with his brother, Alexander. The Comyn brothers were instructed to remain in Moray until all signs of the rebellion had been stamped out.
The column departed from Aberdeen in early July 1297. Andrew Moray responded to news of its advance by marching east to confront it. The two forces met on the banks of the Spey at Enzie, where the road from Aberdeen to Inverness forded the waters of the River Spey, the eastern edge of the province of Moray.[46] There is no surviving account of the ensuing confrontation, but it appears that it replayed Moray's earlier 'dance' with the Countess of Ross. An extremely ambiguous account of events was subsequently sent from Inverness to King Edward by Bishop Cheyne on 25 August,[47] relates that after some discussion, Moray and his rebel army withdrew into very great stronghold of bog and wood [where] no horseman could be of service. This was a highly uninventive explanation when one considers the Comyn family pacified the province of Moray in the early 13th century. It appears more likely that neither side wished to fight men that they did not consider their enemies and they simply went their separate ways. But if Cheyne thought he could save face with this letter, he failed to reckon with Hugh de Cressingham, who was the most able of the king's administrators. Cressingham, having seen this letter, wrote to the king on 5 August:[48]
| “ | Sire, the peace on the other side of the Scottish Sea [the Firth of Forth] is still in obscurity, as it is said, as to the doings of the earls who are there. | ” |
Cressingham clearly did not believe that the Scots lords tasked with dealing with Moray had done their duty to Edward. Cressingham, who appears to have believed that the Scots nobles were playing a double game at King Edward's expense, was especially dismissive of the account of confrontation at the Spey, writing to King Edward:[48]
| “ | Sir Andrew de Rait is going to you with a credence, which he has shown to me, and which is false in many points ... you will give little weight to it. | ” |
While Andrew Moray seized control of northern Scotland and William Wallace rampaged through west-central Scotland, a rising led by Scotland's traditional feudal leaders was taking place in the south. Amongst its leaders were James, the High Steward of Scotland and Robert Wishart, Bishop of Glasgow. Robert Bruce of Carrick, the future king, was also a participant in this rising. Faced with a large army led by Henry de Percy and Robert de Clifford, they entered negotiations in June. After capitulating at Irvine in July, they failed to surrender the promised hostages which included Robert de Bruce's infant daughter, and most of the same leaders, including Robert de Bruce, were once more with the Scottish forces a short time later.
King Edward, having failed to deal with Moray by force of arms, now resorted to more subtle methods. The king proposed to release Sir Andrew Moray of Petty from imprisonment in the Tower to serve in the ranks of the English army in Flanders, if his son was prepared to take his father's place as a royal hostage. A safe conduct, allowing Andrew the younger to come to England, was issued under the king's seal on 28 August 1297.[49] It is not known if the letter and the accompanying safe conduct ever reached Andrew the younger but if it did, it was ignored and his father was forced to remain in confinement in the Tower, dying there on 4 April 1298.[50]
The Battle of Stirling Bridge
By the late summer of 1297, King Edward possessed little authority over Scotland. The reality of the breakdown in royal control was described in a letter to the king from Cressingham:[51]
| “ | by far the greater part of your counties of the realm of Scotland are still unprovided with keepers, as [they have been killed or imprisoned]; and some have given up their bailiwicks, and others neither will nor dare return; and in some counties the Scots have established and placed bailiffs and ministers, so that no county is in proper order, excepting Berwick and Roxburgh, and this only lately. | ” |

Of the castles north of the River Forth, only Dundee remained in English hands. It was under siege in September 1297. King Edward could only reimpose his authority on Scotland by a full-scale armed invasion. Sometime late in the summer of 1297, King Edward's lieutenant in Scotland, the earl of Surrey, finally recognized the need to take decisive action against Moray and Wallace. He had previously done little against the rebels and was subsequently vilified for his indolence. One English chronicler, Walter of Guisborough, said:[52]
| “ | The earl [of Surrey] ... to whom our king committed the care and custody of the Kingdom of Scotland, because of the awful weather, said that he could not stay there and keep his health. He stayed in England, but in the northern part and sluggishly pursued the exiling [of the] enemy, which was the root of our later difficulty. | ” |
Surrey now mustered an army and marched into central Scotland; Moray and Wallace responded by entrusting the ongoing siege of Dundee castle to the townspeople and marching with their army to Stirling, where they waited for his arrival.
Moray and Wallace deployed their small army to the north of the River Forth close to the old bridge at Stirling and under the shadow of Stirling Castle. Surrey's conduct of the ensuing battle, characterized by his arrogant and unimaginative adherence to chivalric convention, was inept. He sent the vanguard of his army across the narrow bridge under the Scots’ gaze, who, rather than wait myopically for the entire army to cross the bridge and deploy for battle, struck when it was only partially deployed. In the ensuing carnage of the Battle of Stirling Bridge, Surrey's isolated vanguard was hacked to pieces. The bulk of his army remained on the southern bank and it soon began to flee the scene as it became clear that Surrey had been outmanoeuvred and outfought by Moray and Wallace. The flight was apparently led by the inept Surrey, whose "charger never once tasted food during the whole journey" sneered Walter of Guisborough.[53]
It is estimated Surrey lost one hundred knights and five thousand infantrymen in the slaughter at Stirling Bridge.[54] The most notable English casualty was Cressingham, who, according to the chronicle of Pierre de Langtoft[55] unaccustomed "to the saddle, From his steed in its course fell under foot, His body was cut to pieces by the ribalds of Scotland" The Lanercost Chronicle records that Wallace had:[56]
| “ | a broad strip [of Cressingham’s skin] ... taken from the head to the heel, to make therewith a baldrick for his sword | ” |
The Scottish army's casualties went unrecorded as it was composed largely of historically nameless infantry soldiers, but there was one very significant loss: Andrew Moray. The defeat of Surrey at the Battle of Stirling Bridge was the zenith of Moray’s campaign against King Edward. He was not a skilled soldier by accident. The training for knighthood that he had received would have equipped him, as a baron's son, with the skills to fulfill a leadership role in Scotland's feudal host and would certainly have included the skills to lead and direct large groups of soldiers on the battlefield.
Death

There is contradictory evidence about the death of Moray. A formal inquisition into the affairs of Sir William Moray of Bothwell, who had died in poverty in England, was held in Berwick-upon-Tweed in November 1300. It was determined in these proceedings that Andrew Moray was: "slain at Stirling against the king. [10] However, there is mention of him still being alive in two letters issued after Stirling Bridge. The first letter, sent from Haddington on 11 October to the mayors of Lübeck and Hamburg, two of the towns of the Hanseatic League, was issued by:[57] "Andrew de Moray and William Wallace, leaders of the kingdom of Scotland and the community of the realm." The second was issued to the prior of Hexham on 7 November by:[58] "Andrew de Moray and William Wallace, the leaders of the army and of the realm of Scotland." Moray's name does not appear on any subsequent surviving document. The interpretation put on this by most historians is that Moray was injured at Stirling Bridge and died of his injuries around November.[59][60]
However it has been argued that Moray was actually killed at Stirling Bridge. Evidence to support this view includes the failure of any chronicle source to place Moray at Hexham. Walter Guisborough's chronicle, which contains a detailed account of this invasion, makes it clear that it was led by Wallace. The letters issued to the prior of Hexham bearing Moray's name may have been issued in his absence. Wallace may have been compelled to continue to issue documents jointly in the name of his deceased co-commander. Moray's death not only robbed him of a comrade, but also of a shield against the jealousies of the traditional Scottish feudal-elites; without him, Wallace, possibly a former outlaw, was exposed to the political intrigues of nobles who felt he had usurped their right to exercise power. Wallace's continued association with the name of Andrew Moray, added a much-needed measure of political gravitas to his actions prior to his appointment to the guardianship of the realm. Only once Wallace was knighted and appointed as Guardian of Scotland some time prior to March 1298, did it become unnecessary to issue letters jointly with Moray.[61]
Legacy
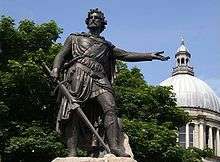
A combination of Moray's early death in battle and his close association with Wallace, a man who has become a near mythical figure in Scottish history, has meant that his achievements were little known. Although there are many statues to Wallace scattered across Scotland, from Aberdeen in the northeast to Dryburgh in the Scottish borders, though these are all surpassed by the Gothic extravagance of the National Wallace Monument looming over the site of the battle of Stirling Bridge, there is no similar monument to Moray. This situation has been turned into a political issue. At the close of December 2009, Murdo Fraser, a Conservative List MSP for Mid-Scotland and Fife, called for a national debate on an appropriate monument to Moray. He stated that it should raise awareness of his historical role.[62]
In the late 20th century there was increased recognition of Moray's role in events. One historian recently described his actions as "the greatest threat to the English government".[63] It has even been claimed that Wallace's relative lack of success after 1297, and the fact that Moray's name was always mentioned first in joint statements, suggests that the successful campaign of 1297 owes more to Moray than Wallace.[64] However, it may be that Moray was mentioned first simply because he was senior in the social hierarchy of the time.
The name of Andrew Moray did not disappear from history. A few months after his death, his widow, whose identity is lost, bore him a son, named Andrew.[10] The child acceded to the lordships of Petty and Bothwell and played a decisive rôle in defeating the attempts of Edward III of England, grandson of the so-called 'Hammer of the Scots', to conquer Scotland in the 1330s. Sir Andrew would twice be regent for King David II, the son of King Robert I, and would display a remarkably similar aptitude to that shown by his father for leading Scotland's armies. And, like his father, he, too, would die prematurely in defence of the realm.
See also
Notes
- ↑ Barrow, Robert Bruce, fourth edition, p.98.
- ↑ Andrew Fisher, ‘Murray, Andrew (d. 1297) ’, Oxford Dictionary of National Biography, Oxford University Press, 2004 accessed 2 Aug 2007
- ↑ Barrow, Kingdom of the Scots, pp. 99–100, 110–11
- ↑ Paul. The Scots Peerage, Vol 2, pp. 120–131
- ↑ Paul. The Scots Peerage, Vol 1, p.507
- ↑ Oram, David I, pp.104-5
- ↑ Chronicle of Holyrood, ed.M.Anderson, p.190.
- 1 2 3 4 Barrow, Robert Bruce, p.98
- ↑ Barron, Scottish Wars of Independence, pp. 33 & 204
- 1 2 3 4 Calendar of Documents Relating to Scotland, ed. J. Bain, vol.2, no.1178, p.300
- ↑ Barrow, Robert Bruce, p.36
- ↑ Calendar of Documents Relating to Scotland, ed. J. Bain, vol.2, no.307, p.84
- ↑ Barrow, Robert Bruce, p.109.
- ↑ Calendar of Documents Relating to Scotland, ed. J. Bain, vol.2, no.725, p.168
- ↑ Barrow, The Kingdom of the Scots, p. 218
- ↑ Barrow, Robert Bruce, p.152
- ↑ Oram, Kings & Queens of Scotland, p.89
- ↑ Oram, Kings & Queens of Scotland, pp.89-90
- ↑ Oram, Kings & Queens of Scotland, p.93
- ↑ Barrow, Robert Bruce, p.24.
- ↑ The Chronicle of Pierre de Langtoft, ed.T.Wright, vol.II, p.237.
- ↑ Stones, Anglo-Scottish Relations, no.22, pp.137-9.
- ↑ Chronicle of Lanercost, ed. H.Maxwell, vol.1, p.135.
- ↑ Calendar of Documents, ed. J.Bain, vol.2, no.789, p.182.
- 1 2 3 4 Calendar of Documents, ed. J.Bain, vol.2, no.742, pp.176-8.
- ↑ Barrow, Robert Bruce, fourth edition, p.445, n.111.
- ↑ Calendar of Documents, ed.J.Bain, vol.2, no.871, p.229.
- ↑ Barrow, Robert Bruce, p.99.
- ↑ Watson, Under the Hammer, pp. 31–2
- ↑ Watson, Under the Hammer, pp. 33–4
- ↑ Scalacronica, ed.H.Maxwell, p.18.
- ↑ Prestwich, Edward I, p.476.
- ↑ Documents Illustrative of Scotland, ed. Rev.J.Stevenson, vol.2, CCCCXXIX, pp.167-9.
- ↑ Broun, 'New information on the Guardians and Wallace's rising'.
- ↑ Watson, Under the Hammer, pp.42-3.
- ↑ Calendar of Documents, ed. J.Bain, vol.2, no.894, p.234.
- ↑ Documents Illustrative of Scotland, ed. Rev.J.Stevenson, vol.2, CCCCLXXII, p.217.
- ↑ Barron, Scottish War of Independence, pp.19-20.
- ↑ Documents Illustrative of Scotland, ed. Rev. J.Stevenson, vol.2, CCCCXXXVII, p.177.
- ↑ Barron, Scottish War of Independence, p.60.
- ↑ Documents Illustrative of Scotland, ed. Rev.J.Stevenson, vol.2, CCCCXXXI, pp.170-3.
- ↑ Barron, Scottish War of Independence, p.35 & p.42.
- 1 2 Calendar of Documents, ed. J.Bain, vol.2, no.922, p.239.
- ↑ Documents Illustrative of Scotland, ed. Rev.J.Stevenson, vol.2, CCCCLVII, p.212.
- ↑ Ferguson, William Wallace, p.38.
- ↑ Barron, Scottish War of Independence, p.50.
- ↑ Documents Illustrative of Scotland, ed. Rev.J.Stevenson, vol.2, CCCCLVII, pp.211-3.
- 1 2 Documents Illustrative of Scotland, ed.Rev.J.Stevenson, vol.2, CCCCLXVII, pp.225-7.
- ↑ Documents Illustrative of Scotland, ed. Rev.J.Stevenson, vol.2, CCCCLXVIII, pp.227-8.
- ↑ Barrow, Robert Bruce, Fourth Edition, n.111, p.445.
- ↑ Documents Illustrative of Scotland, ed. Rev. J.Stevenson, vol.2, CCCCLV, p.207.
- ↑ Quoted in Watson, Under the Hammer, p.39.
- ↑ Quoted in Kightly, Outlaw General, in Folk Heroes, p.167.
- ↑ Fisher, William Wallace, p.55
- ↑ The Chronicle of Pierre de Langtoft, ed.T.Wright, vol.II, p.301.
- ↑ Chronicle of Lanercost, ed. H.Maxwell, vol.1, p.164.
- ↑ Source Book of Scottish History, eds. W.C.Dickinson, G.Donaldson & I.A.Milne,. vol.1, pp.136-7.
- ↑ Stones, Anglo-Scottish Relations, no.26(a), p.155.
- ↑ Peter Traquair Freedom's Sword
- ↑ Michael Lynch A New History of Scotland
- ↑ Taylor, ‘Fighting for the Lion' in History Scotland, September 2005.
- ↑ Scotsman.com, The Scotsman, 26 December 2009 - accessed 3 January 2010
- ↑ Brown, The Wars of Scotland, p.183.
- ↑ John Prebble The Lion of the North
References
- "Anglo-Scottish Relations 1174-1328: Some Selected Documents", ed. E. L. G Stones, 1970;
- Barron, E. M., "The Scottish War of Independence", Second Edition. 1934;
- Barrow, G.W.S. "Robert Bruce and the Community of the Realm", Third Edition, 1988;
- Barrow, G.W.S. "Robert Bruce and the Community of the Realm", Fourth Edition, 2005;
- Barrow, G.W.S. "The Kingdom of the Scots", Second Edition, 2003;
- Broun, D, "New information on the Guadians' appointment in 1286 and Wallace's rising in 1297", September 2011, www.thebreakingofbritain.ac.uk
- Brown, M., "The Wars of Scotland 1214-1371", 2004;
- "Calendar of Documents Relating to Scotland", Four Volumes, ed. J. Bain, 1881–1888;
- "The Chronicle of Walter of Guisborough", ed. H. Rothwell, 1957;
- "Chronicle of Holyrood", ed. M. A. Anderson, 1938;
- "The Chronicle of Lanercost 1272 - 1346", ed. H. Maxwell, 1913;
- "The Chronicle of Pierre de Langtoft", ed. T Wright, Two volumes. 1866-8.
- "Documents Illustrative of Scotland 1286-1306," ed. Rev.J.Stevenson, 2 vols.1870;
- Ferguson, J, "William Wallace", 1938;
- Fisher, A, "William Wallace", 1992;
- "Foedera, Conventiones, Litterae", ed T. Rymer, 1816;
- Kightly, "Folk Heroes of Britain", 1982;
- Oram, Richard, Ed., "The Kings and Queens of Scotland", Stroud, 2001;
- Oram, Richard, "David I: The King who made Scotland", Stroud, 2004;
- Paul, James Balfour, ed. (1905), The Scots Peerage, 2, Edinburgh: David Douglas
- Prestwich, M., "Edward I", 1990;
- "The Scalacronica of Sir Thomas Gray", ed. Sir H. Maxwell, 1907;
- "A Source Book of Scottish History." Three Volumes. Second Edition, eds. W. C. Dickson, G. Donaldson and I. A. Milne, 1958;
- Taylor, J. G., "Fighting for the Lion: The Life of Andrew Moray", in History Scotland, September/October, 2005;
- Watson F. J., "Under the Hammer: Edward I and Scotland 1286-1306", 1998.