Alfred Shout
| Alfred John Shout | |
|---|---|
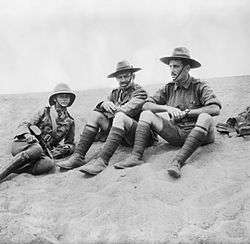
 Alfred Shout at Quinn's Post, Gallipoli, 7 June 1915. | |
| Born |
8 August 1882 Wellington, New Zealand |
| Died |
11 August 1915 (aged 33) Gallipoli Peninsula, Turkey |
| Allegiance |
Cape Colony Australia |
| Service/branch |
Cape Colonial Forces (1900–1907) Australian Army (1907–1915) |
| Years of service | 1900–1915 |
| Rank | Captain |
| Unit | 1st Battalion (1914–1915) |
| Battles/wars |
Second Boer War |
| Awards |
Victoria Cross Military Cross Mentioned in Despatches (2) |
Alfred John Shout, VC, MC (8 August 1882 – 11 August 1915) was a New Zealand-born soldier and an Australian recipient of the Victoria Cross, the highest decoration for gallantry "in the face of the enemy" awarded to members of the British and Commonwealth armed forces. Shout was posthumously awarded the VC for his actions at Lone Pine in August 1915, during the Gallipoli Campaign. After the Turks had counterattacked and seized a large stretch of the Australians' front line, Shout gathered a small party of men and charged down one trench throwing bombs. He killed eight Turks, and managed to clear others to retake the trench. In a similar action later that day, and supported by another officer, he recaptured further ground amid hard fighting. In the final push forward, Shout simultaneously lit three bombs to lob at the Turks. He successfully threw two, but the third burst just as it was leaving his hand. Shout was grievously wounded, and died three days later.
Born in Wellington, Shout had served in the Second Boer War as a teenager. He rose to sergeant and was mentioned in despatches for saving a wounded man before he was discharged in 1902. He remained in South Africa for the next five years, serving as an artilleryman in the Cape Colonial Forces from 1903. With his Australian-born wife and their daughter, Shout emigrated to Sydney in 1907. The family settled in Darlington, where Shout worked for Resch's Brewery as a carpenter and joiner. He was also active in the Militia, being commissioned just prior to the outbreak of the First World War. In August 1914, he enlisted in the Australian Imperial Force for active service and was appointed a lieutenant in the 1st Battalion. After a period of training in Egypt, he took part in the Anzac landings at Gallipoli on 25 April 1915. For his leadership during the invasion and its immediate aftermath, Shout was awarded the Military Cross and later mentioned in despatches. Shout's three gallantry awards at Gallipoli made him the most highly decorated member of the AIF for the campaign.
Early life

Alfred John Shout was born in Wellington, New Zealand, on 8 August 1882.[Note 1] He was the eldest of nine children to an English-born father, John Richard Shout, and Irish mother, Agnes Mary (née Kelly, formerly McGovern).[1][2][3] Information on Alfred Shout's early life is rather scant, and the details differ between sources. However, it is believed that he was privately educated in his youth and,[4][5] in early 1900, travelled to South Africa with his elder half-brother, William McGovern. The brothers sought to join one of the colonial contingents then engaged in the Second Boer War; Alfred enlisted in the newly raised Border Horse on 17 February 1900, while William (using the surname Shout) found a place in Bethune's Mounted Infantry.[3][6][Note 2] The Border Horse was an irregular colonial force formed in eastern Cape Colony, and Shout was allotted to the unit's No. 1 Company with the service number 9216.[6][10] Shout served at Wittebergen, Transvaal and in the Cape Colony with the Border Horse and was twice wounded,[7] including once in the chest.[11] In an action at Thabaksberg on 29 January 1901, the then Lance Corporal Shout "assisted greatly" in maintaining the position of his men. At one point during the engagement, he ventured out under heavy rifle fire to retrieve a wounded man, and brought him back to a place of safety. As a result of his "great courage" in this action, Shout was mentioned in despatches.[7] He was promoted to sergeant on 7 May 1901,[12] and discharged from the Border Horse 16 days later.[6] He then joined the Stellenbosch District Mounted Troop and,[10][11] having "served with distinction" during his time in South Africa, left the service in 1902.[4]
Shout decided to remain in South Africa after his discharge and, in 1903, enlisted in the Cape Colonial Forces. He was made a sergeant in Prince Alfred's Own Cape Field Artillery, with which he served until 1907.[1][7][11] While living in Cape Town, Shout married Rose Alice Howe, an Australian from Sydney, in 1905; the couple had a daughter named Florence Agnes Maud on 11 June that year.[2][10] In 1907, the Shout family emigrated to Australia, settling in the Sydney suburb of Darlington. Here, Shout gained employment as a carpenter and joiner at Resch's Brewery.[7][11] Though his keen interest in the military remained, and he joined the 29th Infantry Regiment of the part-time Citizens Military Force (CMF) shortly after arriving in Sydney. He was also a regular visitor of the Randwick rifle range, where he gained a reputation as an excellent shot.[1][7][9][11] A foundation member of the 29th Infantry Club, Shout was commissioned as a second lieutenant in the CMF on 16 June 1914.[1][7]
First World War
Following the outbreak of the First World War, Shout enlisted in the recently raised Australian Imperial Force (AIF) on 27 August 1914 for service overseas. He was posted to the 1st Battalion as a second lieutenant in F Company, commanded by Lieutenant Cecil Sasse. On 18 October, the 1st Battalion embarked for Egypt, with Shout boarding HMAT Afric at Sydney.[7][13] Following a brief stop at Albany, Western Australia, the troopship arrived at its destination on 2 December.[14] Shortly after docking in Egypt, the 1st Battalion was reorganised into a formation of four companies; Shout was allotted to D Company as a platoon commander.[7] The battalion spent the next four months training in the Egyptian desert,[15] during which time Shout was promoted lieutenant on 1 February 1915.[1][8]
Gallipoli
Landing at Anzac
As part of an endeavour to defeat the Ottoman Empire and force a supply route through to Russia via the Bosporus and the Black Sea, the British War Council formulated an invasion plan of the Gallipoli Peninsula.[16][17] On 25 April 1915, the men of the 1st Australian Brigade—of which the 1st Battalion was part—landed ashore at Anzac Cove between 05:30 and 07:30 among the second and third waves of Australian troops.[18] The 1st Battalion was meant to be held in reserve, but was soon forced into battle.[19][20] Following a request for reinforcements, Shout moved up with one of the 1st Battalion's companies to the hill feature "Baby 700".[19][21] Arriving at the position around 11:00,[21] he led a party of men to hold the rear left flank of the hill as part of the Australians' rearguard action.[7][22] The Allied position on Baby 700 had become dire by that afternoon, which was compounded by the small number of available infantry in the area and the complete lack of artillery support, when the Turks launched a counter-assault. By this time, Shout and Lieutenant Leslie Morshead of the 2nd Battalion were the only two surviving officers in their sector of the line. At 16:30, the Turks broke through the defensive line and the Australians were forced to abandon their position on Baby 700. Shout was one of the last to evacuate, and withdrew down towards the beach.[11][23] During his retreat, Shout encountered Lieutenant Colonel George Braund, commanding officer of the 2nd Battalion, on Walker's Ridge. Braund dispatched Shout to the beach with a request for reinforcements. Shout duly relayed the message, and was immediately tasked with leading 200 stray men to reinforce the thin defensive line near Braund's position.[24][25] Shout established a post at the base of the ridge as dusk began to set in, and his men started to dig in.[26]
... Lieutenant Shout was a hero. Wounded himself several times, he kept picking up wounded men and carrying them out of the firing line. I saw him carry fully a dozen men away. Then another bullet struck him in the arm, and it fell useless by his side. Still he would not go to the rear. "I am here with you boys to the finish", was the only reply he would make ... A little later Lieutenant Shout was wounded again, and fell down. It was cruel to see him. He struggled and struggled until he got to his feet, refusing all entreaties to go to the rear. Then he staggered and fell and tried to rise again. At last some men seized him and carried him away, still protesting.
Soldier of the 1st Battalion on Shout's action at Walker's Ridge, 27 April 1915.[7]
By 27 April, Shout had been continually in action without rest since the landing. That morning, he was sent to Walter's Ridge to replace a wounded officer in a vulnerable sector of the line.[7][27] Shout and his men were subjected to accurate and heavy rifle fire throughout the day, as the Turks shot from the scrub just beyond the Australians' trench. To combat this, he reorganised his men and, exposing himself to the Turks' fire, ventured out to reconnoitre the enemy's position in order to accurately direct his men's rifle fire.[8][28] Though wounded early in the action, Shout refused to leave the frontline.[7][20] As the fighting wore on, the Turks closed in on the Australian trench and Shout led a bayonet charge to hold them at bay.[8][28] He was later wounded a second time, with a bullet passing through his arm and rendering it useless, but still he refused to leave. Soon after, he was wounded a third time and evacuated for medical treatment. Throughout the engagement, Shout had carried several wounded men out of the frontline.[4][7][20] Cited for his "conspicuous courage and ability" at Walker's Ridge, Shout was awarded the Military Cross;[29] the first member of his battalion to be so honoured.[30] The notification and accompanying citation for the medal was published in a supplement to the London Gazette on 3 July 1915.[29]
Shout's wounds proved not to be serious and he soon rejoined the 1st Battalion.[7] On 11 May, he was injured once again, suffering another bullet wound to his arm. He was evacuated to the hospital ship HMHS Gascon but, having sufficiently recovered, rejoined his unit fifteen days later.[4] On 20 May, Shout was mentioned in the despatch of General Sir Ian Hamilton, the General Officer Commanding Mediterranean Expeditionary Force, in recognition of his efforts from the landing on 25 April up to 5 May.[1][31] He was promoted to captain on 29 July.[1][8]
Lone Pine

On 6 August 1915, the 1st Australian Brigade launched an assault on the "impregnable" Turkish position at Lone Pine.[32] Led by the 2nd, 3rd and 4th Battalions (with the 1st Battalion held in reserve),[33][34] the attack was orchestrated to divert Turkish attention and reinforcements away from the primary operation to the north of the line as the British sought to capture the Sari Bair ridge.[35] The Australian assault at Lone Pine commenced in the late afternoon just before sunset. An artillery barrage had preceded the attack, though according to historian Robin Prior the results had been "feeble" and the advance was hard fought.[36] Nonetheless, within half an hour the Australians had breached the Turkish trenches and seized their objectives.[32][33] Despite the initial success, the Australian casualties had been heavy and the 1st Battalion was ordered forward in preparation for the expected Turkish counter-attack.[34] The battle descended into "bitter, savage fighting" over the next three days,[1] predominantly in the form of "deadly bombing duels".[34]
At 09:00 on 9 August, the 1st Battalion relieved the 3rd Battalion on the Lone Pine front at a position known as Sasse's Sap. Soon after, the Turks renewed their attack and recaptured a stretch of the sap.[8][37] Determined to rout these men, and supported by a small number of his own soldiers, Shout charged down one trench throwing bombs. He killed eight Turks, and managed to clear others to retake the trench.[1] Meanwhile, Captain Cecil Sasse—Shout's former company commander—gathered three men with sandbags, and cleared another 20 yards (18 m) section of the sap.[38] Armed with a rifle, Sasse charged down the trench at the front of his men. They discovered a group of Turks focused on, and firing in, a different direction; Sasse's party killed 12 and forced the remainder to flee. Sasse then continued to keep the Turks at bay with rifle fire as his men barricaded the trench with the sandbags.[37][39][Note 3]
Sasse, described by official historian Charles Bean as "elated" by the achievement that morning, approached Shout with a proposal to repeat the feat.[37] Shout agreed. The duo assembled a party of eight men this time to carry sandbags and extra bombs.[20][38] Having reconnoitred the Turks' position, the previously erected barricade was shoved down and, side-by-side, Sasse and Shout ran forward.[37] While Sasse fired his revolver and Shout lobbed bombs, the Australian party advanced in short stages along the trench and built a barricade each time they halted.[1][8] Shout was fighting with "splendid gaiety" throughout the assault,[37] "laughing and joking and cheering his men on".[38] As the Australians progressed further, the two officers located a suitable position to raise their final barricade. Readying himself for this final push forward, Shout simultaneously lit three bombs. He successfully threw two, but the third burst just as it was leaving his hand.[37][40] Shout was grievously wounded. The explosion incinerated his right hand and part of the left, destroyed his left eye, cut his cheek, and caused burns to his chest and leg.[38][41] Despite the severity of his injuries, Shout maintained consciousness and was dragged out of the firing line, where he remained cheerful, "drank tea and sent a message to his wife".[37][38]
Victoria Cross and legacy

Shout was evacuated from the Gallipoli Peninsula to the hospital ship Euralia shortly afterwards.[4][38] He succumbed to his wounds three days later, on 11 August 1915, and was buried at sea.[1] Lieutenant Colonel Alfred Bennett, commanding officer of the 1st Battalion, later labelled Shout's actions at Lone Pine as "brilliant" and described him as "unapproachable in his splendid leadership".[38] Although Sasse's Sap "was never wholly regained",[37] Shout was posthumously awarded the Victoria Cross (VC) in recognition of his determined efforts to recover much of the trench system, while Sasse received the Distinguished Service Order.[38][40] Shout's VC was the seventh and final awarded to the AIF for the operations around Lone Pine, and the second to a member of the 1st Battalion.[3][42][Note 4] Shout's three gallantry awards from Gallipoli also marked him as the most highly decorated member of the AIF for the campaign.[43]
The announcement of Shout's VC was promulgated in the London Gazette on 15 October 1915, reading:[41]
War Office, 15th October, 1915.His Majesty The KING has been pleased to award the Victoria Cross to the undermentioned Officers, Non-Commissioned Officers and Men: —
Captain Alfred John Shout, 1st Battalion, Australian Imperial Force.
For most conspicuous bravery at Lone Pine trenches, in the Gallipoli Peninsula.
On the morning of the 9th August, 1915, with a very small party Captain Shout charged down trenches strongly occupied by the enemy, and personally threw four bombs among them, killing eight and routing the remainder.
In the afternoon of the same day, from the position gained in the morning, he captured a further length of trench under similar conditions, and continued personally to bomb the enemy at close range under very heavy fire until he was severely wounded, losing his right hand and left eye.
This most gallant officer has since succumbed to his injuries.
Considerable confusion reigned following Shout's death. Army Headquarters in Melbourne cabled Rose Shout on 15 August to inform her that Alfred had been wounded. Confirmation of his death was subsequently conveyed to her, but was contradicted by a later cable on 23 August. This communication stated that Shout was not dead, but alive and was returning to Australia aboard the Thermistocles. The press in Australia published news of his pending return, adding that he would arrive in Sydney in mid-September. This proved to be a case of mistaken identity. Shout's death was confirmed by 26 August; a Lieutenant A.J. Shirt, also of the 1st Battalion, was the officer aboard the Thermistocles. Rose Shout received a ministerial apology for the clerical errors and distress caused.[1][4][38]
Shout is commemorated on the Lone Pine Memorial,[44] and he was remembered by the citizens of Darlington with a memorial plaque. The governor-general, Sir Ronald Munro Ferguson, unveiled the plaque at the Darlington Town Hall in a ceremony on 20 November 1915. The plaque has since entered the collections of the Victoria Barracks Museum in Paddington.[1][38] In 1916, to honour "the heroic and glorious deeds and death" of Shout and relieve the financial strain placed upon his wife, a collection was taken up by local citizens in Sydney to provide Rose and their daughter with a house.[45][46][47]
Until 2006 Shout's medals were in the possession of his family. However, that year Shout's grandson decided to sell the medals to relieve some of the family debt and financial burdens. At the time Shout's VC was the only one to the AIF at Gallipoli not in the collection of the Australian War Memorial. The medals were auctioned by the Sydney firm Bonhams & Goodman on 24 July 2006, and realised a world record hammer price of AU$1 million. The sale surpassed, almost doubling, the previous auction records for a medal—set by the Naval Gold Medal awarded to Sir Thomas Hardy, 1st Baronet—and the price paid for a VC, previously held by that awarded to Norman Cyril Jackson.[48] Shout's medals were purchased by media mogul Kerry Stokes, who subsequently donated the set to the Australian War Memorial for display in the Hall of Valour.[43][49]
Notes
- ↑ There is discrepancy between sources regarding Shout's date of birth. Higgins 1988, in Shout's Australian Dictionary of Biography entry, states it to be 7 August 1881. Staunton 2005, p. 37 also gives 7 August, though records the year to have been 1882. Shout's Australian Imperial Force service file, however, notes it to be 8 August 1882, which is the date given in Arthur 2005, p. 677, Bean 1941a, p. 295, Snelling 1995, p. 178 and Wigmore 1963, p. 47. As the service record is an official government file and the majority of scholars record the date it gives, 8 August 1882 is the date used in this article.
- ↑ It was previously thought that Shout had initially served in South Africa with one of the New Zealand contingents to the Second Boer War.[1][7][8][9] However, recent research by both the Australian War Memorial and Harry Willey indicates that this was not the case.[3][10][11]
- ↑ There appears to be some confusion regarding Shout's and Sasse's actions on the morning of 9 August. Some sources connect the two actions, to say that Shout and Sasse operated in unison to clear a trench in the morning.[38][40] However, official historian Charles Bean and other more recent scholarship indicates that the two actions were separate. As Shout and Sasse did work together in the afternoon, it is possible that the actions have become confused.[3][8][37]
- ↑ The other six were Leonard Keysor (also of the 1st Battalion), William Symons, Frederick Tubb, Alexander Burton, William Dunstan and John Hamilton.
References
- 1 2 3 4 5 6 7 8 9 10 11 12 13 14 Higgins, Matthew (1988). "Shout, Alfred John (1882–1915)". Australian Dictionary of Biography. Canberra: Australian National University. Retrieved 27 November 2009.
- 1 2 "Alfred John Shout". Cenotaph Database. Auckland Museum. Retrieved 8 October 2016.
- 1 2 3 4 5 Willey, Harry. "Shout, Captain Alfred John" (PDF). Cenotaph. Auckland Museum. Retrieved 8 October 2016.
- 1 2 3 4 5 6 "Shout, Alfred John". Records Search. National Archives of Australia. Retrieved 27 November 2009.
- ↑ "Captain Alfred John Shout". Victoria Cross. Birkenhead Returned Services Association. Retrieved 30 July 2013.
- 1 2 3 Stephen Skinner. "Nominal Roll of the Border Horse". British Medals. Retrieved 30 July 2013.
- 1 2 3 4 5 6 7 8 9 10 11 12 13 14 15 Snelling 1995, pp. 178–179
- 1 2 3 4 5 6 7 8 Staunton 2005, p. 37
- 1 2 Wigmore 1963, p. 47
- 1 2 3 4 "Queen's South Africa Medal: Sergeant A. J. Shout, Border Horse". Collection. Australian War Memorial. Retrieved 30 July 2013.
- 1 2 3 4 5 6 7 "Memorial pendant: Captain A. J. Shout". Collection. Australian War Memorial. Retrieved 15 June 2013.
- ↑ The London Gazette: no. 27311. p. 3114. 7 May 1901. Retrieved 27 November 2009.
- ↑ "Alfred John Shout" (PDF). First World War Embarkation Roll. Australian War Memorial. Retrieved 2 December 2009.
- ↑ "1st Battalion". Australian military units. Australian War Memorial. Retrieved 2 December 2009.
- ↑ "1st Infantry Battalion (August 1914 – June 1915)" (PDF). First World War Unit Diaries. Australian War Memorial. Retrieved 21 December 2009.
- ↑ Dennis, Peter; Grey, Jeffrey; Morris, Ewan; Prior, Robinand; Bou, Jean. "Gallipoli". The Oxford Companion to Australian Military History. Oxford Reference Online. Retrieved 29 June 2013.
- ↑ Arthur 2005, p. 218
- ↑ Bean 1941a, p. 280
- 1 2 Carlyon 2002, p. 141
- 1 2 3 4 "Captain Alfred Shout". Gallipoli and the Anzacs. Department of Veterans Affairs. Retrieved 21 December 2009.
- 1 2 Bean 1941a, pp. 295–296
- ↑ Bean 1941a, p. 304
- ↑ Bean 1941a, pp. 314–316
- ↑ Bean 1941a, p. 318
- ↑ Carlyon 2002, pp. 168–169
- ↑ Bean 1941a, p. 471
- ↑ Bean 1941a, pp. 508–509
- 1 2 "Recommendation for Alfred John Shout to be awarded the Military Cross" (PDF). Recommendations: First World War. Australian War Memorial. Retrieved 8 October 2016.
- 1 2 The London Gazette: (Supplement) no. 29215. p. 6541. 3 July 1915. Retrieved 30 January 2010.
- ↑ Snelling 1995, p. 161
- ↑ The London Gazette: (Supplement) no. 29251. p. 7668. 5 August 1915. Retrieved 30 January 2010.
- 1 2 Snelling 1995, p. 147
- 1 2 Staunton 2005, p. 23
- 1 2 3 Perrett 2004, p. 196
- ↑ Prior 2010, p. 169
- ↑ Prior 2010, p. 171
- 1 2 3 4 5 6 7 8 9 Bean 1941b, pp. 564–565
- 1 2 3 4 5 6 7 8 9 10 11 Snelling 1995, pp. 163–164
- ↑ "1st Infantry Battalion War Diary" (PDF). Australian Imperial Force unit war diaries, 1914–18 War. Australian War Memorial. Retrieved 10 October 2016.
- 1 2 3 Perrett 2004, p. 198
- 1 2 The London Gazette: no. 29328. p. 10153. 15 October 1915. Retrieved 31 January 2010.
- ↑ Wigmore 1963, p. 46
- 1 2 Braithwaite, David (25 July 2006). "RSL stoked with Kerry's medal splurge". Sydney Morning Herald. Retrieved 12 October 2016.
- ↑ "Shout, Alfred John". Casualty Details. Commonwealth War Graves Commission. Retrieved 12 October 2016.
- ↑ "Case of Mrs. Shout". Sydney Morning Herald. 19 September 1916. Retrieved 12 October 2016.
- ↑ Stephens, A.G. (27 September 1916). "Captain A. J. Shout". The Wingham Chronicle and Manning River Observer. Retrieved 12 October 2016.
- ↑ "For V.C.'s Widow". The Sunday Times. 3 December 1916. Retrieved 12 October 2016.
- ↑ "Gallipoli VC Medal Sets Auction Record". The Age. 24 July 2006. Retrieved 12 October 2016.
- ↑ "Victoria Cross". Australian War Memorial. Retrieved 12 October 2016.
Bibliography
| Wikinews has related news: Victoria Cross fetches record price at auction |
| Wikimedia Commons has media related to Alfred Shout. |
- Arthur, Max (2005). Symbol of Courage: The Men Behind the Medal. Chatham, Kent, United Kingdom: Pan Books. ISBN 0-330-49133-4.
- Bean, C.E.W. (1941a). The Story of ANZAC from the outbreak of war to the end of the first phase of the Gallipoli Campaign, May 4, 1915. Official History of Australia in the War of 1914–1918. Volume I. Canberra, Australia: Australian War Memorial.
- Bean, C.E.W. (1941b). The Story of ANZAC from 4 May 1915, to the evacuation of the Gallipoli Peninsula. Official History of Australia in the War of 1914–1918. Volume II. Canberra, Australia: Australian War Memorial.
- Carlyon, Les (2002). Gallipoli. Sydney, Australia: Macmillan. ISBN 978-0-7329-1128-7.
- Dennis, Peter; Grey, Jeffrey; Morris, Ewan; Prior, Robin; Bou, Jean (2008). The Oxford Companion to Australian Military History (2nd ed.). Melbourne, Australia: Oxford University Press. ISBN 978-0-19-551784-2.
- Higgins, Matthew (1988). "Shout, Alfred John (1881–1915)". Australian Dictionary of Biography. Volume 11. Melbourne, Australia: Melbourne University Press. ISBN 978-0-522-84380-4.
- Perrett, Bryan (2004). For Valour: Victoria Cross and Medal of Honor Battles. London, United Kingdom: Cassell Military Paperbacks. ISBN 0-304-36698-6.
- Prior, Robin (2010). Gallipoli: The End of the Myth. New Haven, United States: Yale University Press. ISBN 978-0-300-16894-5.
- Snelling, Stephen (1995). Gallipoli. VCs of the First World War. Trowbridge, United Kingdom: Wrens Park Publishing. ISBN 0-905778-33-2.
- Staunton, Anthony (2005). Victoria Cross: Australia's Finest and the Battles they Fought. Prahran, Victoria, Australia: Hardie Grant Books. ISBN 1-74066-288-1.
- Wigmore, Lionel (1963). They Dared Mightily. Canberra, Australia: Australian War Memorial.